So we have all the hardware, now we need the dreaded C code. Many people get frighted when they see a few hundred lines of code, but like most things take it a step at a time any you will soon have it sorted. Feel free to change, edit, publish, etc. I still have a long list of features I want to add, for example when the HLT starts I would to see the estimated time it will hit the target strike temperature.
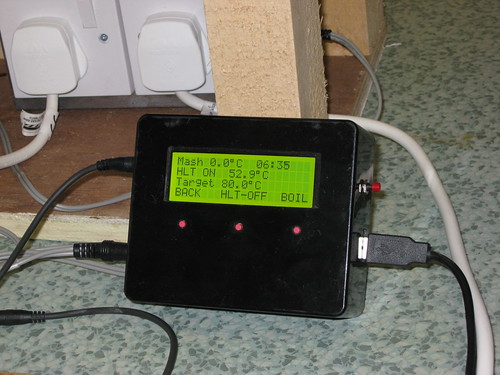
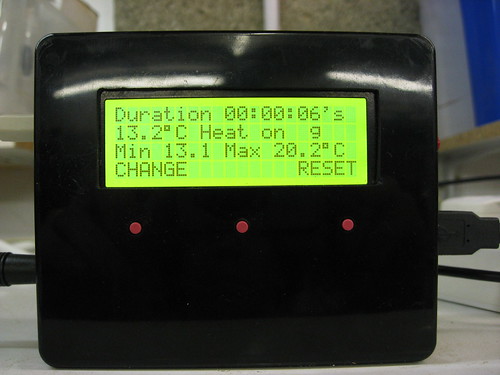
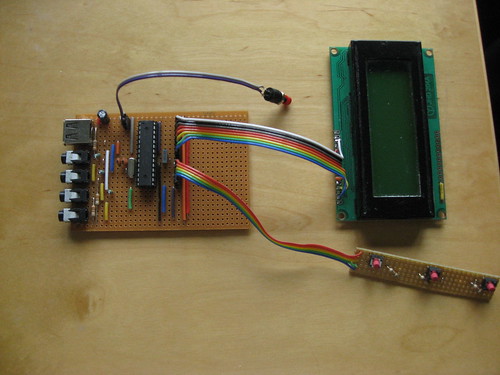
I'd be interested in other features you think would be useful - I'll take some more screen photos when I do the next brew.
Code: Select all
//BeerComputer v2.0
//Howard Benn Apr 2010
//A super low cost controller for making all grain (AG) beer
//It uses 3 x Maxim single wire temperature probes - HLT, Mash tun, Kettle
//and the super low cost solid state relays (SSR) now available from China on eBay
//also uses a 4 line x 20 char display again low cost from China from eBay
//fits in a ATMEGA168 to save a few quid hence all the PROGMEM stuff

//include librarys
#include <MsTimer2.h> //used for the 1 second update loop
#include <LiquidCrystal.h> //used to control the LCD display - has to be Arduino 0017 or above to work properly
#include <Bounce.h> //debouncer for the switches
#include <avr/pgmspace.h> //need to store screen in PROGMEM

//define IO pins
#define RS_pin 14 //display - setup to make connection the easy
#define E_pin 15
#define D4_pin 16
#define D5_pin 17
#define D6_pin 18
#define D7_pin 19

#define button_1_pin 11 //buttons with pull-down resistors i.e off=0
#define button_2_pin 10
#define button_3_pin 12

#define heat_pin 8 // IO pins for heater and fridge
#define cool_pin 9

#define HLT_pin 8 // IO pin for HLT - same SSR as heat_pin
#define boil_pin 9 // IO pin for Boiler - same SSR as cool_pin

#define one_wire1_pin 2 //one wire interface to temperature sensors
#define one_wire2_pin 3 //one wire interface to temperature sensors
#define one_wire3_pin 4 //one wire interface to temperature sensors

// Sensor validation
#define INVALIDCRC 1
#define INVALIDMODEL 2
#define NODEVICE 3
#define SLAVEGOOD 0

//Global variables

// setup the LCD with the numbers of the interface pins
LiquidCrystal lcd(RS_pin, E_pin, D4_pin, D5_pin, D6_pin, D7_pin);

//setup the buttons
Bounce button_1 = Bounce(button_1_pin, 5);
Bounce button_2 = Bounce(button_2_pin, 5);
Bounce button_3 = Bounce(button_3_pin, 5);

//set up varable to store temp reading
// 64bit address of device
uint8_t TempAddr[8]; //address of sensor
float HLT_fridge_temp = 0; //temperature sensor 0
float mash_temp = 0; //mash tum
float boiler_temp = 0; //boiler temp

//static variables for FERM
int TargetTemp = 21; //target brewing temp for 4 - 6 day brew
#define HistTime 60000  //time in milli-seconds not to change state of the cool, warm status
long timeChanged = 0; //used to record the last time the temp went outside the +- 0.5 oC margin
long StartTime = 0; // time in millis that we start
float BrewMax = 0; // max temp during fermentation
float BrewMin = 100; // min temp during fermentation
byte cool; //true if fridge is on
byte heat; //true if heater on

//static variables for BREW
float HLTtarget = 80; //target temperature for HLT
byte HLTready = 0; //flag to change from heating to maintaining HLT temp
boolean HLToff = true; //flag to manually turn HLT off
long StartHLT = 0; //HLT on start time
long StartMash = 0; //Mash start time
long StartBoil = 0; //Boil start time
float BoilTarget = 98; //boil target to start boil time
boolean BoilOff = true; //flag to manually turn Boiler off
int BoilTime = 90; //Boil time in minutes
long StartCool = 0;

//Menu control
#define FERM 1
#define BREW 2
byte mode = 0;
byte menu = 1; //position on the menu list

/******************************
Due to the limited RAM we have to store the screen data in PROGMEM
******************************/
//                              12345678901234567890
const prog_uchar string_0[] PROGMEM = "Welcome to Howard's";   // "String 0" etc are strings to store in Progmem to get over limited RAM
const prog_uchar string_1[] PROGMEM = "  Big Beer Making";
const prog_uchar string_2[] PROGMEM = "      Machine";
const prog_uchar string_3[] PROGMEM = "FERM    TEST    BREW";
//                               12345678901234567890
const prog_uchar string_10[] PROGMEM = "Change Target Temp";
const prog_uchar string_11[] PROGMEM = "Current target ";
const prog_uchar string_12[] PROGMEM = "New target ";
const prog_uchar string_13[] PROGMEM = "UP      SET     DOWN";
//                               12345678901234567890
const prog_uchar string_20[] PROGMEM = "Not connected";
const prog_uchar string_21[] PROGMEM = "         ";
const prog_uchar string_23[] PROGMEM = "BACK    HLT   BOILER";
//                               12345678901234567890
const prog_uchar string_30[] PROGMEM = "Duration ";
const prog_uchar string_31[] PROGMEM = " Fridge on";
const prog_uchar string_32[] PROGMEM = " Heat on  ";
const prog_uchar string_33[] PROGMEM = "          ";
const prog_uchar string_34[] PROGMEM = "Min ";
const prog_uchar string_35[] PROGMEM = " Max ";
const prog_uchar string_36[] PROGMEM = "TARGET         RESET";
//                               12345678901234567890
const prog_uchar string_40[] PROGMEM = "Ready to heat HLT";
const prog_uchar string_41[] PROGMEM = "Water in ?";
const prog_uchar string_42[] PROGMEM = "HLT target ";
const prog_uchar string_43[] PROGMEM = "       CHANGE   HEAT";
//                               12345678901234567890
const prog_uchar string_50[] PROGMEM = "Heating HLT";
const prog_uchar string_51[] PROGMEM = "HLT ready  ";
const prog_uchar string_52[] PROGMEM = "Temp ";
const prog_uchar string_53[] PROGMEM = " set ";
const prog_uchar string_54[] PROGMEM = "Time ";
const prog_uchar string_55[] PROGMEM = "BACK   OFF   MASH";
const prog_uchar string_56[] PROGMEM = "BACK   ON    MASH";
//                               12345678901234567890
const prog_uchar string_60[] PROGMEM = "Mash ";
const prog_uchar string_61[] PROGMEM = "HLT OFF ";
const prog_uchar string_62[] PROGMEM = "HLT ON  ";
const prog_uchar string_63[] PROGMEM = "Target ";
const prog_uchar string_64[] PROGMEM = "BACK   HLT-OFF  BOIL";
const prog_uchar string_65[] PROGMEM = "BACK   HLT-ON   BOIL";
//                               12345678901234567890
const prog_uchar string_70[] PROGMEM = "Heating Boiler";
const prog_uchar string_75[] PROGMEM = "Boil started ";
const prog_uchar string_76[] PROGMEM = "Finish ";
const prog_uchar string_71[] PROGMEM = "Boil Target ";
const prog_uchar string_72[] PROGMEM = "Boil Temp ";
const prog_uchar string_73[] PROGMEM = "BACK     OFF    BOIL";
const prog_uchar string_74[] PROGMEM = "BACK     ON     BOIL";
//                               12345678901234567890
const prog_uchar string_80[] PROGMEM = "Cool started ";
const prog_uchar string_81[] PROGMEM = "BACK         FINISH";
//                               12345678901234567890
const prog_uchar string_90[] PROGMEM = "All done";
const prog_uchar string_91[] PROGMEM = "Brew time ";
const prog_uchar string_92[] PROGMEM = "Press any button ";
const prog_uchar string_93[] PROGMEM = "to restart";

/******************************
PRINT FUNCTIONS
*******************************/

void LCDPrintFloat( float f){
  if (f>99.9) {
    lcd.print ("++.+");
    return;
  }
  if (f<0) {
    lcd.print ("--.-");
    return;
  }
  if (f<10) lcd.print (" ");
  lcd.print((int)f);
  lcd.print(".");
  int temp = (f - (int)f) * 10;
  lcd.print( abs(temp) );
}

void LCDPrintProgMem (const prog_uchar str[]){
  char c;
  if(!str) return;
  while((c = pgm_read_byte(str++)))
    lcd.print(c,BYTE);
}
void LCDPrintTemp (float f){
  LCDPrintFloat (f);
  lcd.write (0xDF);
  lcd.print ("C");
}

void LCDPrintInt (int i){
  if (i<10) lcd.print ("0");
  lcd.print (i);
}

void LCDClearLine (int line){
  lcd.setCursor (0,line);
  lcd.print("                    ");
}

int ChangeTemp (int current) {
  // change the target temperature
  //Change Target Temp
  //Current target 80oC
  //New Target 77oC
  //UP     SET     DOWN

  int new_temp = current;
  boolean set = false;
  lcd.clear ();

  while (!set) {
    lcd.setCursor(0,0);
    LCDPrintProgMem (string_10);
    lcd.setCursor(0,1);
    LCDPrintProgMem (string_11);
    LCDPrintTemp(current);
    lcd.setCursor(0,2);
    LCDPrintProgMem (string_12);
    LCDPrintTemp (new_temp);
    lcd.setCursor(0,3);
    LCDPrintProgMem (string_13);

    //read buttons
    if ( button_1.update() ) {  //UP button
    // Auto increment if the button is held
      if ( button_1.read() == HIGH) {
        // Make the button retrigger in 500 milliseconds
        button_1.rebounce(500);
        if (new_temp < 99) new_temp++;
      }
    }

    if ( button_3.update() ) {   //DOWN button
    // Auto increment if the button is held
      if ( button_3.read() == HIGH) {
        // Make the button retrigger in 500 milliseconds
        button_3.rebounce(500);
        if (new_temp > 0) new_temp--;
      }
    }

    if ( button_2.update() ) {    //SET button
      if ( button_2.read() == HIGH) {
        set=true;
      }
    }

  }
  lcd.clear ();
  return (new_temp);

}

void LCDPrintElapsedTimeDHM (long start) {

  int days;
  int hours;
  int mins;
  long TimeNow;
  long ElapsedTime;

  TimeNow = millis ();
  ElapsedTime = TimeNow-start;

  days = ElapsedTime/86400000;
  hours = (ElapsedTime/3600000) % 24;
  mins = (ElapsedTime/60000) % 60;

  LCDPrintInt (days);
  lcd.print(":");
  LCDPrintInt (hours);
  lcd.print(":");
  LCDPrintInt (mins);
}

void LCDPrintElapsedTimeHMS (long start) {

  int hours;
  int mins;
  int seconds;
  long TimeNow;
  long ElapsedTime;

  TimeNow = millis ();
  ElapsedTime = TimeNow-start;

  hours = ElapsedTime/3600000;
  mins = (ElapsedTime/60000) % 60;
  seconds = (ElapsedTime/1000) % 60;

  LCDPrintInt(hours);
  lcd.print(":");
  LCDPrintInt(mins);
  lcd.print(":");
  LCDPrintInt(seconds);
}

void LCDPrintElapsedTimeMS (long start) {

  int mins;
  int seconds;
  long TimeNow;
  long ElapsedTime;

  TimeNow = millis ();
  ElapsedTime = TimeNow-start;

  mins = ElapsedTime/60000;
  seconds = (ElapsedTime/1000) % 60;

  LCDPrintInt(mins);
  lcd.print(":");
  LCDPrintInt(seconds);
}

void LCDPrintRemaining (long start, int end) {

  int mins;
  int seconds;
  long TimeNow;
  long endMS;
  long TimeToGo;

  TimeNow = millis ();
  endMS = end * 60000; //convert from minutes to mS
  TimeToGo = start + endMS - TimeNow;

  mins = TimeToGo/60000;
  seconds = (TimeToGo/1000) % 60;

  LCDPrintInt(mins);
  lcd.print(":");
  LCDPrintInt(seconds);
}

/******************************
Startup screen and control
*******************************/

void LCDPrintWelcome () {
  lcd.clear();
  lcd.setCursor(0,0);
  LCDPrintProgMem (string_0);
  lcd.setCursor(0,1);
  LCDPrintProgMem (string_1);
  lcd.setCursor(0,2);
  LCDPrintProgMem (string_2);
  lcd.setCursor(0,3);
  LCDPrintProgMem (string_3);

}

void WelcomeButtons (){
  while (mode == 0) { //repeat until a button is pressed
    if ( button_1.update() ) {    //set into FERM mode
      if ( button_1.read() == HIGH) {
          lcd.clear();
          mode = FERM;
          StartTime = millis ();
          cool = false; //set up fridge startup conditions
          heat = false;
      }
    }
    if ( button_2.update() ) {    //Test
      if ( button_2.read() == HIGH) {
        lcd.clear();
        Test ();
      }
    }
    if ( button_3.update() ) {    //set into BREW mode
      if ( button_3.read() == HIGH) {
        lcd.clear();
        mode = BREW;
      }
    }
  }

}

/******************************
Test Mode
*******************************/
void PrintTest (float temperature){
  if (temperature != 0) {
    LCDPrintTemp (temperature);
    LCDPrintProgMem (string_21);
  }
  else {
    LCDPrintProgMem (string_20);
  }
}

void Test () {
  boolean button_pushed = false;

  lcd.clear();
  while (!button_pushed) {
    lcd.setCursor(0,0);
    PrintTest (HLT_fridge_temp);

    lcd.setCursor(0,1);
    PrintTest (mash_temp);

    lcd.setCursor(0,2);
    PrintTest (boiler_temp);

    lcd.setCursor(0,3);
    LCDPrintProgMem (string_23);

    if ( button_1.update() ) {    //back to start
      if ( button_1.read() == HIGH) {
        LCDPrintWelcome();
        button_pushed = true;
      }
    }
    if ( button_2.update() ) {    //HLT on/off
      if ( button_2.read() == HIGH) {
        if (!HLToff) {
          HLToff = true;
          digitalWrite (HLT_pin, LOW);
          digitalWrite (boil_pin, LOW);
        }
        else {
          HLToff = false;
          digitalWrite (HLT_pin, HIGH);
          digitalWrite (boil_pin, LOW);
        }
      }
    }
    if ( button_3.update() ) {    //boiler on/off
      if ( button_3.read() == HIGH) {
        if (!BoilOff) {
          BoilOff = true;
          digitalWrite (HLT_pin, LOW);
          digitalWrite (boil_pin, LOW);
        }
        else {
          BoilOff = false;
          digitalWrite (HLT_pin, LOW);
          digitalWrite (boil_pin, HIGH);
        }
      }
    }
  }
}

/******************************
Fermentation control
*******************************/

void LCDPrintFerm () {

  /* Calculate elapsed time and temperature, print results
  Duration 12:10:30
  20.1 oC Heat
  Min 19.5 Max 22.2
  CHANGE FERM TEMP
  */

  if (HLT_fridge_temp > BrewMax) BrewMax = HLT_fridge_temp; //set max
  if (HLT_fridge_temp < BrewMin) BrewMin = HLT_fridge_temp; //set min

  lcd.setCursor(0,0);
  LCDPrintProgMem (string_30);
  LCDPrintElapsedTimeDHM (StartTime);
  lcd.setCursor(0,1);
  LCDPrintTemp (HLT_fridge_temp);
  if (cool) LCDPrintProgMem (string_31);
  if (heat) LCDPrintProgMem (string_32);
  if (!cool & !heat) LCDPrintProgMem (string_33);
  lcd.setCursor(0,2);
  LCDPrintProgMem (string_34);
  LCDPrintFloat (BrewMin);
  LCDPrintProgMem (string_35);
  LCDPrintTemp (BrewMax);
  lcd.setCursor(0,3);
  LCDPrintProgMem (string_36);

  if ( button_1.update() ) {    //change button
    if ( button_1.read() == HIGH) {
      TargetTemp = ChangeTemp (TargetTemp);
    }
  }

  if ( button_3.update() ) {    //reset max and min
    if ( button_3.read() == HIGH) {
      BrewMax = HLT_fridge_temp;
      BrewMin = HLT_fridge_temp;
    }
  }
}

void ControlTemp (){
  //Controls the Fridge internal temperature - uses a 0.5 degree historysis and a programmable delay
  //to prevent the fridge going on and off too often
  //Thought about using the PID lib, but a bit over the top for this

  long timeNow;

  timeNow = millis();
  if ((timeNow - timeChanged) < HistTime) return; // don't do anything if there has been a recent change

  //check if we need to turn the fridge on
  if (HLT_fridge_temp > (TargetTemp + 0.5)) {
    if (cool == false) {
      timeChanged = millis(); //if we change state note time
      cool = true;
      digitalWrite(cool_pin, HIGH);  //fridge relay on
    }
  }
  else {
    if (cool == true) {
      timeChanged = millis();
      cool = false;
     digitalWrite(cool_pin, LOW);  //fridge relay off
    }
  }
  // check if we need to turn the heater on
  if (HLT_fridge_temp < (TargetTemp - 0.5)) {
    if (heat == false){
      timeChanged = millis();
      heat = true;
      digitalWrite(heat_pin, HIGH);  //heat relay on
    }
  }
  else {
    if (heat == true) {
      timeChanged = millis();
      heat = false;
      digitalWrite(heat_pin, LOW);  //heat relay off
    }
  }
}

/******************************
Brew mode
*******************************/

void MenuUpDown () {

  if ( button_1.update() ) {    //Back
    if ( button_1.read() == HIGH) {
      if (menu > 1) menu--;
      lcd.clear();
    }
  }

  if ( button_3.update() ) {    //Forward
    if ( button_3.read() == HIGH) {
      menu++;
      lcd.clear();
    }
  }
}

void HLTcontrol () {

  if (HLToff) { //HLT forced off by MMI
    digitalWrite (HLT_pin, LOW);
    return;
  }

  if (HLT_fridge_temp < HLTtarget) {
    digitalWrite (boil_pin, LOW); //only ever allow 1 element to be on at a time
    digitalWrite (HLT_pin, HIGH);
  }
  else {
    digitalWrite (boil_pin, LOW);
    digitalWrite (HLT_pin, LOW);
    HLTready = true;
  }
}

void LCDStartHLT () {
  /* get ready to turn HLT on
  Ready to heat HLT
  Water in?
  Current target 80oC
  BACK   CHANGE   HEAT
  */

  lcd.setCursor(0,0);
  LCDPrintProgMem (string_40);
  lcd.setCursor(0,1);
  LCDPrintProgMem (string_41);
  lcd.setCursor(0,2);
  LCDPrintProgMem (string_42);
  LCDPrintTemp(HLTtarget);
  lcd.setCursor(0,3);
  LCDPrintProgMem (string_43);

  MenuUpDown (); //check for menu changes

  if ( button_2.update() ) {    //change button
    if ( button_2.read() == HIGH) {
      HLTtarget = ChangeTemp (HLTtarget);
    }
  }

}

void LCDHeatHLT () {
  /* HLT on
  Heating HLT
  Current 66 target 80
  Time 0:20:30
  BACK   OFF   MASH  */

  if (StartHLT == 0) {
    StartHLT = millis(); //set starttime first time around
    HLToff = false;
  }
  lcd.setCursor(0,0);
  if (!HLTready){
    LCDPrintProgMem (string_50);
  }
  else {
    LCDPrintProgMem (string_51);
  }
  lcd.setCursor(0,1);
  LCDPrintProgMem (string_52);
  LCDPrintFloat (HLT_fridge_temp);
  LCDPrintProgMem (string_53);
  LCDPrintTemp(HLTtarget);
  lcd.setCursor(0,2);
  LCDPrintProgMem (string_54);
  LCDPrintElapsedTimeHMS (StartHLT);
  lcd.setCursor(0,3);
  if (!HLToff) {
    LCDPrintProgMem (string_55);
  }
  else {
    LCDPrintProgMem (string_56);
  }

  MenuUpDown (); //check for menu changes

  if ( button_2.update() ) {    //change button
    if ( button_2.read() == HIGH) {
      if (!HLToff) HLToff = true;
      else HLToff = false;
    }
  }

  HLTcontrol ();
}


void LCDMash () {  //NEED TO SORT setting target temp ?
/*
  Mash 66.3oC 40:53
  HLT off 50.4oC
  target 80.0oC
  BACK   HLT_ON   BOIL  */

  if (StartMash == 0) StartMash = millis(); //set starttime first time around
  lcd.setCursor(0,0);
  LCDPrintProgMem (string_60);
  LCDPrintTemp (mash_temp);
  lcd.print ("  ");
  LCDPrintElapsedTimeMS (StartMash);
  lcd.setCursor(0,1);
  if (HLToff) {
    LCDPrintProgMem (string_61);
  }
  else {
    LCDPrintProgMem (string_62);
  }
  LCDPrintTemp (HLT_fridge_temp);
  lcd.setCursor(0,2);
  LCDPrintProgMem (string_63);
  LCDPrintTemp (HLTtarget);
  lcd.setCursor(0,3);
  if (!HLToff) {
    LCDPrintProgMem (string_64);
  }
  else {
    LCDPrintProgMem (string_65);
  }

  MenuUpDown (); //check for menu changes

  if ( button_2.update() ) {    //change button
    if ( button_2.read() == HIGH) {
      if (!HLToff) {
        HLToff = true;
      }
      else {
        HLToff = false;
      }
    }
  }

  HLTcontrol ();
}

void LCDHeatBoiler () {  //Heat Boiler until we hit target temp then start timer
/*
  Heating Boiler
  Boil target 98 oC
  Boiler 80.2 oC
  BACK    OFF     BOIL
  */

  lcd.setCursor(0,0);
  LCDPrintProgMem (string_70);
  lcd.setCursor(0,1);
  LCDPrintProgMem (string_71);
  LCDPrintTemp (BoilTarget);
  lcd.setCursor(0,2);
  LCDPrintProgMem (string_72);
  LCDPrintTemp (boiler_temp);
  lcd.setCursor(0,3);
  if (!BoilOff) {
    LCDPrintProgMem (string_73);
    digitalWrite (HLT_pin, LOW);  //always make sure HLT is iff before we turn the boiler on
    digitalWrite (boil_pin, HIGH);
  }
  else {
    LCDPrintProgMem (string_74);
    digitalWrite (boil_pin, LOW);
  }

  MenuUpDown (); //check for menu changes

  if ( button_2.update() ) {    //change button
    if ( button_2.read() == HIGH) {
      if (!BoilOff) {
        BoilOff = true;
      }
      else {
        BoilOff = false;
      }
    }
  }
}

void LCDBoil () {  //Boil and display timer
/*
  Boil started 24:30
  Finish 63:20
  Temp 99 oC
  BACK    OFF     COOL
  */

  if (StartBoil == 0) {
    StartBoil = millis(); //set starttime first time around
  }
  lcd.setCursor(0,0);
  LCDPrintProgMem (string_75);
  LCDPrintElapsedTimeMS (StartBoil);
  lcd.setCursor(0,1);
  LCDPrintProgMem (string_76);
  LCDPrintRemaining (StartBoil, BoilTime);
  lcd.setCursor(0,2);
  LCDPrintProgMem (string_72);
  LCDPrintTemp (boiler_temp);
  lcd.setCursor(0,3);
  if (!BoilOff) {
    LCDPrintProgMem (string_73);
    digitalWrite (HLT_pin, LOW);  //always make sure HLT is iff before we turn the boiler on
    digitalWrite (boil_pin, HIGH);
  }
  else {
    LCDPrintProgMem (string_74);
    digitalWrite (boil_pin, LOW);
  }

  MenuUpDown (); //check for menu changes

  if ( button_2.update() ) {    //change button
    if ( button_2.read() == HIGH) {
      if (!BoilOff) {
        BoilOff = true;
      }
      else {
        BoilOff = false;
      }
    }
  }
}

void LCDCool () {  //Boil and display timer
/*
  Cool started 24:30
  Temp 99 oC
  BACK          FINISH
  */

  if (StartCool == 0) {
    StartCool = millis(); //set starttime first time around
    digitalWrite (boil_pin, LOW); // turn element off
  }
  lcd.setCursor(0,0);
  LCDPrintProgMem (string_80);
  LCDPrintElapsedTimeMS (StartCool);
  lcd.setCursor(0,2);
  LCDPrintProgMem (string_52);
  LCDPrintTemp (boiler_temp);
  lcd.setCursor(0,3);
  LCDPrintProgMem (string_81);

  MenuUpDown (); //check for menu changes

}

void LCDFinish () {
  lcd.setCursor(0,0);
  LCDPrintProgMem (string_90);
  lcd.setCursor(0,1);
  LCDPrintProgMem (string_91);
  LCDPrintElapsedTimeHMS (StartHLT);
  lcd.setCursor(0,2);
  LCDPrintProgMem (string_92);
  lcd.setCursor(0,3);
  LCDPrintProgMem (string_93);
  if ( button_1.update() || button_2.update() || button_3.update()  ) {    //any button
    if ( (button_1.read() || button_2.read() || button_3.read()) == HIGH) {
      mode = 0;
    }
  }
}

/******************************
Setup
*******************************/

void OneSecondLoop() {

  //read the existing stored temperature values from RAM
  //start the next conversion - takes around 750mS so should be ready next time we get here
  //Need to remember and reset the pin to make the test loops work
  uint8_t pin;

  pin = get_pin();

  change_pin (one_wire1_pin); //set to first sensor
  HLT_fridge_temp = getTempC(); //temperature sensor 0
  globalTempRequest();

  change_pin (one_wire2_pin);
  mash_temp = getTempC(); //mash tum
  globalTempRequest();

  change_pin (one_wire3_pin);
  boiler_temp = getTempC(); //boiler temp
  globalTempRequest();

  change_pin (pin);

}


void setup() {
  // set up the LCD's number of columns and rows:
  lcd.begin(20,4);

  //configure pins - inputs are defaulted
  pinMode(heat_pin, OUTPUT);
  pinMode(cool_pin, OUTPUT);
  // turn SSRs off
  digitalWrite (heat_pin, LOW);
  digitalWrite (cool_pin, LOW);

  SetAddress (&TempAddr[0]);

  MsTimer2::set(1000, OneSecondLoop); // 1 second loop
  MsTimer2::start();
}

void loop() {

  switch (mode) {
    case 0:
      LCDPrintWelcome();
      WelcomeButtons ();
      break;
    case 1:
      ControlTemp ();
      LCDPrintFerm ();
      break;
    case 2:
      switch (menu){
        case 1:
          LCDStartHLT ();
          break;
        case 2:
          LCDHeatHLT ();
          break;
        case 3:
          LCDMash ();
          break;
        case 4:
          LCDHeatBoiler ();
          break;
        case 5:
          LCDBoil ();
          break;
        case 6:
          LCDCool ();
          break;
        case 7:
          LCDFinish ();
          break;
      }
      break;
  }
}
You will also need the temp sensor code
Code: Select all
//Tiny temp - small version of OneWire and DallasTemperature
//with only one sensor per wire but with hot swap

// This is ripped off from the DallasTemperature library,
// and you can ONLY have a single sensor per wire
// The only functions you need are reset to see if there is a device on the bus
// Skip to read without address
// Read scratchpad to read temp

#include <inttypes.h>
#include "OneWire2.h"

#define STARTCONVO 0x44         // Tells device to take a temperature reading and put it on the scratchpad
#define COPYSCRATCH 0x48 		// Copy EEPROM
#define READSCRATCH 0xBE 		// Read EEPROM
#define WRITESCRATCH 0x4E 		// Write to EEPROM
#define RECALLSCRATCH 0xB8 		// Reload from last known
#define READPOWERSUPPLY 0xB4		// determine if device needs parasite power

#define DS18S20MODEL 0x10       // Model ID
#define DS18B20MODEL 0x28       // Model ID
#define DS1822MODEL 0x22       // Model ID

// device resolution
#define TEMP_9_BIT  0x1F //  9 bit
#define TEMP_10_BIT 0x3F // 10 bit
#define TEMP_11_BIT 0x5F // 11 bit
#define TEMP_12_BIT 0x7F // 12 bit


// One Wire address
//OneWire2 *pDataWire;
OneWire2 pDataWire(one_wire1_pin);

// 64bit address of device
uint8_t *arSlaveAddr;

// temperature LSB
uint8_t tempLSB;

// temperature MSB
uint8_t tempMSB;

// T(high)
uint8_t highAlarmTemp;

// T(low)
uint8_t lowAlarmTemp;

// device configuration
uint8_t resolution;

void change_pin (uint8_t pin)
{
  pDataWire.change_pin (pin);
}

uint8_t get_pin () {
  return (pDataWire.get_pin());
}

// read length bytes of a device's scratch pad
void readScratchPad(uint8_t length)
{
   // sanity check
   if (length > 8) length = 8;

   // send the command
   pDataWire.reset();
   pDataWire.skip();
   pDataWire.write(READSCRATCH);

   // read the response
   for (uint8_t i = 0; i <= length; i++)
   switch (i)
   {
      case 0:
         // byte 0: temperature LSB
         tempLSB = pDataWire.read();
	 break;
      case 1:
	 // byte 1: temperature MSB
	 tempMSB = pDataWire.read();
	 break;
      case 2:
	 // byte 2: high alarm temp
         highAlarmTemp = pDataWire.read();
	 break;
      case 3:
	 // byte 3: low alarm temp
	 lowAlarmTemp = pDataWire.read();
	 break;
      case 4:
	 // byte 4:
	 // this is really the configuration register, but for
	 // our purposes, this is how we'll think of it
	 resolution = pDataWire.read();
	 break;
      case 5:
      case 6:
      case 7:
      case 8:
	 break;
   }
   pDataWire.reset();
}

void SetAddress (uint8_t *newAddr) {
  arSlaveAddr = newAddr;
}

// Validate whether the current address is correct
int CheckSensor()
{

  if (pDataWire.reset() == false) {
    return NODEVICE;
  }
  pDataWire.read_rom (arSlaveAddr);
  // Calculate Cycle-Redudancy-Check (ie: check the data is not invalid
  if (OneWire2::crc8(arSlaveAddr, 7) != arSlaveAddr[7]) {
   return INVALIDCRC;
  }

  if (!(arSlaveAddr[0] ==  DS18B20MODEL
                || arSlaveAddr[0] == DS18S20MODEL
                || arSlaveAddr[0] == DS1822MODEL
        )){
    return INVALIDMODEL;
  }
    // Return all good
  readScratchPad(8); // read the scratchpad to set model, resolution etc
  return SLAVEGOOD;
}

// returns a float with the temperature in degrees C.
float getTemperature()
{
    // If we're ready to rock, begin communication channel
    if (CheckSensor() != SLAVEGOOD) return 0;  // return a value outside our range

    // The temp is the first two bytes so just request those 2
    readScratchPad(2);

    int16_t rawTemperature = (((int16_t) tempMSB) << 8) | tempLSB;

    switch (arSlaveAddr[0]) {
        case DS18B20MODEL:
        case DS1822MODEL:
           switch (resolution)
            {
               case TEMP_12_BIT:
                  return (float)rawTemperature * 0.0625;
                  break;
               case TEMP_11_BIT:
                  return (float)(rawTemperature >> 1) * 0.125;
                  break;
               case TEMP_10_BIT:
                  return (float)(rawTemperature >> 2) * 0.25;
                  break;
               case TEMP_9_BIT:
                  return (float)(rawTemperature >> 3) * 0.5;
                  break;
            }
            break;
        case DS18S20MODEL:
            return (float)rawTemperature * 0.5;
            break;
    }

}

// sends convert temperature to all devices on the NewOneWire connection.
// only one device on each bus needs to do this.  ideally, it should be
// on your highest resolution device so if a delay is necessary, it will
// be long enough
void globalTempRequest()
{
    pDataWire.reset();
    pDataWire.skip();
    pDataWire.write(STARTCONVO);
}

// returns temperature in degrees C
float getTempC()
{
    return getTemperature();
}

// returns temperature in degrees F
float getTempF()
{
    return (getTemperature() * 1.8) + 32;
}

// Convert float celcius to fahrenheit
float toFahrenheit(float celcius)
{
    return (celcius*1.8)+32;
}