Building a Brew Shed

The forum for discussing all kinds of brewing paraphernalia.
lancsSteve

Re: Building a Brew Shed

Post by lancsSteve » Thu Mar 17, 2011 11:22 pm

Made the recirculating/flow control setup today after a quick bike ride to screwfix this morning:
Image

Thanks again to Aleman for the help in figuring out bits and design - and The Mumbler for the pipe cutter and 15mm pipe!

Silicon hose arriving tomorrow - getting there!

L2wis

Re: Building a Brew Shed

Post by L2wis » Fri Mar 18, 2011 5:35 pm

i love the excitement of putting together a build! I feel like I need to build something new to keep it going haha! Hope you get to use all your new kit asap!

lancsSteve

Re: Building a Brew Shed

Post by lancsSteve » Fri Mar 18, 2011 11:19 pm

Getting there - got all the extra compression fittings and my silicon tube today and another keg to use as an HLT on longish-term loan from a friend. After musch stressing and gas leaking got the regulartor connected on properly and tightened sufficiently and got the burner fired up for the first time today. Hoping to finish the plumbing in, mash tun and hlt insulation and wiring tomorrow/over weekend and get a first brew in next week (when I'm conveniently on strike for two days) :-D

Image

L2wis

Re: Building a Brew Shed

Post by L2wis » Fri Mar 18, 2011 11:43 pm

That type of gas leak sounds a lot less fun than my CO2 barrel, glad you got it sorted though.

lancsSteve

Re: Building a Brew Shed

Post by lancsSteve » Sat Mar 19, 2011 10:37 am

Wasn't so much a leak as not tightened enough and a case of opening tap, hear gas, close, tighten, repeat, ptfe and a lot of time spent on double and treble checking but yeah less fun than CO2!

Now trying to figure out all the hose connections needed and what needs to come undone and do up rather than stay in place with compression - time to go back to Aleman's video (again I think!

User avatar
Kev888
So far gone I'm on the way back again!
Posts: 7701
Joined: Fri Mar 19, 2010 6:22 pm
Location: Derbyshire, UK

Re: Building a Brew Shed

Post by Kev888 » Sat Mar 19, 2011 11:58 am

All looking very good stuff! I really like the concept too - with the hinged roof you won't get steam condensing and dripping everywhere like I do in the garage.

Cheers
kev
Kev

L2wis

Re: Building a Brew Shed

Post by L2wis » Sat Mar 19, 2011 2:03 pm

yeh same story here with me in my shed with the condensation!

User avatar
Gricey
Under the Table
Posts: 1081
Joined: Sat Jul 03, 2010 9:07 pm
Location: Sheffield, UK
Contact:

Re: Building a Brew Shed

Post by Gricey » Sun Mar 20, 2011 4:44 pm

Whats the plumbing around the pump for? I've got away briefly with just one ball valve on the output and keeping a head / letting the pump fill before turning on, but my installation isnt permanent yet...
Bad Panda Brewery
Fermenting: FV1: AG#18 English IPA FV2: AG#19 Summer Dunkelweizen
Conditioning: AG#16 Chimay Reddish, AG#17 Amarillo Brillo
Maturing: AG#05 B.O.R.I.S.: Bricksh*tter Oatmeal Russian Imperial Stout - ready 01/10/11, AG#07 Monkey Shot! IAPA - ready 16/06/11 maybe
Drinking: AG#11, AG#14, AG#15
Planning: AG#20 Summer Hefeweisen, AG#21 Saison Brettre, AG#22 Simcoe Poisoning Red IPA, AG#23 Oatmeal Stout

lancsSteve

Re: Building a Brew Shed

Post by lancsSteve » Mon Mar 21, 2011 10:35 am

Gricey wrote:Whats the plumbing around the pump for? I've got away briefly with just one ball valve on the output and keeping a head / letting the pump fill before turning on, but my installation isnt permanent yet...
It was Aleman's design - it allows you to get refined flow control and recirculation so you can control flow in with ball valve, flow out with ball valve and recirculation of some wort with blue handled ball valve - my understanding is that by doing this instead of straining the pump and plumbing and increasing pressure through narrow openings you can recirculate some of the liquid back through the pump and (I assume) even leave it running with just recirculation while changing fittings and connections etc.

Hopefully Aleman or others can elaborate on further features and reasons for this plumbing.

User avatar
Aleman
It's definitely Lock In Time
Posts: 6132
Joined: Sun Jun 03, 2007 11:56 am
Location: Mashing In Blackpool, Lancashire, UK

Re: Building a Brew Shed

Post by Aleman » Mon Mar 21, 2011 11:26 am

That is a BMF pump (Big Mutha . . . you get the picture :lol:). I think it is capable of pumping something like 5 Gallons per minute at a 10M head . . . a little bit of overkill for recirculating the mash, Indeed when I first tried it I ended up with a successful stuck mash with the bottom foot of the mash resembling concrete. I then moved away from pumping the mash directly and used an under back, with a phase angle regulator and ball valve to control the flow rate. Talking to another brewer he suggested putting a bypass loop in place between the inlet and the outlet, this allows you to run the pump at full speed (Great for cooling the motor . . . and its much quieter), but still control the flow rate very accurately. The more the wort flows around the bypass loop the less it flows out of the outlet. You don't necessarily need a ball valve on the inlet of the pump, as there is one on the vessel that you are pumping from. . . . However once flushed, I pump boiling water around the tubing, and leave the pump and bypass tubing filled with water between uses, so being able to turn the pump off complete is handy.

DO NOT RUN THE PUMP DRY If you do so you will crack the carbon seal and wort will leak everywhere (Another reason for a bypass loop the carbon seal is cooled by the moving wort). . . . I have discovered a spare seal kit for the pump . . . PM me your address Steve and I'll send it on.

lancsSteve

Building a Brew Shed - plumbing, wiring and test runs

Post by lancsSteve » Wed Mar 23, 2011 9:10 pm

Getting there - slowly... Still got some leakage issues to resolve with the pump and compression fittings and a full 'wet run' (mustn't do a 'dry run' that'd kill the pump) to do. Planning to give my old kit it's last hurrah tomorrow while putting last touches on this and trying to resolve some of the issues through different routes.

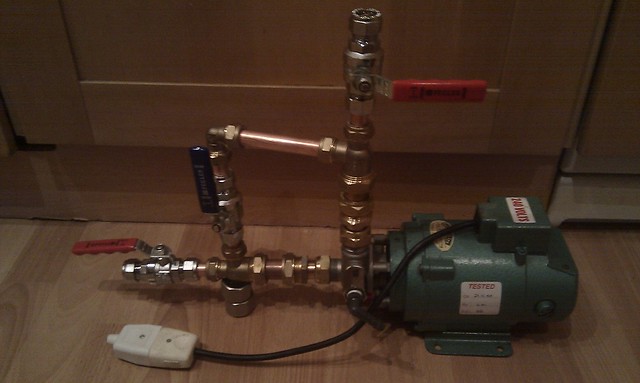
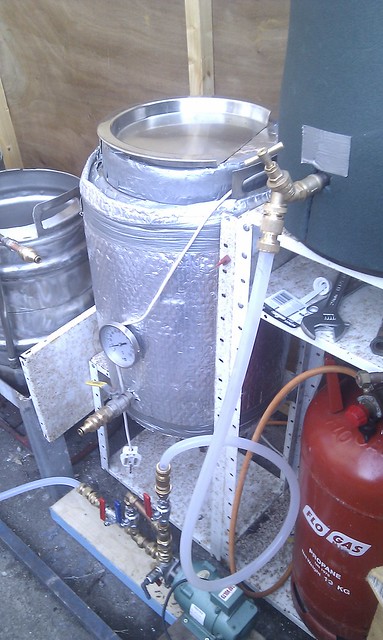
Here's the silicon hose to move hot liquor and wort around, I've tried setting it all up initially to use brass hoselock connectors having picked up a few sets knocked down and make it all removable/disconnectable etc. However having a few issues with the male 3/4" tap connecotr bits with a little leaage - no worries when it's cold water at the moment but very different when it's hot wort. Concerns are integrity of the seals at temp and general watertightness, on first pump test with cold water had a few issues - nothing too bad and mainly on the pump outflow on first running. Will try adding PTFE and better tightening or if I can't resolve these at all then try pushing silicon hose over 15mm pipe with jubilee clip and then try hoselock connectors to join silsion pipe together rather than compression 15mm>3/4">brass male hose connector as used here:
Image

More general views of the pump system - the recirculation and flow control worked well with the ball valves though, thanks again Aleman for the design and tips on its use =D> need more practice but certainly a sound and clever design :-D
Image
Image

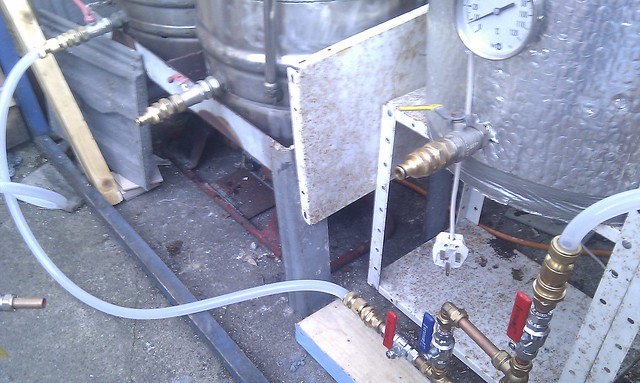
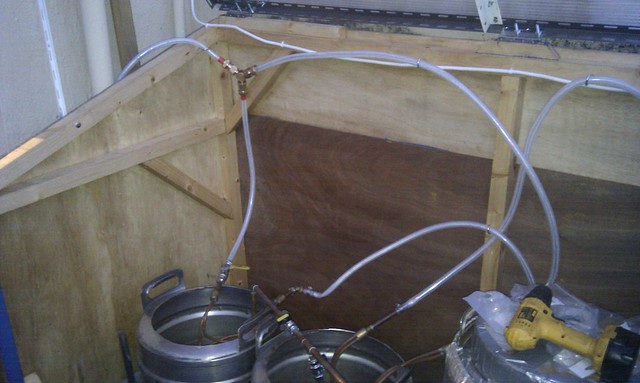
And here's the cooling system - food grade hose used as got it local and cheap and by the metre and means I *could* run water through the chillers and then warm water into HLT potentialy. Gnerally wanted strong, clear reinforced tube by the metre so why not!

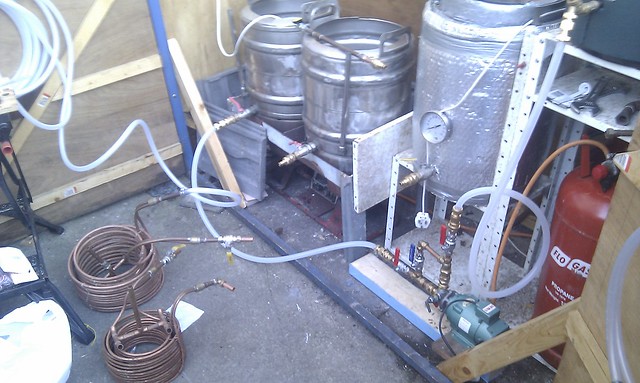
Setup to allow the two chillers to run via the 3 way connector or use a simple connector to run just one chiller, can all be out of the way while boiling with burner on and using hooks to keep the lines up and well clear of the super heat below:
Image

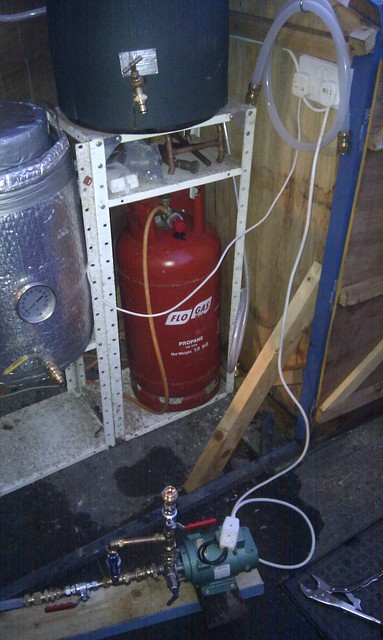
Wired in an electric socket with switches to control pump and elec blanket element in mash tun, the wire then goes in to the house via the air vent hole conveniently located next to brew shed so no need to have open windows or door anymore, thus making SWMBO happier. (Silicon hose just hanging there out of the way not used/wet!)
Image

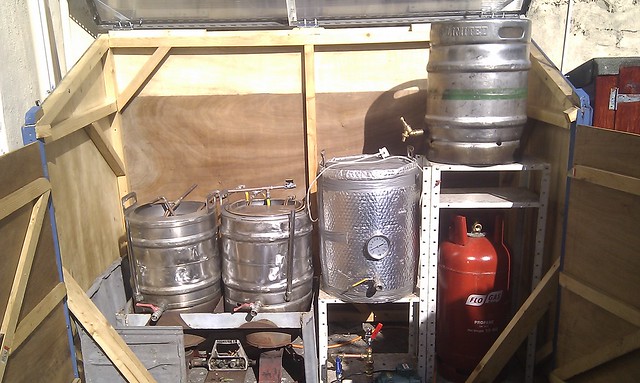
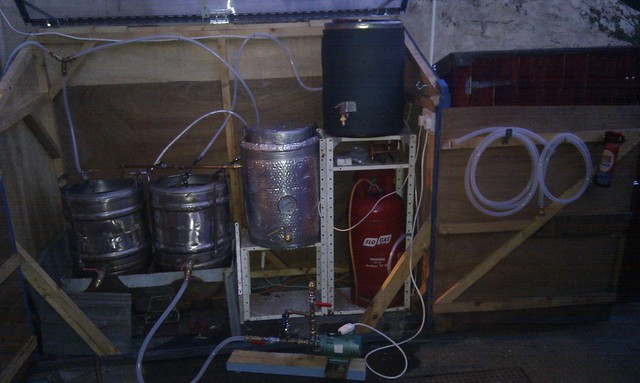
The whole brewery - with plenty of hooks (and a fire extinguisher) add to hang bits up on. Working... but not ready till further tested with cold then hot water and then all joints retightened and any remaining leak issues resolved.
Image

Getting some paving slabs to replace the roof tiles via freegle - but weighing about 45kg each I do worry about structural integrity and unbalancing. Kind of hoping tiles will do the job but if anyone's looking and screaming NOOOOOO please post!

Final steps now (for tomorrow) are: bolting in heat shield for mash tun, bolting down false bottom into mash tun, full cold and then hot wet run and then checking ALL joints and resolving any remaining leaks. And putting a layer of mylar over the HLT camping mat jacket so that's as shiny as the mash tun. (The insulation on HLT is all removable - foam in the base and on the lid and a single layer of camping mat that slides over the outside so still usable as a boiler by its owner - aim was to add some insulation to keep liquor at temp for reasonable time after pumping from boiler rather than heating it direct or keeping it hot for hours and hours on end.
Last edited by lancsSteve on Wed Mar 23, 2011 9:28 pm, edited 1 time in total.

BarnsleyBrewer
Under the Table
Posts: 1793
Joined: Tue Mar 25, 2008 11:52 pm
Location: Wombwell (South Yorkshire)

Re: Building a Brew Shed

Post by BarnsleyBrewer » Wed Mar 23, 2011 9:28 pm

Nice build, bet your well chuffed. :D
"Brewing Fine Ales in Barnsley Since 1984"
- - - - - - - 30 years (1984 - 2014)- - - - - - -
Pints Brewed in 2021......... 104
Pints brewed in 2018.. 416
Pints brewed in 2017.. 416 - Pints brewed in 2016.. 208
Pints brewed in 2015.. 624 - Pints brewed in 2014.. 832

lancsSteve

Re: Building a Brew Shed

Post by lancsSteve » Wed Mar 23, 2011 9:31 pm

Chuffed? Very... A bit wary? Certainly... Hoping it's all sound and not going to suddenly spray me with boiling hot wort? MOST DEFINITELY!

Was hoping to get first brew on it tomorrow but am realistic about need to wet run cold then hot and just get my head round using a SERIOUS pump rather than good old gravity. Been a big project but very pleased with it all so far! Can't wait to have first full outing on it but giving old kit a last 'aah how easy but small and slow' run will be a good thing too.

User avatar
Aleman
It's definitely Lock In Time
Posts: 6132
Joined: Sun Jun 03, 2007 11:56 am
Location: Mashing In Blackpool, Lancashire, UK

Re: Building a Brew Shed

Post by Aleman » Thu Mar 24, 2011 10:48 am

Looking very nice Steve, I think you will have no problems with the roofing tiles they will be fine.

Leaks are always a PITA, I had to strip my new boiler down to fix an issue with a leaking nipple.

If you wanted to drop down to 15mm ball valves on teh kettle you could always do it with a 22->15mm reducer.

I'll get the pump seal kit in the post this weekend.

One thing when you start the pump for the mash recirc, you will need top open all the valves fully to fill the pump and pipework, then back off the pump outlet , fully open the bypass . . . and then switch on the pump

lancsSteve

Re: Building a Brew Shed

Post by lancsSteve » Thu Mar 24, 2011 2:54 pm

Having a test run right at the moment, pics soon. Sorting heat shields too. Had a few arcs of running pump dry by accident but stopped v quick - all a major learning process!

Post Reply