
Hot water cylinder tipping mash tun build
-
Haydnexport
- Lost in an Alcoholic Haze
- Posts: 637
- Joined: Tue Jan 06, 2015 2:12 pm
Re: Hot water cylinder tipping mash tun build
i thought hot water cylinders were made out of copper?
-
PoppaZombie
- Steady Drinker
- Posts: 36
- Joined: Wed Dec 21, 2016 3:26 pm
Re: Hot water cylinder tipping mash tun build
Thanks for the help, Fil. Unfortunately I can't find the bbcode share function on Flickr for love nor money. The only thing I seem to be able to copy is the url. Is it because I'm on an iPad and am using the app?
-
PoppaZombie
- Steady Drinker
- Posts: 36
- Joined: Wed Dec 21, 2016 3:26 pm
Re: Hot water cylinder tipping mash tun build
Quite a few are stainless now. It's a cheaper alternative to copper cylinders by the look of it.Haydnexport wrote:i thought hot water cylinders were made out of copper?
-
Kev888

- So far gone I'm on the way back again!
- Posts: 7701
- Joined: Fri Mar 19, 2010 6:22 pm
- Location: Derbyshire, UK
Re: Hot water cylinder tipping mash tun build
Open your picture in flickr. To the bottom right of your picture, flickr will display three or four icons (they may take a moment or two to appear after the picture loads); one of these is a kind of curved arrow pointing to the right (which if you hover over it is called 'share photo').PoppaZombie wrote:Lordy. How the hell do I just display the photo. Links are a right pain to view!
Click this arrow and then select the 'BBCode' tab/heading in the pop-up window. This will give you the code to copy and then paste into your post here - it will embed the image in the post rather than just link to it.
Kev
-
Fil
- Telling imaginary friend stories
- Posts: 5229
- Joined: Sun Oct 16, 2011 1:49 pm
- Location: Cowley, Oxford
Re: Hot water cylinder tipping mash tun build
From the photostream view, click on a pick to get it in single pic view, and at the bottom right hand of the screen on the black back ground are 3 x icons, the centre side swiping arrow icon is the share button/link ... that will allow you to select the protocol , click on BBCode and copy the highlighted and selected textPoppaZombie wrote:Thanks for the help, Fil. Unfortunately I can't find the bbcode share function on Flickr for love nor money. The only thing I seem to be able to copy is the url. Is it because I'm on an iPad and am using the app?
I must admit i had to poke about when 1st using it..
ist update for months n months..
Fermnting: not a lot..
Conditioning: nowt
Maturing: Challenger smash, and a kit lager
Drinking: dry one minikeg left in the store
Coming Soon Lots planned for the near future nowt for the immediate
Fermnting: not a lot..
Conditioning: nowt
Maturing: Challenger smash, and a kit lager
Drinking: dry one minikeg left in the store
Coming Soon Lots planned for the near future nowt for the immediate
-
PoppaZombie
- Steady Drinker
- Posts: 36
- Joined: Wed Dec 21, 2016 3:26 pm
Re: Hot water cylinder tipping mash tun build
Eureka!
It looks like the ipad app doesn't bother to include the bbcode share function so I switched to the laptop.
Thanks a lot for your help and patience
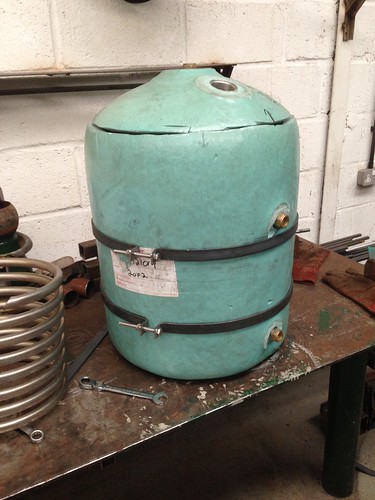
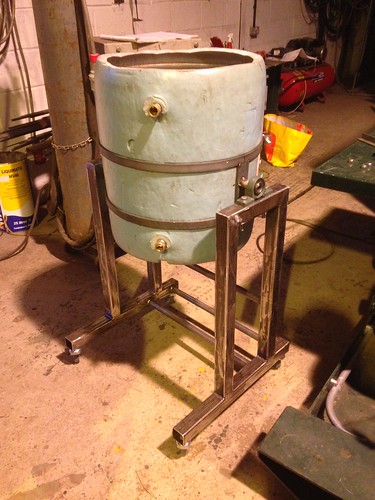
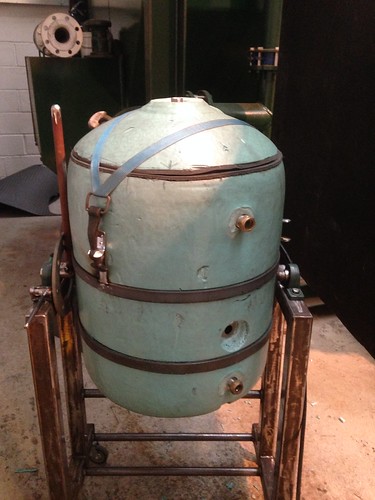
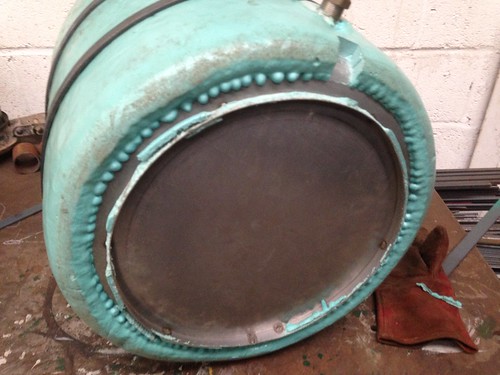
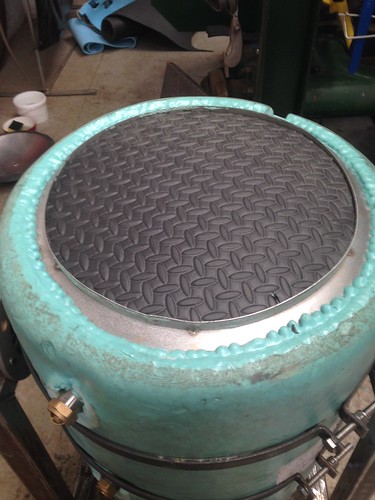
Lid off, coil out and 25 x 5mm flat bar wrestled into bolt tensioned straps. Unfortunately I butchered the hell out of it when cutting the top off. It didn't matter in the end but if I had to do it again id be a bit steadier
Detail on the bolts.
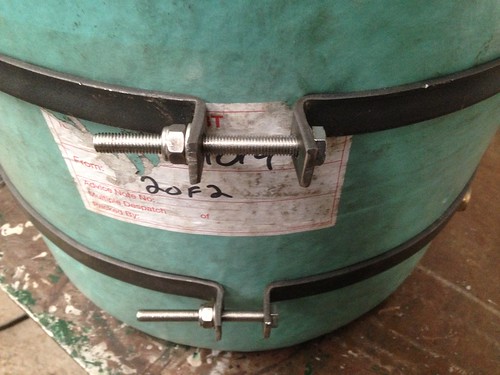
The 5mm bar, once the ends had been bent, hammered in the vice and then drilled, had plenty enough strength to tension up around the vessel without straightening out the bolt tensioners
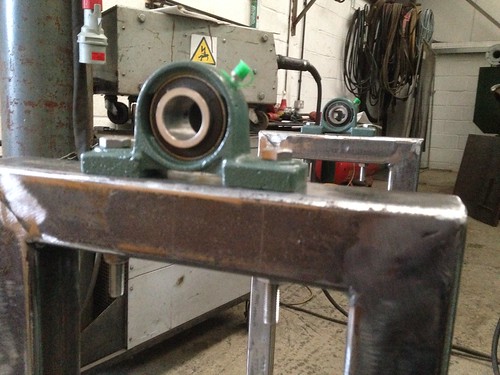
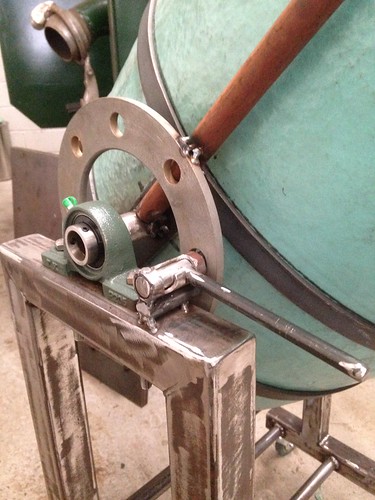
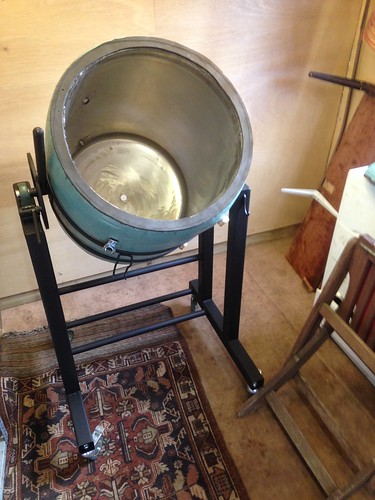
50mm Side plates with 28mm round bar for the pivot
Pillow block mounted bearings were from ebay for £11 for the pair including postage. A bargain imo. 25mm centre bore. However, muggins here didnt measure the tube that was going into these before ordering so I ended up grinding 3mm off their diametre.
I used 50mm box section for the frame.
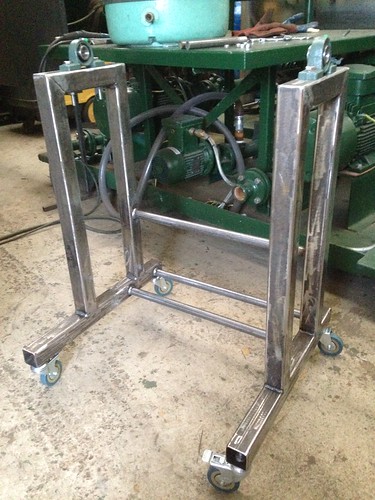
I had planned to use 1 1/2" but unfortunately we didn't have enough in the workshop. I used 25mm tube for the intermediate bars to help keep the weight down a bit. I wanted there to be plenty of room for the tap and pipes to pass through when it is tipped so kept the top of the three as low as poss.
I also wanted the tap to be around 45-50cm from the deck to empty and sparge into 25 ltr fermenting buckets using a small length of tube. I'll get a pump one day but for now I'll transfer to the boiler by bucketting it in. Leaving this much meant that its nice and low for doughing in.
There is plenty of space for the grain catching bucket to fit inbetween the front wheels. I kept the span open by pushing the frontal tube as far back as i could.
The two upright supports and bearings centres are actually set back in the frame to compensate for the shift in the centre of gravity when it tips. The last thing I want is to make a tipping mash tun that throws itself forward when you try to tip it. When upright and pushed against the wall, the back of the cylinder actually touches the wall meaning it has to be pulled out before tipping but packs out the way quite nicely when not in use. When I first drew the frame out I had planned to make it deep enough so it could be tipped when against the wall but the overall depth would have been 90cm or so. That was too space hungry for me so it'll come forward at cleaning time.
The casters were another ebay purchase at £10 for the set. Two with brakes and two without. 75mm diametres and 50kg load rating per caster.
I could then put them together and give it a spin!
I'll post some more pics in the next few days
It looks like the ipad app doesn't bother to include the bbcode share function so I switched to the laptop.
Thanks a lot for your help and patience
Lid off, coil out and 25 x 5mm flat bar wrestled into bolt tensioned straps. Unfortunately I butchered the hell out of it when cutting the top off.
Detail on the bolts.
The 5mm bar, once the ends had been bent, hammered in the vice and then drilled, had plenty enough strength to tension up around the vessel without straightening out the bolt tensioners
50mm Side plates with 28mm round bar for the pivot
Pillow block mounted bearings were from ebay for £11 for the pair including postage. A bargain imo. 25mm centre bore. However, muggins here didnt measure the tube that was going into these before ordering so I ended up grinding 3mm off their diametre.
I used 50mm box section for the frame.
I had planned to use 1 1/2" but unfortunately we didn't have enough in the workshop. I used 25mm tube for the intermediate bars to help keep the weight down a bit. I wanted there to be plenty of room for the tap and pipes to pass through when it is tipped so kept the top of the three as low as poss.
I also wanted the tap to be around 45-50cm from the deck to empty and sparge into 25 ltr fermenting buckets using a small length of tube. I'll get a pump one day but for now I'll transfer to the boiler by bucketting it in. Leaving this much meant that its nice and low for doughing in.
There is plenty of space for the grain catching bucket to fit inbetween the front wheels. I kept the span open by pushing the frontal tube as far back as i could.
The two upright supports and bearings centres are actually set back in the frame to compensate for the shift in the centre of gravity when it tips. The last thing I want is to make a tipping mash tun that throws itself forward when you try to tip it.
The casters were another ebay purchase at £10 for the set. Two with brakes and two without. 75mm diametres and 50kg load rating per caster.
I could then put them together and give it a spin!
I'll post some more pics in the next few days
-
Kev888
- So far gone I'm on the way back again!
- Posts: 7701
- Joined: Fri Mar 19, 2010 6:22 pm
- Location: Derbyshire, UK
Re: Hot water cylinder tipping mash tun build
Looks like a very solid build, good stuff. I used a hot water cylinder in my last build too, for the HLT - if won at a good price it can be a very economical way of getting quite a lot of metal tank and high performance insulation in one package.
Sealing the lid well to prevent heat (and heat-laden vapour) escaping could be quite important with a Mash Tun.
Sealing the lid well to prevent heat (and heat-laden vapour) escaping could be quite important with a Mash Tun.
Kev
-
Fil
- Telling imaginary friend stories
- Posts: 5229
- Joined: Sun Oct 16, 2011 1:49 pm
- Location: Cowley, Oxford
Re: Hot water cylinder tipping mash tun build
Wow Great Progress, am looking forward to the internal details, and how your finishing off the cut rim. Its good to have another contributor with hands on skills and a different take on how to get a brewery up.
btw i would consider a locking pin or similar to keep the tun upright rather than relying on the back wall and a castor lock
btw i would consider a locking pin or similar to keep the tun upright rather than relying on the back wall and a castor lock
ist update for months n months..
Fermnting: not a lot..
Conditioning: nowt
Maturing: Challenger smash, and a kit lager
Drinking: dry one minikeg left in the store
Coming Soon Lots planned for the near future nowt for the immediate
Fermnting: not a lot..
Conditioning: nowt
Maturing: Challenger smash, and a kit lager
Drinking: dry one minikeg left in the store
Coming Soon Lots planned for the near future nowt for the immediate
-
PoppaZombie
- Steady Drinker
- Posts: 36
- Joined: Wed Dec 21, 2016 3:26 pm
Re: Hot water cylinder tipping mash tun build
I am considering buying another cylinder for an HLT too. How do you get along with yours?Kev888 wrote:Looks like a very solid build, good stuff. I used a hot water cylinder in my last build too, for the HLT - if won at a good price it can be a very economical way of getting quite a lot of metal tank and high performance insulation in one package.
Sealing the lid well to prevent heat (and heat-laden vapour) escaping could be quite important with a Mash Tun.
With regards to the lid I planned to use foam or rubber on the mating faces and then somehow clamp them together to create a seal.
I first had to so a bit of tentative grinding to level up the two faces. Originally, when I had first cut into the foam and tank, it was with a bit of a downward angle which meant as I went round the vessel, the trailing edge of the blade ground into the bottom edge quite heavily.
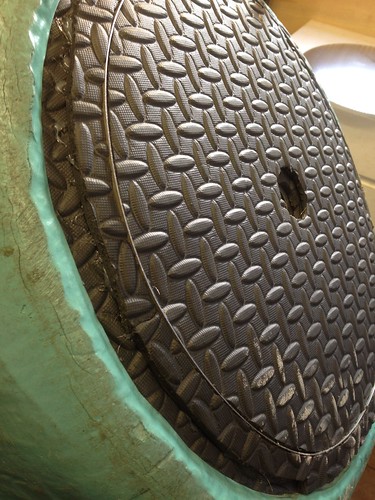
Some high density foam left from a previous project provided the material for the bottom gasket. It was the stuff from fatigue mats with the metal grip pattern on one side. Any foam would do. After cutting to size I used a glue gun to stick down the foam onto the top edge of the tanks green insulation. I may cover this foam with silver foil tape at a later date.
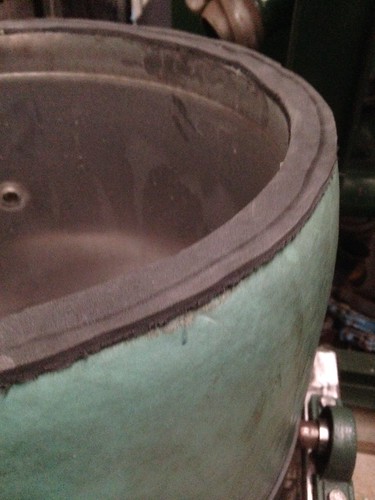
For the lid I used two lengths of draught excluder foam strips, side by side, as the foam was a lot softer than the high density stuff. It squashed down nice and easy forming a good insulating seal under pressure.
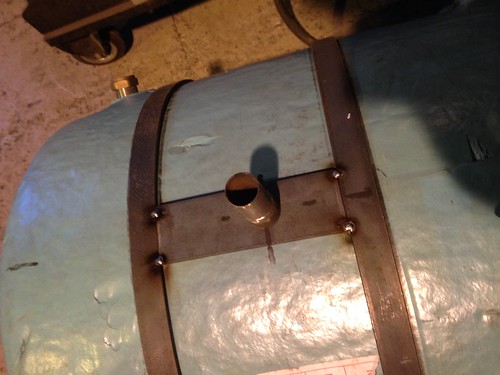
Pic below was with the first strip on. I ran a second strip next to it to cover the edge of the green insulation completely. As you can see, I left the mating face on the lid cut at a bit of an inward angle so when put in position it kinda nestles into the vessel.
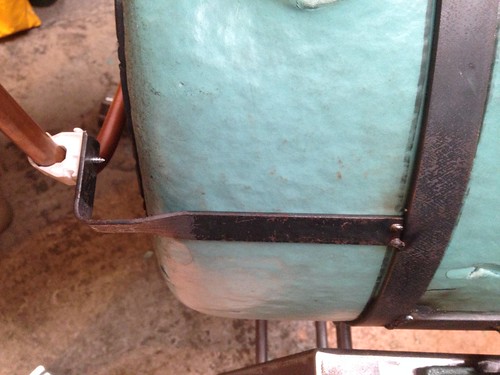
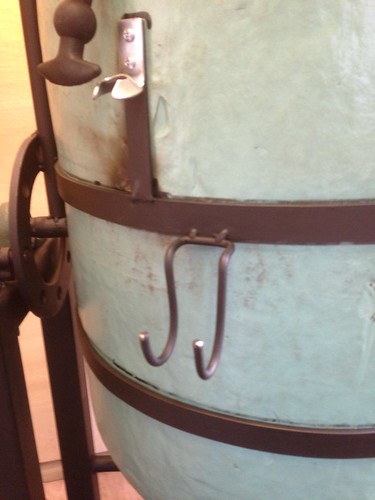
A double strap with rubber handle, hooked onto the back bolts, looped over the lid and pulled into its retaining socket, provides the downforce to seal the lid. I was given the rubber handle and its retainer from a guy in the next industrial unit. These handles get used on a lot of plant for holding panels in place on pumps and farm machinery and the like. Simple and sturdy. I originally wanted those clips like thermopots but was struggling to devise a simple way of attaching them to the lid. I'd have had to fix some kind of frame to the lid to offer something to weld or bolt the hooks to. This was going to be too much faff for too little gain so I kept it simple and used what I had available. The straps transfer a lot of pressure onto the lid so Im happy
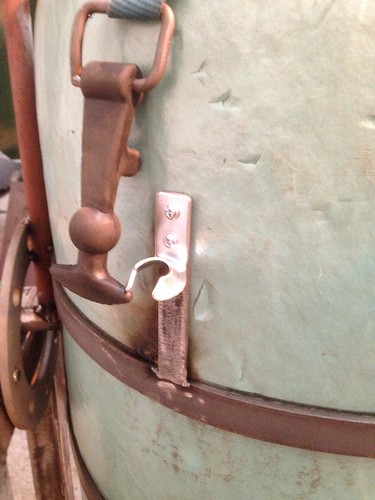
The lid seals nice and tight anyhow. I just need a blanking plug for the immersion socket to finish that off.
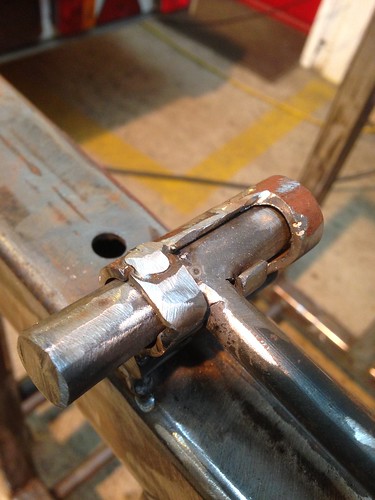
For control of the tipping I welded a handle onto the lug. To this I welded a 4" pipe centred around the lug so that during rotation the holes still lined up with the locking bolt. The hole centres are at 45 degree increments around the flange so it turned out perfect for locking the tun in different positions. I then set about bodging together a bolt that fit the holes and the frame width. I had bought a gate bolt for the lock but found it, and any others I could find, just too wide for mounting on the 50mm box frame. I could have hung it over the sides of the box section steel but really didn't want the whole unit to have any extra width. Sure the bolt looks rough as a badger a**e, but it works just fine. I guess that is the theme of the whole tun. Rough but practical.

Last edited by PoppaZombie on Tue Mar 07, 2017 10:33 am, edited 1 time in total.
-
Kev888
- So far gone I'm on the way back again!
- Posts: 7701
- Joined: Fri Mar 19, 2010 6:22 pm
- Location: Derbyshire, UK
Re: Hot water cylinder tipping mash tun build
Seems to be progressing pretty quickly, should be a very capable MT soon, at this rate. What kind of thing are you planning for the false bottom or manifold? (apologies if you already mentioned that somewhere higher up).
BTW I used some alu foil tape around some of my tanks, it did the job but didn't stay especially smart - being in a damp garage it got a bit of surface corrosion after a few months, especially where wort got onto it and attached it. It was relatively easy to damage, too, but then I man-handled my tanks (tipping them by hand) so they were much more prone to picking up dings than yours likely will be.


The things inside are a dip-tube for the outlet and (somewhat higher up than it seems in the picture) a thermowell for a temperature probe -and obviously the heating element. This left one remaining hole, so that vertical 22mm pipe was added as an overflow. The sight glass was a bit of thick-walled polycarbonate tube (not acrylic/perspex), though translucent silicone hose could also have been used.
BTW I used some alu foil tape around some of my tanks, it did the job but didn't stay especially smart - being in a damp garage it got a bit of surface corrosion after a few months, especially where wort got onto it and attached it. It was relatively easy to damage, too, but then I man-handled my tanks (tipping them by hand) so they were much more prone to picking up dings than yours likely will be.
It was very good; the only minor down-side was that mine was copper, which could sometimes develop a slight film of verdigris over winter in the cold, damp garage. But easily wiped off with just a kitchen tissue so it was more a slight annoyance than any actual deficiency. I didn't want to risk damaging the insulation by soldering an element flange in, so used a mechanical flange from Toolstation. Here are a couple of old pictures:PoppaZombie wrote:I am considering buying another cylinder for an HLT too. How do you get along with yours?
The things inside are a dip-tube for the outlet and (somewhat higher up than it seems in the picture) a thermowell for a temperature probe -and obviously the heating element. This left one remaining hole, so that vertical 22mm pipe was added as an overflow. The sight glass was a bit of thick-walled polycarbonate tube (not acrylic/perspex), though translucent silicone hose could also have been used.
Kev
-
PoppaZombie
- Steady Drinker
- Posts: 36
- Joined: Wed Dec 21, 2016 3:26 pm
Re: Hot water cylinder tipping mash tun build
Thanks for the pointer, Kev. I will give it a go as a finishing touch.Kev888 wrote:I used some alu foil tape around some of my tanks, it did the job but didn't stay especially smart - being in a damp garage it got a bit of surface corrosion after a few months, especially where wort got onto it and attached it. It was relatively easy to damage, too, but then I man-handled my tanks (tipping them by hand) so they were much more prone to picking up dings than yours likely will be.
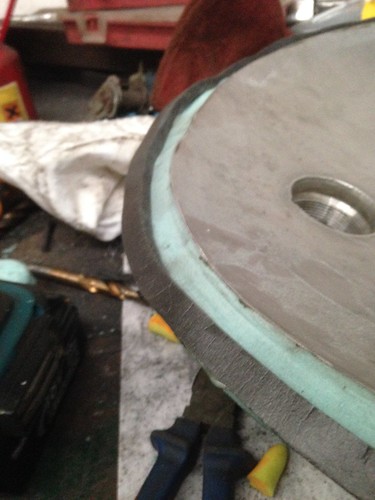
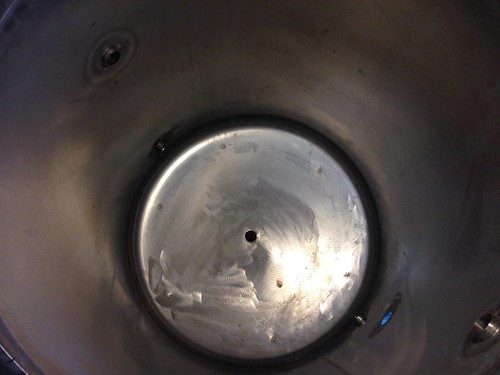
Once open and with the coil cut out, you could see the inside was a little dirty with residues from its past life.

After some rubbing down and drilling the centre hole with a step drill bit, the bottom came clean
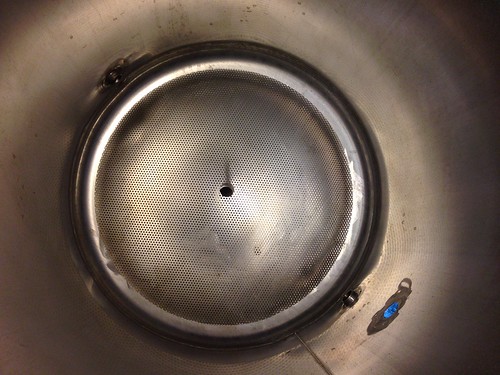
For the inside I am using a 40cm domed false bottom bought from the Malt Miller. It is a 450mm tank so has an inch of room around the FBs circumference. This seems to accommodate the curve into the walls quite well but is this too far from the wall? I just hope it doesn't move around too much.The false bottom was £27. As it will be bottom draining I'll need to find a plug of some sort to cover the 20mm hole it came with.
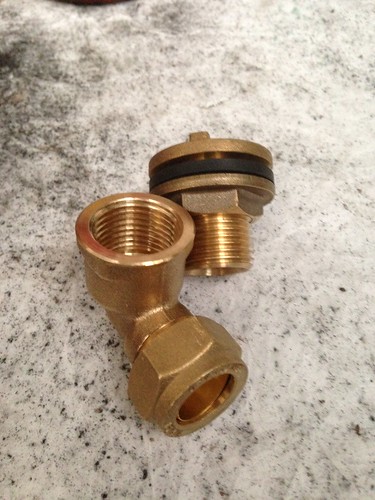
As the tun will be bottom draining I picked up a brass tank connecter and an elbow with 1/2" BSP to 15mm compression fitting from Screwfix. I figured this was the most direct configuration with the shallowest elbow for low cost. I think they were about £8 together.
Unfortunately the bottom of the tank was not insulated by the manufacturer. It has a small strip of stainless bent into a circle tacked to the bottom which acts as a rest. I decided to keep this as I was planning to bolt a pipe support to it for the outlet. In the end I made a hanging stirrup thing with a pipe bracket instead so I could probably have cut it off. If I had it would have made insulating the bottom a bit easier.
For the base I used the same insulation foam as the rim and stuck it down with the glue gun. Time will tell if the glue enjoys life at mash and sparge temperatures but I imagine it will be fine. I cut rings and glued these around the outside to cover the gap up to the green insulation. I used two layers to ensure good heat retention but thought it probably wasn't necessary.
Here's the stirrup pipe hanger thingy to take the weight of the valve etc. I just bent a piece of 3mm flat bar in the vice to suit
I wanted to offset the tap to keep the fittings compact, lessening the danger of it getting knocked about. I have a 1/2 ball valve coming from ebay in the post

I bent a mash paddle hook in the vice and welded it on before I took the thing apart for priming and painting. I used an acrylic bonding metal primer as an undercoat before two coats of Rustins matt black metal paint which I had leftover from another project.

The unused connections were blanked off with 22mm compression blanks which were about £1.50 a pop from Screwfix.

The tun is now back at home in the shed waiting for the finishing touches. I think it's just the copper outlet and ball valve, thermometer and False bottom plug left to do.
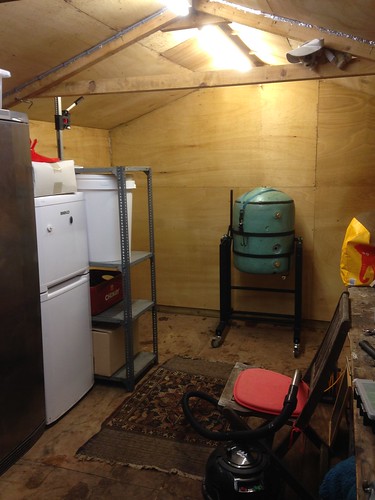
It may be a while before I get to test it for heat retention as I have some work to do getting the shed ventilation sorted. A load of mould appeared on the ceiling after my last brewday so I have to get something set up before doing another brew. That's the last thing I need, to be brewing in a great big mould infection booth! When I do I'll post to let everyone know how it holds up temp wise.
Andy
-
Kev888
- So far gone I'm on the way back again!
- Posts: 7701
- Joined: Fri Mar 19, 2010 6:22 pm
- Location: Derbyshire, UK
Re: Hot water cylinder tipping mash tun build
Yet more very useful progress!
Though yes, if it were to move around (say when mashing in) and ride up on the radius at the edge of the base then you could see a gap letting more/bigger bits of grain out than is normal (you will always get fine particles when initially running off). If that happens, some method of keeping the FB central may be needed; maybe some spacers around the edge or a small pin poking down into the central/bottom drain? But nothing too tight or rigid in a way that could prevent the weight of grain pressing the FB firmly against the pot base.
Hope the test goes well. If testing with water, you can normally expect that heat loss with grain will be a little better.
For continuous (or fly) sparging, the false bottom would ideally cover the whole base to maximise evenness of flow, but an inch around the edge is quite trivial - I seriously doubt you'd notice any difference at all. With batch sparging there will be even less impact (in fact some would prefer breaks in the drainage to help reduce compaction when draining).PoppaZombie wrote:Kev888 wrote:For the inside I am using a 40cm domed false bottom bought from the Malt Miller. It is a 450mm tank so has an inch of room around the FBs circumference. This seems to accommodate the curve into the walls quite well but is this too far from the wall? I just hope it doesn't move around too much.
Though yes, if it were to move around (say when mashing in) and ride up on the radius at the edge of the base then you could see a gap letting more/bigger bits of grain out than is normal (you will always get fine particles when initially running off). If that happens, some method of keeping the FB central may be needed; maybe some spacers around the edge or a small pin poking down into the central/bottom drain? But nothing too tight or rigid in a way that could prevent the weight of grain pressing the FB firmly against the pot base.
Hope the test goes well. If testing with water, you can normally expect that heat loss with grain will be a little better.
Kev
Re: Hot water cylinder tipping mash tun build
That looks awesome, Poppazombie. Nice work. 
Could make a handy butter churn too.
Could make a handy butter churn too.
-
jinjahbiscuit
- Steady Drinker
- Posts: 60
- Joined: Wed Jun 24, 2015 6:00 pm
Re: Hot water cylinder tipping mash tun build
That's very neat. Certainly a few ideas worth thinking about.
Thanks for sharing the build.
Thanks for sharing the build.
-
orlando

- So far gone I'm on the way back again!
- Posts: 7197
- Joined: Thu Nov 17, 2011 3:22 pm
- Location: North Norfolk: Nearest breweries All Day Brewery, Salle. Panther, Reepham. Yetman's, Holt
Re: Hot water cylinder tipping mash tun build
Slitting some silicon tubing and fitting to the rim of the false bottom should take up a little of the gap between it and the actual bottom and help take up any small dents.
I am "The Little Red Brooster"
Fermenting:
Conditioning:
Drinking: Southwold Again,
Up Next: John Barleycorn (Barley Wine)
Planning: Winter drinking Beer
Fermenting:
Conditioning:
Drinking: Southwold Again,
Up Next: John Barleycorn (Barley Wine)
Planning: Winter drinking Beer