
NOTE - I have pictures to add later tonight when I get home. If anyone spots any glaring errors or feel that something isn't explained clearly, please PM me and I can edit as required.
Thanks to Jim and the mods for their editorial assistance.
Your first all-grain brew day – a walk through guide.
This guide has been written with aim of helping a first time all-grain brewer towards a successful first brew.
It will be a long article; but please don’t be daunted….you made it this far and this guide will get you through (hopefully).
Things do get a lot easier with a few brews under your belt. I saw a forum post the other day that likened it to riding a bike; pretty difficult at first but once you get the hang of it you kind of wonder what all the fuss was about.
This guide will use a simple recipe to produce 23 litres of beer (5 gallons).
I will attempt to keep things as straightforward as possible, but I assume you have some basic brewing knowledge.
I have purposely avoided water treatment (other than the use of Campden) and discussion of mash pH.
For the first few brews, and before worrying about water treatments and mash pH; concentrate on getting the process right and producing something that is consistent and drinkable.
Before going any further, please familiarize yourself with cleaning and sanitation processes and the chemicals used. Cleanliness throughout the process is important. Anything that takes place after the wort has been boiled, we refer to as the ‘cold side’. It is imperative that anything that comes in to contact with the wort or beer on the cold side has been sanitized. Unsanitary conditions will ruin your brew.
'Walk Through' For AG First Timers
-
Mr. Dripping
'Walk Through' For AG First Timers
Last edited by Mr. Dripping on Fri Jul 25, 2014 12:53 pm, edited 1 time in total.
-
Mr. Dripping
Re: 'Walk Through' For AG First Timers
Let’s start with an equipment list. You’ve probably read all about these during your research towards making the leap.
HOT LIQUOR TANK (HLT) – with outlet tap.
BOILER – with outlet tap and a hop strainer.
*note: some people make do using their hot liquor tank as a boiler, it’s easier if you have one of each.
MASH TUN – with a tap and a manifold or false bottom.
CHILLER – immersion chiller, plate chiller (or you can use a no chill method, which I will cover).
ACCURATE THERMOMETER – helps to have a couple about the place.
HYDROMETER & TRIAL JAR – the trial jar is not essential, but does make taking gravity readings easier.
MASH PADDLE – a strong, long handled spoon will suffice. Preferably stainless steel or plastic.
WEIGHING SCALES
SANITISER – preferably no rinse (they are just so much easier to work with).
MEASURING JUG – get a couple, they are cheap.
TIN FOIL
CAMPDEN TABLET – or sodium metabisulphate powder.
FERMENTATION BUCKET – I like to have a few of these on hand, but one will do.
BOWLS – suitable for weighing out grains and hops.
KETTLE FININGS – Protofloc, Whirlfloc or Irish moss
NOTE BOOK – take notes, it makes things a lot easier and there is stuff you will need to write down
RECIPE – we will be using the following recipe to produce a nice session beer.
I’ve pinched Jim’s stock bitter recipe from his home page.
Grain Bill
Pale Malt – 3500g
Crystal Malt – 250g
Total grain – 3750g
Boil Hops
Challenger 20g for 90 minutes
Fuggles 30g for 90 minutes
Fuggles 10g for 15 minutes
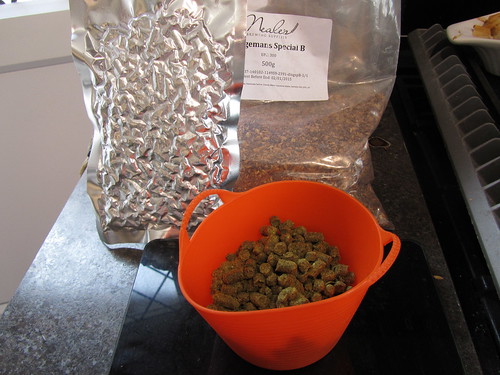
You might as well weigh these out and set them to one side. I usually weigh out my grains the night before and they sit handily in an old fermentation bucket. The hops I keep in the freezer and weigh those out a few minutes before I actually come to use them, this helps keep them as fresh as possible.
Here are the grains weighed out with the help of my trusty assistant
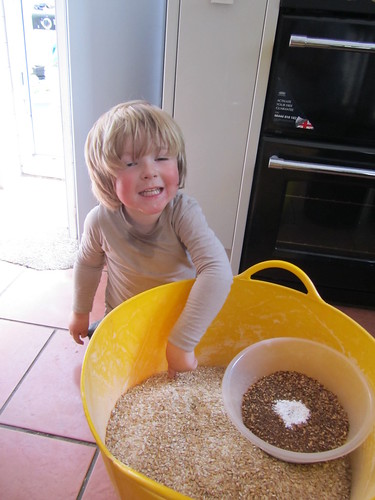 IMG_1931 by markpotts72, on Flickr
HOT LIQUOR TANK (HLT) – with outlet tap.
BOILER – with outlet tap and a hop strainer.
*note: some people make do using their hot liquor tank as a boiler, it’s easier if you have one of each.
MASH TUN – with a tap and a manifold or false bottom.
CHILLER – immersion chiller, plate chiller (or you can use a no chill method, which I will cover).
ACCURATE THERMOMETER – helps to have a couple about the place.
HYDROMETER & TRIAL JAR – the trial jar is not essential, but does make taking gravity readings easier.
MASH PADDLE – a strong, long handled spoon will suffice. Preferably stainless steel or plastic.
WEIGHING SCALES
SANITISER – preferably no rinse (they are just so much easier to work with).
MEASURING JUG – get a couple, they are cheap.
TIN FOIL
CAMPDEN TABLET – or sodium metabisulphate powder.
FERMENTATION BUCKET – I like to have a few of these on hand, but one will do.
BOWLS – suitable for weighing out grains and hops.
KETTLE FININGS – Protofloc, Whirlfloc or Irish moss
NOTE BOOK – take notes, it makes things a lot easier and there is stuff you will need to write down
RECIPE – we will be using the following recipe to produce a nice session beer.
I’ve pinched Jim’s stock bitter recipe from his home page.
Grain Bill
Pale Malt – 3500g
Crystal Malt – 250g
Total grain – 3750g
Boil Hops
Challenger 20g for 90 minutes
Fuggles 30g for 90 minutes
Fuggles 10g for 15 minutes
You might as well weigh these out and set them to one side. I usually weigh out my grains the night before and they sit handily in an old fermentation bucket. The hops I keep in the freezer and weigh those out a few minutes before I actually come to use them, this helps keep them as fresh as possible.
Here are the grains weighed out with the help of my trusty assistant
IMG_1931 by markpotts72, on Flickr
Last edited by Mr. Dripping on Fri Jul 25, 2014 7:17 pm, edited 2 times in total.
-
Mr. Dripping
Re: 'Walk Through' For AG First Timers
Before you start there are a few things that you need to determine about your equipment.
First measure the dead-space in your HLT, mash tun and boiler. This is the amount of liquid that remains in the vessel on draining completely. This is a simple process: place 5 litres of water in to the HLT, the boiler and in to the mash tun. Open the tap and collect the water that runs out; measure this and deduct it from the 5 litres you put in to start with. For example; if you put 5 litres in and collect 4 litres out, the dead-space is 1 litre.
Make sure the hop filter is fitted to the boiler when you do this to get an accurate figure.
Write the dead-space value for all vessels down.
Check the accuracy of your hydrometer in water. Most hydrometers are calibrated to read 1.000 at 20 degrees Celcius, but some are not. Usually it will say on the hydrometer stem. Fill your trial jar with 20 degree C water and pop your hydrometer in. If your hydrometer is calibrated at a different temperature then use water at that temperature. Take the reading……hopefully it will read 1.000 at 20 degrees. If it doesn’t, then try to establish at what temperature it does read 1.000 and write this down in your note book as you will need it for temperature correction purposes later on.
Further reading – how to read a hydrometer correctly.
How much water do I need?? Or in brewers speak, how much liquor do I need? Brewers refer to brewing water as liquor.
Our recipe will produce a final volume of 23 litres, but there are various losses that we need to account for along the way. Some of which we know and the rest we can work out with a bit of simple maths.
These are the losses we need to factor in:
LOSS TO HLT DEAD-SPACE – we worked that out earlier.
LOSS TO BOILER DEAD-SPACE – you did write that figure down earlier, didn’t you??
LOSS TO MASH TUN DEAD-SPACE – again, we previously worked that out.
LOSS TO BOIL OFF – when we boil the wort, we lose liquid to evaporation.
LOSS TO ABSORBTION BY GRAIN – the grain will absorb liquor.
LOSS TO HOPS – yes, those soak up liquor too!!
Losses to evaporation will be different for each particular set up and depend mainly on how vigorous the boil is, the shape of the boiler and the ambient conditions.
In this example we will use a 10% evaporation rate per hour and the boil time is 90 minutes.
We will therefore boil off approximately 3.34 litres of wort….let’s round this up to 3.5 litres.
Note: keep accurate notes of initial volumes going in to the boiler and the final volume out, over a few brews you can tweek the evaporation rate in line with your actual figures.
It is commonly assumed that 1kg of grain will absorb 1 litre of water.
So for our example our losses to grain are 3.75kg x 1 litre = 3.75 litres
1g of hops will soak up around 15ml of liquid.
The recipe calls for 60g of hops, so that is a loss of 0.9 litres……I will round this up to 1 litre.
We will assume here that the losses from the HLT, mash tun and boiler are 1 litre each.
Remember that everyone has slightly different equipment, so this value will differ from system to system.
So our losses would be:
HLT – 1 litre
MASH TUN – 1 litre
BOILER – 1 litre
BOIL OFF – 3.5 litres
LOSS TO GRAIN – 3.75 litres
LOSS TO HOPS – 1 litre
TOTAL LOSSES – 11.25 litres
This volume needs to be added to the 23 litres that we hope to end up with, so the amount of liquor required here is 23 + 11.25 = 34.25 litres.
Last edited by Mr. Dripping on Fri Jul 25, 2014 6:37 pm, edited 1 time in total.
-
Mr. Dripping
Re: 'Walk Through' For AG First Timers
So, now it is time to get set up.
Here you will see my HLT and mash tun arrangement, with the tun set below the HLT to allow me to transfer liquid by gravity.
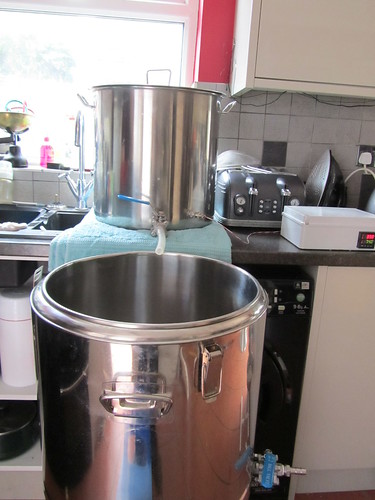 IMG_1929 by markpotts72, on Flickr
Fill the HLT with at least the volume of liquor we worked out – in our case this was 34.25 litres.
If your HLT is not marked with a scale; now is the time to put one on. Stainless pots are usually fitted with a sight glass for this purpose; if you are using a plastic bucket with a kettle element, you can simply mark the measurements on the side using a permanent marker.
I have marked mine in 2 litre graduations. So using a jug, take 2 litres at a time and pour this in to the HLT while marking each addition on the side of the bucket or on the sight glass. This is quite tedious, but you only need do it once.
Take a Campden tablet, crush it and add it to your liquor. This will neutralize any chlorines or chloramines present in your water. Chlorines will taint your brew with an unpleasant medicinal taste.
Now turn on the element to heat the liquor to what is known as ‘strike temperature’.
Again to keep things simple we will assume that the strike temperature is mash temperature + 8 degrees Celcius.
We will aim to mash this batch at 66 degrees C, so we are looking for a strike temperature of 74 degrees.
The liquor temperature will drop as you move it from the HLT to the tun and will drop again when it hits the cooler grains and tun walls. Providing your mash temperature falls within the range of 64-68 degrees Celcius, the mash will work well.
Further reading – how to calculate an accurate strike temperature.
Effect of different mash temperatures.
Some fancy HLT’s have built in thermostats, but don’t rely on those entirely. It is not hard to stick a thermometer in there just to check. If you don’t have a temperature sensor on the HLT, keep sticking the thermometer in there periodically to check on things. Also, give the thing a good stir from time to time to make sure you have an even temperature throughout.
While the liquor is heating up, fill the kettle and put it on to boil. Have a cuppa and use the rest of the kettle to pre-heat the mash tun.
Take the lid off the tun, make sure your grain manifold / false bottom is in place and the outlet tap is closed. Put the hot water in the tun and put the lid back on. Enjoy the cuppa while you’re waiting.
Here you will see my HLT and mash tun arrangement, with the tun set below the HLT to allow me to transfer liquid by gravity.
IMG_1929 by markpotts72, on FlickrFill the HLT with at least the volume of liquor we worked out – in our case this was 34.25 litres.
If your HLT is not marked with a scale; now is the time to put one on. Stainless pots are usually fitted with a sight glass for this purpose; if you are using a plastic bucket with a kettle element, you can simply mark the measurements on the side using a permanent marker.
I have marked mine in 2 litre graduations. So using a jug, take 2 litres at a time and pour this in to the HLT while marking each addition on the side of the bucket or on the sight glass. This is quite tedious, but you only need do it once.
Take a Campden tablet, crush it and add it to your liquor. This will neutralize any chlorines or chloramines present in your water. Chlorines will taint your brew with an unpleasant medicinal taste.
Now turn on the element to heat the liquor to what is known as ‘strike temperature’.
Again to keep things simple we will assume that the strike temperature is mash temperature + 8 degrees Celcius.
We will aim to mash this batch at 66 degrees C, so we are looking for a strike temperature of 74 degrees.
The liquor temperature will drop as you move it from the HLT to the tun and will drop again when it hits the cooler grains and tun walls. Providing your mash temperature falls within the range of 64-68 degrees Celcius, the mash will work well.
Further reading – how to calculate an accurate strike temperature.
Effect of different mash temperatures.
Some fancy HLT’s have built in thermostats, but don’t rely on those entirely. It is not hard to stick a thermometer in there just to check. If you don’t have a temperature sensor on the HLT, keep sticking the thermometer in there periodically to check on things. Also, give the thing a good stir from time to time to make sure you have an even temperature throughout.
While the liquor is heating up, fill the kettle and put it on to boil. Have a cuppa and use the rest of the kettle to pre-heat the mash tun.
Take the lid off the tun, make sure your grain manifold / false bottom is in place and the outlet tap is closed. Put the hot water in the tun and put the lid back on. Enjoy the cuppa while you’re waiting.
Last edited by Mr. Dripping on Fri Jul 25, 2014 6:54 pm, edited 2 times in total.
-
Mr. Dripping
Re: 'Walk Through' For AG First Timers
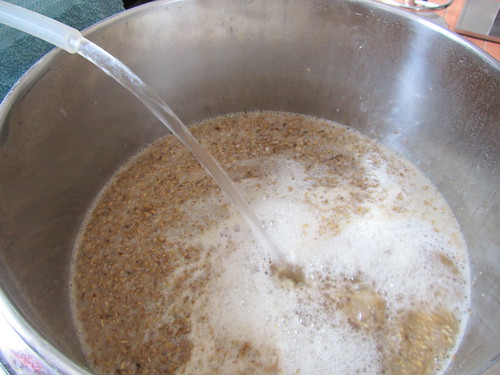
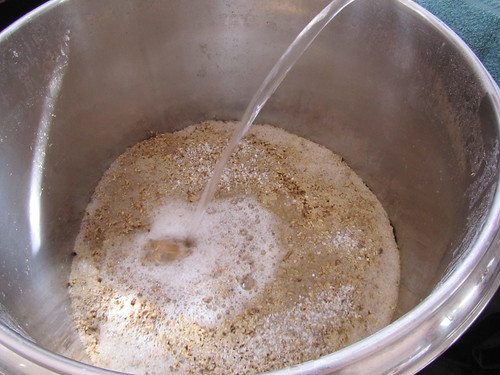
Doughing In.
This is brewing terminology for mixing the grains with the hot liquor.
The liquor has reached the required temperature of 76 degrees, so drain the mash tun of the pre-heat water and again close the tap on the tun.
The standard liquor to grain ratio used when making English style ales is 2.5:1. So for every kilo of grain used, we need to add 2.5 litres of water.
Our grain bill is 3.750kg, so we will be using around 9.4 litres of liquor for the mash.
Open the HLT tap and allow 8 litres of liquor to run in to the tun. Hold off on adding the full amount as we can use the 1.4 litres to adjust the mash temp if needed.
Now slowly add the grains to the tun while stirring thoroughly to produce a nice, evenly mixed mash. Make sure that any dough balls are broken up so that all of the grain gets thoroughly wet.
 IMG_1934 by markpotts72, on Flickr
 IMG_1935 by markpotts72, on Flickr
Once you have doughed in, take the temperature of the mash; remember we are aiming for a mash temperature of 66 degrees.
We still have a little hot liquor left to add, so ordinarily the temperature will be a degree or two lower than target. If this is so; then add the remaining 1.4 litres of hot liquor to the mash and give it a good stir. Take the temperature again and with a bit of luck we will have hit the 66 degrees.
If the temperature is a little high after adding all the grains, you can use cold water to make up the liquor volume and bring the temperature down a degree or two.
Put the lid on the mash tun and make a note of the time. The mash will take 90 minutes, during which time the enzymes in the malt get to work on the starches and convert those in to soluble sugars for us to extract and ferment.
Don’t worry too much about hitting 66 on the nose, but do make a note of your temperatures as your records will help you adjust things next time round if you need to.
 IMG_1936 by markpotts72, on Flickr
So we’ve 90 minutes to kill. I usually brew 40-45 litres per batch and my HLT is a little smaller than it should be really, so while the mash gets on with its thing I top up my HLT with more liquor, generally clean something, grab a bacon buttie, take the dog out for a scoot on the field……….
Of course, you can do whatever you fancy; I’m just making the point that you’ve 90 minutes to wait, and being stood there watching the tun won’t make it pass any quicker.
Sparging.
The mashing process dissolves the sugars from the grain in to the liquor. The resulting sugar solution is what brewers refer to as wort.
Sparging is a technique used to extract the wort from the mash tun while leaving the grains behind.
The process I will describe below is known as batch sparging. The other sparging method commonly used is known as fly or continuous sparging and requires a little more equipment. Batch sparging is simple and will perform perfectly well for the homebrewer.
We need to get our calculator out again to work out how much liquor to add to the tun and how much wort to draw off.
I find it easier to work backwards from the final volume of beer we want to make. We need 23 litres final volume, to this we need to add the wort lost to hop additions and the amount lost to boil off and the amount lost to boiler dead space.
So, 23 litres of beer needed + 1 litre dead space in boiler + 1 litre lost to hops and 3.5 litres lost to evaporation during the boil = 28.5 litres of wort required for the boil. For ease and the purposes of this article, we will round that to 29 litres.
As the name suggests, we will look to collect this in 2 batches of 14.5 litres.
We also need to take account of the tun dead space of 1 litre.
Of the 9.4 litres of liquor originally added to the tun, the grain will absorb 3.75 litres and we have the 1 litre dead space giving a total of 4.75 litres of wort lost in the mash tun.
This means there is 4.65 litres of wort available to drain off.
We need 14.5 litres per batch, so we need to add 9.85 litres of hot liquor for the first batch and then 14.5 litres of liquor for the second batch.
That’s the maths done for now.
The liquor for sparging needs to be slightly hotter than the liquor used for mashing, so if your HLT has a thermostat, turn it up to 80 degrees C. If you don’t have a thermostat, switch the element back on and use a thermometer to check the temperature.
Without getting technical, I feel it is important to mention that the temperature in the grain bed should not rise above 74 degrees Celcius. Temperatures above this encourage the extraction of tannins from the grain, and these will make your beer taste of stewed tea.
Further reading – do I need to perform a mashout?? Fly sparging.
The sparge should take around 40-50 minutes.
So, once the liquor has reached 80 degrees, open the tap and run 9.85 litres of liquor to the tun….I would likely round this up to 10 litres.
Give the mash a good stir and leave it to settle for around 10 minutes. You can check the temperature too and make sure you are not above 74 degrees C.
While you’re waiting, cover the top of the mash with tin foil and pierce some holes through the top. How many will depend on the size of your tun, but you want to have them covering as much of the area as possible so that liquid can run through them easily and evenly.
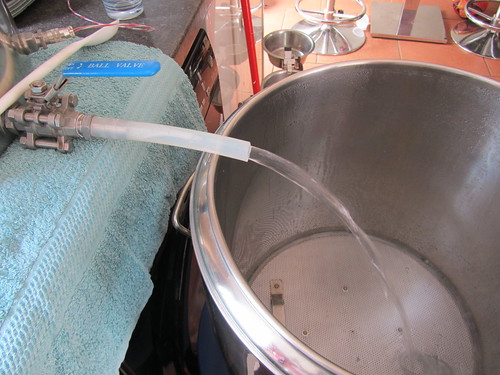
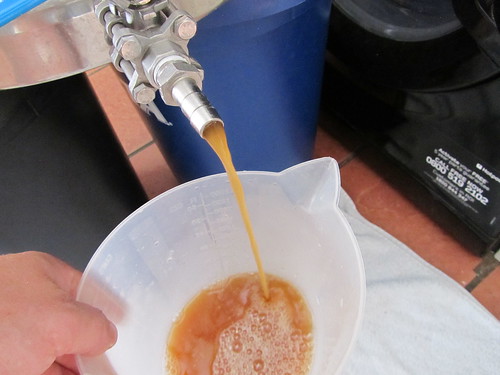
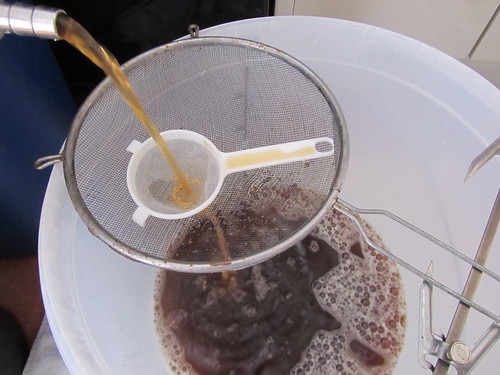
Now grab a couple of jugs and a fermenting bucket………open the tap on your mash tun slowly until the wort starts to trickle out and catch this in your jug. These first runnings will be very cloudy and will contain lots of lipid material and grain particles. This needs to be returned to the tun by pouring it gently over the tin foil we placed on top of the mash. Swap to an empty jug so you don’t have to keep opening and closing the tap.
After returning two or three jugs of wort it will start to run noticeably clearer and it will not contain little pieces of grain anymore. At this point I would open the tap a little more to increase the flow and recirculate another jug or two of wort. It again should clarify a little more and you can now stop recirculating and allow the wort to flow in to a fermenting bucket.
Collect the 14.5 litres of wort required from the first batch and close the tun tap. If you have a separate boiler you can put the wort in to it and start to bring it up to the boil while you collect your second sparge.
For the second sparge you need to add a further 14.5 litres to the tun. Stir well and leave to settle again for 10 minutes before recirculating in the way described above and then collecting your second sparge volume of 14.5 litres to be put in to the boiler. This second sparge will produce a wort that is much lighter in colour. Don’t worry, this is normal.
 IMG_1940 by markpotts72, on Flickr
 IMG_1943 by markpotts72, on Flickr
 IMG_1944 by markpotts72, on Flickr
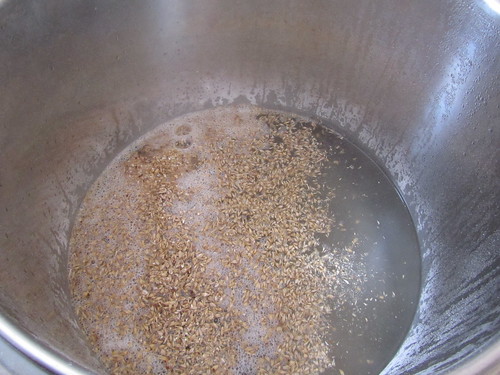
Here is a picture of the first runnings and another after a few litres of wort have been run off showing how it clarifies.
 IMG_1942 by markpotts72, on Flickr
 IMG_1946 by markpotts72, on Flickr
Here I am running the wort in to the collection vessel after recirculation. Note the inline Yorkshire filter

 IMG_1947 by markpotts72, on Flickr
The sparging process uses the grain husks to act as a filter bed, which clarifies the wort and separates it from solids in the mash.
If you open the tun tap too far, too quickly the wort will run out accordingly fast and you can in some cases compact the mash and have a stuck sparge. If this happens, add in a little more liquor, stir well and repeat the recirculation process then proceed to drain the tun at a slower rate. There is also another problem with sparging too quickly in that you may leave sugar behind in the grain and therefore not hit your target gravity. This is more of an issue when fly sparging. A flow rate of around 1 litre per minute from the tun is often quoted.
Pictures here show topping up of the mash tun and the lighter coloured second runnings.
 IMG_1948 by markpotts72, on Flickr
 IMG_1949 by markpotts72, on Flickr
This is brewing terminology for mixing the grains with the hot liquor.
The liquor has reached the required temperature of 76 degrees, so drain the mash tun of the pre-heat water and again close the tap on the tun.
The standard liquor to grain ratio used when making English style ales is 2.5:1. So for every kilo of grain used, we need to add 2.5 litres of water.
Our grain bill is 3.750kg, so we will be using around 9.4 litres of liquor for the mash.
Open the HLT tap and allow 8 litres of liquor to run in to the tun. Hold off on adding the full amount as we can use the 1.4 litres to adjust the mash temp if needed.
Now slowly add the grains to the tun while stirring thoroughly to produce a nice, evenly mixed mash. Make sure that any dough balls are broken up so that all of the grain gets thoroughly wet.
IMG_1934 by markpotts72, on FlickrIMG_1935 by markpotts72, on FlickrOnce you have doughed in, take the temperature of the mash; remember we are aiming for a mash temperature of 66 degrees.
We still have a little hot liquor left to add, so ordinarily the temperature will be a degree or two lower than target. If this is so; then add the remaining 1.4 litres of hot liquor to the mash and give it a good stir. Take the temperature again and with a bit of luck we will have hit the 66 degrees.
If the temperature is a little high after adding all the grains, you can use cold water to make up the liquor volume and bring the temperature down a degree or two.
Put the lid on the mash tun and make a note of the time. The mash will take 90 minutes, during which time the enzymes in the malt get to work on the starches and convert those in to soluble sugars for us to extract and ferment.
Don’t worry too much about hitting 66 on the nose, but do make a note of your temperatures as your records will help you adjust things next time round if you need to.
IMG_1936 by markpotts72, on FlickrSo we’ve 90 minutes to kill. I usually brew 40-45 litres per batch and my HLT is a little smaller than it should be really, so while the mash gets on with its thing I top up my HLT with more liquor, generally clean something, grab a bacon buttie, take the dog out for a scoot on the field……….
Of course, you can do whatever you fancy; I’m just making the point that you’ve 90 minutes to wait, and being stood there watching the tun won’t make it pass any quicker.
Sparging.
The mashing process dissolves the sugars from the grain in to the liquor. The resulting sugar solution is what brewers refer to as wort.
Sparging is a technique used to extract the wort from the mash tun while leaving the grains behind.
The process I will describe below is known as batch sparging. The other sparging method commonly used is known as fly or continuous sparging and requires a little more equipment. Batch sparging is simple and will perform perfectly well for the homebrewer.
We need to get our calculator out again to work out how much liquor to add to the tun and how much wort to draw off.
I find it easier to work backwards from the final volume of beer we want to make. We need 23 litres final volume, to this we need to add the wort lost to hop additions and the amount lost to boil off and the amount lost to boiler dead space.
So, 23 litres of beer needed + 1 litre dead space in boiler + 1 litre lost to hops and 3.5 litres lost to evaporation during the boil = 28.5 litres of wort required for the boil. For ease and the purposes of this article, we will round that to 29 litres.
As the name suggests, we will look to collect this in 2 batches of 14.5 litres.
We also need to take account of the tun dead space of 1 litre.
Of the 9.4 litres of liquor originally added to the tun, the grain will absorb 3.75 litres and we have the 1 litre dead space giving a total of 4.75 litres of wort lost in the mash tun.
This means there is 4.65 litres of wort available to drain off.
We need 14.5 litres per batch, so we need to add 9.85 litres of hot liquor for the first batch and then 14.5 litres of liquor for the second batch.
That’s the maths done for now.
The liquor for sparging needs to be slightly hotter than the liquor used for mashing, so if your HLT has a thermostat, turn it up to 80 degrees C. If you don’t have a thermostat, switch the element back on and use a thermometer to check the temperature.
Without getting technical, I feel it is important to mention that the temperature in the grain bed should not rise above 74 degrees Celcius. Temperatures above this encourage the extraction of tannins from the grain, and these will make your beer taste of stewed tea.
Further reading – do I need to perform a mashout?? Fly sparging.
The sparge should take around 40-50 minutes.
So, once the liquor has reached 80 degrees, open the tap and run 9.85 litres of liquor to the tun….I would likely round this up to 10 litres.
Give the mash a good stir and leave it to settle for around 10 minutes. You can check the temperature too and make sure you are not above 74 degrees C.
While you’re waiting, cover the top of the mash with tin foil and pierce some holes through the top. How many will depend on the size of your tun, but you want to have them covering as much of the area as possible so that liquid can run through them easily and evenly.
Now grab a couple of jugs and a fermenting bucket………open the tap on your mash tun slowly until the wort starts to trickle out and catch this in your jug. These first runnings will be very cloudy and will contain lots of lipid material and grain particles. This needs to be returned to the tun by pouring it gently over the tin foil we placed on top of the mash. Swap to an empty jug so you don’t have to keep opening and closing the tap.
After returning two or three jugs of wort it will start to run noticeably clearer and it will not contain little pieces of grain anymore. At this point I would open the tap a little more to increase the flow and recirculate another jug or two of wort. It again should clarify a little more and you can now stop recirculating and allow the wort to flow in to a fermenting bucket.
Collect the 14.5 litres of wort required from the first batch and close the tun tap. If you have a separate boiler you can put the wort in to it and start to bring it up to the boil while you collect your second sparge.
For the second sparge you need to add a further 14.5 litres to the tun. Stir well and leave to settle again for 10 minutes before recirculating in the way described above and then collecting your second sparge volume of 14.5 litres to be put in to the boiler. This second sparge will produce a wort that is much lighter in colour. Don’t worry, this is normal.
IMG_1940 by markpotts72, on FlickrIMG_1943 by markpotts72, on FlickrIMG_1944 by markpotts72, on FlickrHere is a picture of the first runnings and another after a few litres of wort have been run off showing how it clarifies.
IMG_1942 by markpotts72, on FlickrIMG_1946 by markpotts72, on FlickrHere I am running the wort in to the collection vessel after recirculation. Note the inline Yorkshire filter
IMG_1947 by markpotts72, on FlickrThe sparging process uses the grain husks to act as a filter bed, which clarifies the wort and separates it from solids in the mash.
If you open the tun tap too far, too quickly the wort will run out accordingly fast and you can in some cases compact the mash and have a stuck sparge. If this happens, add in a little more liquor, stir well and repeat the recirculation process then proceed to drain the tun at a slower rate. There is also another problem with sparging too quickly in that you may leave sugar behind in the grain and therefore not hit your target gravity. This is more of an issue when fly sparging. A flow rate of around 1 litre per minute from the tun is often quoted.
Pictures here show topping up of the mash tun and the lighter coloured second runnings.
IMG_1948 by markpotts72, on FlickrIMG_1949 by markpotts72, on Flickr
Last edited by Mr. Dripping on Fri Jul 25, 2014 7:08 pm, edited 2 times in total.
-
Mr. Dripping
Re: 'Walk Through' For AG First Timers
The Boil.
So, hopefully we now have 29 litres of wort that is approaching boiling point. Now is a good time to go and weigh out your first charge of hops.
The boil will take 90 minutes; some people boil only for 60 minutes and some recipes call for a longer boil. I have read that a longer boil time gives a more stable end product.
I start the clock once a nice rolling boil has started. A simmer is not really good enough, but you don’t want the wort leaping out over the side of the boiler.
 IMG_1950 by markpotts72, on Flickr
 IMG_1952 by markpotts72, on Flickr
 IMG_1953 by markpotts72, on Flickr
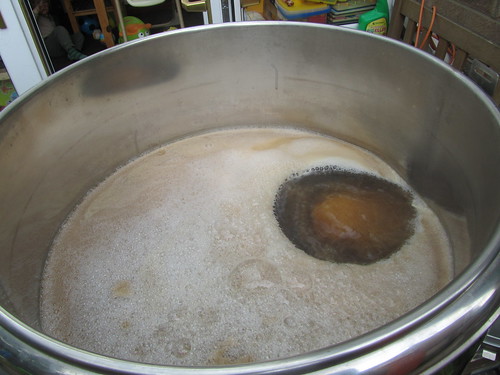
Once the wort has begun to boil add the 20g of challenger hops and the 30g of fuggle hops.
After 75 minutes of boiling (15 minutes remaining), add the 10g of fuggle hops.
Boiling the hops in the wort adds bitterness to the beer. The longer you boil the hops for, the more bitterness is extracted. Hops added late in the boil are used to give the beer a hoppy flavour and aroma.
If you are using an immersion chiller, then now is the time to place that carefully in to the boiler as well. Heating the chiller for the last 15 minutes of the boil process will sanitize the copper coil. (I will cover wort chilling in a bit more detail shortly).
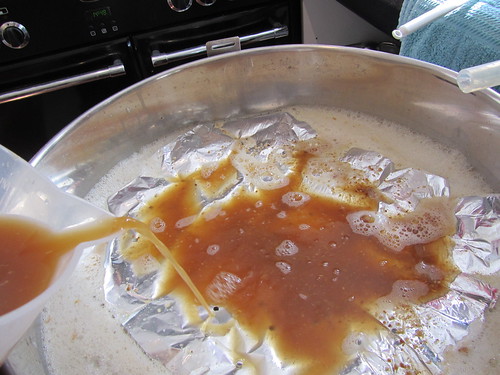
With 10 minutes remaining of the boil add your kettle finings, I use a product called Protofloc. There are others available; the most common being Whirlfloc and Irish moss. These products help to produce a nice clear wort.
Please check the instructions of the product you are using to make sure you use the correct dose for the amount of beer you are making and are adding it for the correct amount of boil time. I would use ¼ of a protofloc tablet for a 5 gallon batch.
When you hit the 90 minute mark, switch off the boiler and if you are using an immersion chiller, this can now be switched on to start cooling the hopped wort.
Cooling The Wort.
There are a few ways that brewers use to cool their wort. Which method you chose will depend on your system and the money (or lack of) you have to tackle the issue.
Most brewers, myself included, start with an immersion chiller. Basically a wound length of copper tubing that connects to domestic cold water supply. This is placed inside the boiler and water runs through it to cool the wort in situ. Make sure your water in/out connections are not dripping water in to the boiler.
Many brewers use a plate heat exchanger. These are good for larger volumes, but do bring their own issues in terms of sanitization.
You can also use a no chill cube. In this method, the hot wort is placed in to a large food safe container that can be sealed. It is then simply left at ambient temperature or in a water bath to cool down.
There are also counterflow (CF) chillers that can be employed.
There is plenty of information here on Jim’s that covers the pros and cons of each particular method.
While the wort is cooling, sanitize your fermenting bucket. We are now on the ‘cold side’ that I mentioned near the start of the article, so it is important that anything that now comes in to contact with the wort is sanitary.
It’s also handy to have a sanitized spoon and thermometer available.
Fermentation takes place generally at temperatures between 18 and 22 degrees C.
If you are using an immersion chiller, keep checking the wort temperature and switch off the chiller once you get to around 25 degrees (the wort will cool further still during transfer from boiler to fermenter).
If you are using a plate or couterflow chiller, the wort runs from the boiler, through the chilling apparatus and then falls in to the fermenting bucket. You can check the temperature of the wort that is falling in to the fermenter and adjust the flow rates if needed.
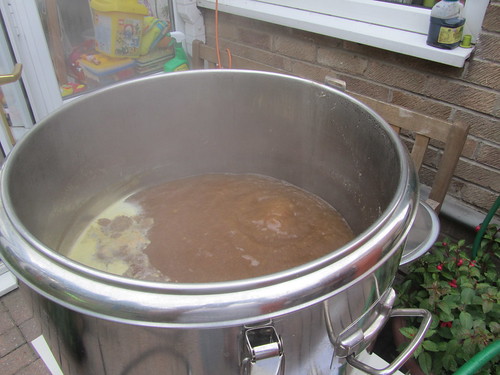
 IMG_1954 by markpotts72, on Flickr
 IMG_1956 by markpotts72, on Flickr
 IMG_1957 by markpotts72, on Flickr
So, if you were using a plate or CF chiller, you now should have a fermenter that contains 23 litres of unfermented, hopped wort at your feet.
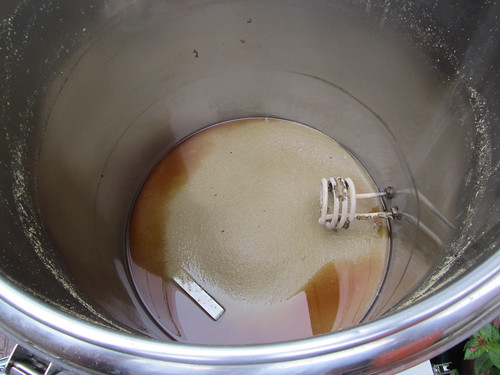
If you are using an immersion chiller, your boiler will be full of hopped wort and you should now open the boiler tap and let it run in to the fermenting bucket.
Employ the same recirculation technique that I described for sparging by gently jugging back the first 3-4 litres of wort. Remember, the jug used must be sanitized.
This time the hops will act as a filter bed and when the wort has drained you will be able to see quite a lot of crud (known as trub) in the bottom; again this is quite normal.
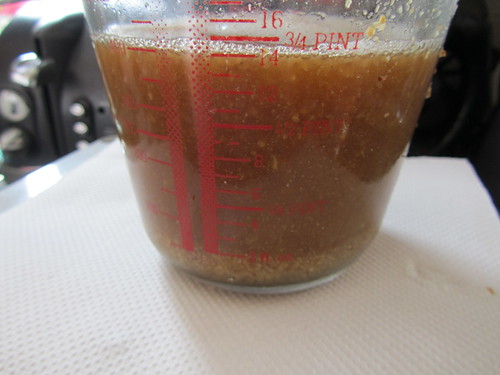
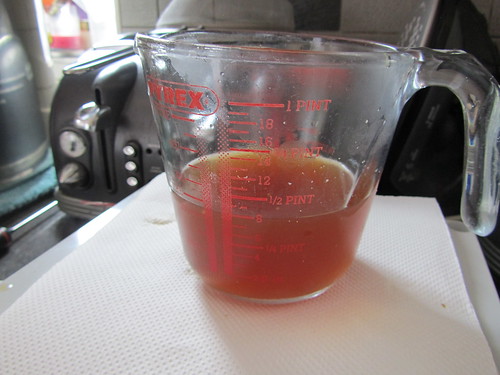
When you are draining the boiler, keep aside a small amount of wort (I need 200ml) for your trial jar so you can measure the original gravity of the wort with your hydrometer.
Do not return this to the main batch of wort unless your trial jar and hydrometer were sanitized.
Personally, I don’t bother sanitizing and dispose of it once I’ve had a small taste of the hopped wort.
This is useful in my opinion as it trains and develops your taste buds; be warned though, it doesn’t taste of beer…..more like a very bitter cup of cold Horlicks.
Almost there!!
Check the temperature of the wort, ideally it should be at 20 degrees Celcius.
Now we need to aerate the wort before adding the yeast. To do this, take a sanitized, long-handled spoon (or a mash paddle) and stir the wort vigorously creating a splashing motion. This will add oxygen to the wort which is important in terms of getting the yeast off to a healthy start and getting the beer to ferment out properly.
Pitch the yeast according to the instructions on the packet and then place your fermenter in your fermenting fridge/cupboard/space.
It is preferable to keep the fermenter at a constant temperature. There are several methods employed by homebrewers to do this, the most popular being a temperature controlled domestic fridge.
It is best practice to re-hydrate dried yeast.
There are several articles on temperature control and yeast rehydration.
There, that’s it……..you made it through. Now the fun bit……..clean up!!!
So, hopefully we now have 29 litres of wort that is approaching boiling point. Now is a good time to go and weigh out your first charge of hops.
The boil will take 90 minutes; some people boil only for 60 minutes and some recipes call for a longer boil. I have read that a longer boil time gives a more stable end product.
I start the clock once a nice rolling boil has started. A simmer is not really good enough, but you don’t want the wort leaping out over the side of the boiler.
IMG_1950 by markpotts72, on FlickrIMG_1952 by markpotts72, on FlickrIMG_1953 by markpotts72, on FlickrOnce the wort has begun to boil add the 20g of challenger hops and the 30g of fuggle hops.
After 75 minutes of boiling (15 minutes remaining), add the 10g of fuggle hops.
Boiling the hops in the wort adds bitterness to the beer. The longer you boil the hops for, the more bitterness is extracted. Hops added late in the boil are used to give the beer a hoppy flavour and aroma.
If you are using an immersion chiller, then now is the time to place that carefully in to the boiler as well. Heating the chiller for the last 15 minutes of the boil process will sanitize the copper coil. (I will cover wort chilling in a bit more detail shortly).
With 10 minutes remaining of the boil add your kettle finings, I use a product called Protofloc. There are others available; the most common being Whirlfloc and Irish moss. These products help to produce a nice clear wort.
Please check the instructions of the product you are using to make sure you use the correct dose for the amount of beer you are making and are adding it for the correct amount of boil time. I would use ¼ of a protofloc tablet for a 5 gallon batch.
When you hit the 90 minute mark, switch off the boiler and if you are using an immersion chiller, this can now be switched on to start cooling the hopped wort.
Cooling The Wort.
There are a few ways that brewers use to cool their wort. Which method you chose will depend on your system and the money (or lack of) you have to tackle the issue.
Most brewers, myself included, start with an immersion chiller. Basically a wound length of copper tubing that connects to domestic cold water supply. This is placed inside the boiler and water runs through it to cool the wort in situ. Make sure your water in/out connections are not dripping water in to the boiler.
Many brewers use a plate heat exchanger. These are good for larger volumes, but do bring their own issues in terms of sanitization.
You can also use a no chill cube. In this method, the hot wort is placed in to a large food safe container that can be sealed. It is then simply left at ambient temperature or in a water bath to cool down.
There are also counterflow (CF) chillers that can be employed.
There is plenty of information here on Jim’s that covers the pros and cons of each particular method.
While the wort is cooling, sanitize your fermenting bucket. We are now on the ‘cold side’ that I mentioned near the start of the article, so it is important that anything that now comes in to contact with the wort is sanitary.
It’s also handy to have a sanitized spoon and thermometer available.
Fermentation takes place generally at temperatures between 18 and 22 degrees C.
If you are using an immersion chiller, keep checking the wort temperature and switch off the chiller once you get to around 25 degrees (the wort will cool further still during transfer from boiler to fermenter).
If you are using a plate or couterflow chiller, the wort runs from the boiler, through the chilling apparatus and then falls in to the fermenting bucket. You can check the temperature of the wort that is falling in to the fermenter and adjust the flow rates if needed.
IMG_1954 by markpotts72, on FlickrIMG_1956 by markpotts72, on FlickrIMG_1957 by markpotts72, on FlickrSo, if you were using a plate or CF chiller, you now should have a fermenter that contains 23 litres of unfermented, hopped wort at your feet.
If you are using an immersion chiller, your boiler will be full of hopped wort and you should now open the boiler tap and let it run in to the fermenting bucket.
Employ the same recirculation technique that I described for sparging by gently jugging back the first 3-4 litres of wort. Remember, the jug used must be sanitized.
This time the hops will act as a filter bed and when the wort has drained you will be able to see quite a lot of crud (known as trub) in the bottom; again this is quite normal.
When you are draining the boiler, keep aside a small amount of wort (I need 200ml) for your trial jar so you can measure the original gravity of the wort with your hydrometer.
Do not return this to the main batch of wort unless your trial jar and hydrometer were sanitized.
Personally, I don’t bother sanitizing and dispose of it once I’ve had a small taste of the hopped wort.
This is useful in my opinion as it trains and develops your taste buds; be warned though, it doesn’t taste of beer…..more like a very bitter cup of cold Horlicks.
Almost there!!
Check the temperature of the wort, ideally it should be at 20 degrees Celcius.
Now we need to aerate the wort before adding the yeast. To do this, take a sanitized, long-handled spoon (or a mash paddle) and stir the wort vigorously creating a splashing motion. This will add oxygen to the wort which is important in terms of getting the yeast off to a healthy start and getting the beer to ferment out properly.
Pitch the yeast according to the instructions on the packet and then place your fermenter in your fermenting fridge/cupboard/space.
It is preferable to keep the fermenter at a constant temperature. There are several methods employed by homebrewers to do this, the most popular being a temperature controlled domestic fridge.
It is best practice to re-hydrate dried yeast.
There are several articles on temperature control and yeast rehydration.
There, that’s it……..you made it through. Now the fun bit……..clean up!!!
Last edited by Mr. Dripping on Fri Jul 25, 2014 7:14 pm, edited 3 times in total.