How to Make a Mash Tun

The forum for discussing all kinds of brewing paraphernalia.
Post Reply
Bigster

Post by Bigster » Wed Apr 19, 2006 9:26 pm

Well here is my mash tun which proves 2 things:

I can resize pictures ok ;)
I can follow instructions ... thanks andy


Image


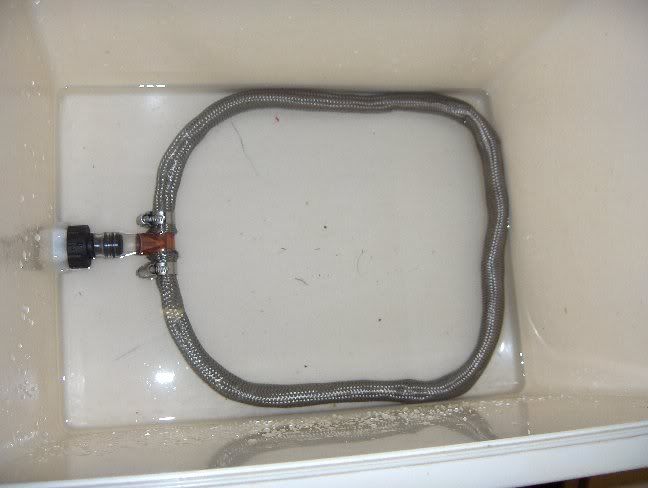
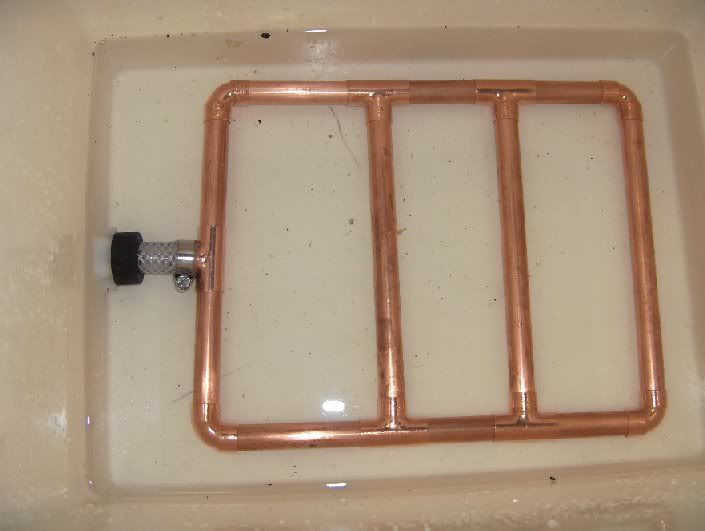
The only concern in making it was tightening the retaining nut on the drum tap.
I thought I had tightened it as much as possible each time but each time it leaked for england.
Eventually it was sorted but that nut is on tighter than a g-string on one of those roly poly ladies :o (Russ Abott show?).

Anyway I digress as usual. There are a few questions(what a surprise):

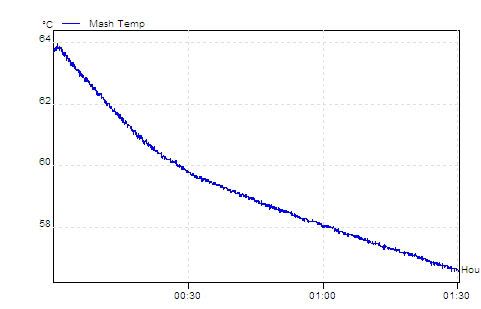
1. After many trial runs with just water have got it down to just 1 pint
left - is that good enough, does it matter?

2. Having read elsewhere on this thread have a slight concern about getting a stuck run off. I am going to give it a good stir before running it off and make sure that the grain bed is always covered with water. Any other tips?


Cheers

User avatar
Andy
Virtually comatose but still standing
Posts: 8716
Joined: Fri Nov 18, 2005 1:00 pm
Location: Ash, Surrey
Contact:

Post by Andy » Wed Apr 19, 2006 9:44 pm

Bigster - looking good!

Regarding the leaking tap (which you seem to have sorted), ensure that the tap itself is screwed in flush with the outside of the inner wall. If the hole is a tight fit then you might have initially been tightening up the nut but the actual flange bit of the tap might not have been seated flush against the outside of the wall. Hope that makes sense! Happened to me when fitting a tap to a fermenting bin, just had to screw the tap in first until it was flush with the outer wall and then do the locknut up.

A pint of liquid left in the tun is good going!

One thing I would comment on is that your braid is sitting against the tun walls in a few places, it's better to leave a gap of an inch or two from the tun walls to discourage liquor being drawn down the sides of the tun rather than filtering through the grains. With my braid I've just bent some curves into it to keep it away from the walls.

http://homepage.ntlworld.com/andy.whit/ ... G_2033.jpg

On the stuck mash front, just suck it and see initially! If you get a stuck mash then try blowing back into the tap first and if that doesn't work then go for the restir and recirculate approach.

Bigster

Post by Bigster » Wed Apr 19, 2006 9:55 pm

Thanks Andy - will try and get a bit of bendiness in there.

Another point if anyone else is going for this design my braid got a bit flattened at one point. When I pushed it together ( length wise not width wise ) the tube obviously shortened and fitted better in the tun and in my view worked better.

Cheers

Bigster

Post by Bigster » Thu Apr 20, 2006 11:56 am

[Make sure you get a good seal between the clear pipe and the copper tee otherwise you'll get all the wort draining through the manifold at that point alone.]

Good point DAAb - will have a think on. May and try and get a snug fitting extra bit of tubing over the tube in the tee end although this may be easier said than done....

andy - have you made any mods to that bit? :(

Cheers

James

Post by James » Thu Apr 20, 2006 12:10 pm

Bigster,

That is some sound advise from Andy, get the manifold a little bit more central in the bottom of the tun (I assume you are fly sparging). I really like stainless braid, it’s so easy to build with. I’d defiantly loose the tap connector though. Although it is used for (cold) water, the highly acid medium of wort is another matter; it might leach something. I always try and use food grade materials wherever I can, I don’t like risking it.

Daab’s idea would not only solve this but also help to get the braid a little bit more central in the tun, as it would loose the extra ‘length’ of the tap connector. Tube straight into the back of the tap is how mine is built, simple is great. Hope that helps. Good luck!

JC

User avatar
Andy
Virtually comatose but still standing
Posts: 8716
Joined: Fri Nov 18, 2005 1:00 pm
Location: Ash, Surrey
Contact:

Post by Andy » Thu Apr 20, 2006 1:23 pm

QUOTE (Bigster @ Apr 20 2006, 12:56 PM) andy - have you made any mods to that bit? :(

Mine is exactly the same as yours in that area bigster, no probs encountered so far...

User avatar
johnmac
Under the Table
Posts: 1357
Joined: Fri Jan 27, 2006 6:00 pm
Location: Shropshire

Post by johnmac » Wed May 03, 2006 3:30 pm

My Wilkinsons mash tun:


Image


Don't ask me why the manifold is off center - IT JUST IS!!! Connection to the Drum Tap is with a bath tap connector.


Extra insulation in the lid; the sort that you put on the wall behind the radiators:


Image

I put about a gallon of water in at 67c. 75minutes later, it was at 59c. Will that be OK?

Image

I think I'd prefer some sort of perforated staniless steel false botton, if I could get hold of stainless grill or gauze.

User avatar
johnmac
Under the Table
Posts: 1357
Joined: Fri Jan 27, 2006 6:00 pm
Location: Shropshire

Post by johnmac » Wed May 03, 2006 6:02 pm

QUOTE Can you shorten the center pieces at all to get the long edges away from the sides a shade, it will reduce the chance of the sparge water channeling down the sides of the MT. (You could just try it out first though, if you get good efficiency from the grain dont worry about it).

It's partly soldered together, so I'll have to suck it and see! (At least I used lead free solder, which incidentally, is under a fiver in Wilkinson’s.)

The flexibility of the bath tap connector when not fully tightened is such that the manifold does lay flat in the bottom of the cooler.

Regarding sparging, will a large plastic jug with lots of holes drilled in the bottom do the trick?

fizzypop boy

Post by fizzypop boy » Wed May 03, 2006 7:18 pm

ANYBODY THOUGHT OF USING PLASTIC PUSH FIT PIPEWORK?.OBVIOUSLY WILL TAKE THE HEAT A S ITS USED IN CENTRAL HEATING,NO DANGER OF FALLING APART IF YOU CATCH IT WITH PADDLE,AND EASY TO BREAK APART FOR CLEANING.

James

Post by James » Wed May 03, 2006 7:41 pm

QUOTE (johnmac @ May 3 2006, 06:02 PM)Regarding sparging, will a large plastic jug with lots of holes drilled in the bottom do the trick?

That'll do the job, no problem.

"ANYBODY THOUGHT OF USING PLASTIC PUSH FIT PIPEWORK?."

Please turn caps off - YOU ARE SHOUTING!

If the pipework is PVC, then it can leech into your wort. Save yourself the bother and make a stainless braid manifold from an old flexible tap connector, simple cheap and real quick (5 mins quick :) )

User avatar
johnmac
Under the Table
Posts: 1357
Joined: Fri Jan 27, 2006 6:00 pm
Location: Shropshire

Post by johnmac » Wed May 03, 2006 8:07 pm

The John Guest white plastic pipe will take boiling water and is food grade. However, when you cut it, you'll see it's made up in a sandwich of layers, including one layer of black rubber stuff. That was never intended to come in contact with drinking water, but when you cut slots in the pipe...

Also, the push fit fittings are very bulky, so there would be a problem getting the manifold to lay flat against the bottom of the tun.

eskimobob

Post by eskimobob » Sat May 13, 2006 8:32 pm

Ok so I bought a coolbox from Wilkinsons a few days ago like johnmac's one and have just converted it - added a tap. Here's the finished thing:

Image

I decided I'd see what the thermal performance was so I put in some water (about half full) at 64C and measured the temp over 90 mins. The temperature drop was quite large at 7C over 90 mins - see graph below:

Image

I therefore decided I ought to try and improve the insulation. Fortunately the coolbox design enabled the inner and outer plastic sections to be dismantled. Sandwiched in between the two layers of plastic was a thin sheet of polystyrene. I therefore firstly covered the inner plastic in a sheet of aluminimum foil then two layers of bubble-wrap. I covered the inside of the outer case with a layer of aluminimum foil and fitted it all back together with the original sheets of polystyrene. I gave the lid the same treatment; it had not previously had any insulation. The lid is shown below during construction:

Image

I repeated my temperature experiment confident that I would have improved matters but was disappointed to only reduce the temp drop by 2C to about 5C over the 90 mins - see graph below:

Image

I'm surprised at the small improvement in performance considering the outside of the coolbox was not noticably warm with the improved model whereas it has been warm to touch originally. I can't therefore see that putting lots of blankets over it will help much although the heat must be going somewhere :o

I notice that Daab says the grain will help to reduce the temp drop so I will have to wait and see tomorrow. I was hoping to get down the the 1C drop in temp that some of you guys report with your home made mash tuns... :blink:

User avatar
Andy
Virtually comatose but still standing
Posts: 8716
Joined: Fri Nov 18, 2005 1:00 pm
Location: Ash, Surrey
Contact:

Post by Andy » Sat May 13, 2006 8:45 pm

Different story when you've got a mash in there, I did the water only experiment when I put mine together and got quite a temperature drop. When mashing however the temp. pretty much remains constant over typical mashing times (90 mins). Must be something to do with the thermal properties of water vs thicker consistency mixtures. Also make sure you pre-heat the tun using boiling water!

User avatar
johnmac
Under the Table
Posts: 1357
Joined: Fri Jan 27, 2006 6:00 pm
Location: Shropshire

Post by johnmac » Sat May 13, 2006 9:03 pm

Just to confirm what andy says - my Wilkinsons mash tun achieved a one degree drop over an hour and a quarter, whilst wrapped in a blanket. I have additional insulation in the lid, but not the sides.

One other thing about the Wilko coolbox; if you pick it up when full of mash, the handle will fall off!

Bigster

Post by Bigster » Fri May 19, 2006 9:12 pm

After the incident with the stainless braid on my first brew I have started on a copper one.
Image

So far so good although some may say should use 22mm not 15mm. Not going to solder joints as a solid fit. The jubilee clip is a stainless one. Originally the 12.5mm id b&Q hose went straight in to the tap connection but it wasnt quite snug enough so I have bodged my hoselock connector so now it is snug as a bug.

2 questions

How far should I cut in to the underside of the pipe . Im guessing half way is a bit much?

Should i leave the tap end cross piece uncut or doesnt it matter ?

:beer

Post Reply