
Digging a trench would be worthwhile - it doesn't really need to be particularly deep. 12-18 inches should do it, you just need it deep enough so it doesn't ice up over winter. Very easy with a proper trenching spade! Then some 15mm blue HDPE? pipe (which is pretty cheap) and a quick T off of your outside tap....likesbeer wrote:Cheers guys, the base of the shed is actually stood on small concrete pillars, there is a concrete base but it was very un-level.
So I built up 250mm x 250mm pads about 100mm high give or take to get them level.
The timbers are treated, clad on both sides with ply to allow for insulation between. As its off the ground and treated timber and well ventilated I dont think rotting will be an issue for at least 50 years.
Building it hasnt actually been that hard if you've got the tools. But thats easy for me to say as I have a friend who is a chippy and I was just lugged stuff about. That said I would be happy now to give it ago on my own.
Cost wise I recon about £700-£800 when finished, but its fully insulated £100 ish, ply top and bottom of floor not cheap stuff. So could be done cheaper as a simple shed. That said if you bought an el cheepo shed they are in the region of £800-£1000 for rubbish and it starts getting to several thousand for log cabin type structures. I saved on windows they were free so was the door, dontated by friends. I reckon by getting some of the timber from a reclaimers yard some further savings could have been made.
pdtnc, plumbing water to the shed now that keeps me up at night. My problem is the shed is 150ft from the house (a very long garden), I have an outside tap. The last thing I really wanted to do was dig a trench and lay a proper pipe and then some how tee into the house supply. Hence the hose pipe idea, however I have also been concerned about the quality of the water that will come out of it. I did think that one of the big inline filter type things would sort any problems is this a bad idea?
Cheap solutions suggestions would be appreciated guys thanks.
New brewery build 3B's
-
adm
Re: New brewery build 3B's
-
likesbeer
Re: New brewery build 3B's
I realise that would be the proper way as such...but..........that would mean either digging the trench in the flower border then negotiating the vegy patch, and certain death from her who must be obeyed for digging up her flowers.
Or shoving it down the middle of the grass a real pain. Did I mention its a 150ft but its not very wide so not easy to negotiate the trees and certainly not easy getting past their roots.
Second I cant issolate the outside tap no idea where it is connected until I did the patio up not on the cards this year, so would need to connect to the tap or alternative T into the house somewhere all a real pain in the a****.
I guess instead of using hosepipe I could still do plan A but use proper water pipe the blue stuff run it on the surface tucked against the fence. to guard against frost I would drain when not in use.
As promised earlier the plan for the brew kit, you commecnts most appreciated as always.
HLT - Narrow neck fermenter with heating element and thermostat so I can set and leave probably a hot water tank element or something similar plus some extra inslulation. I'm using one of these as I have a spare or two.
Mash tun - 30 litre plastice fermenter, insulated with camping matt or similar and a false bottom of stainless mesh which I should hopefully get on the cheap from a local machine shop that I use a lot for work.
Boiler - Burco, kindly donated by befuggled (again many thanks, related post)
Cooling - standard copper cool made from 10mm tube I'll copy a design from someone on this site, probably the type where the water is fed into the middle of the coil
It will all be set up onto a three tier arrangement built from good old wood left over from the shed build.
Picture of this will follow in due course.
Or shoving it down the middle of the grass a real pain. Did I mention its a 150ft
Second I cant issolate the outside tap no idea where it is connected until I did the patio up not on the cards this year, so would need to connect to the tap or alternative T into the house somewhere all a real pain in the a****.
I guess instead of using hosepipe I could still do plan A but use proper water pipe the blue stuff run it on the surface tucked against the fence. to guard against frost I would drain when not in use.
As promised earlier the plan for the brew kit, you commecnts most appreciated as always.
HLT - Narrow neck fermenter with heating element and thermostat so I can set and leave probably a hot water tank element or something similar plus some extra inslulation. I'm using one of these as I have a spare or two.
Mash tun - 30 litre plastice fermenter, insulated with camping matt or similar and a false bottom of stainless mesh which I should hopefully get on the cheap from a local machine shop that I use a lot for work.
Boiler - Burco, kindly donated by befuggled (again many thanks, related post)
Cooling - standard copper cool made from 10mm tube I'll copy a design from someone on this site, probably the type where the water is fed into the middle of the coil
It will all be set up onto a three tier arrangement built from good old wood left over from the shed build.
Picture of this will follow in due course.
Re: New brewery build 3B's
I have a temporary bodge with my water, where the blue plastic pipe runs down to near my garage along the line of the fence, and mostly hidden in the flower bed. The house end has a 3/4" BSP fitting, and I link from the garden tap to the blue tube with a short length of braided silicone hose and a couple of Hozelock/Gardena type fittings, which of course will uncouple for other uses. I'm avoiding using PVC garden hose for mash or sparge liquor, though I do use it when I'm cleaning-up.
When I get proper wiring I'll have to lift the path slabs, and at that point the blue pipe will be connected properly, and get buried.
When I get proper wiring I'll have to lift the path slabs, and at that point the blue pipe will be connected properly, and get buried.
-
likesbeer
Re: New brewery build 3B's
Its about time for an update I think...........
Its been quite a while since a started this also since I've been on the site been really busy and everytime I've thought about doing an update I havent taken the pics so here we go.
Started last Nov it probaby ended up taking best part of 6 months what with snow and scope creep but it was worth it.
I did my first extract brew in here 2 weeks ago and first AG last week and all is going well.
I'll post the brew day seperatly so for the pics,
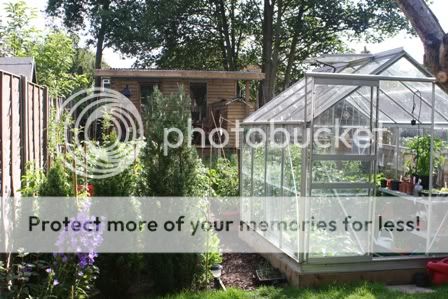
Last time I took a pic from the end of the veggy patch (the one with the insulated green house) it wasnt quite so far away.

A slightly better view with decking and small shed for the lawn mower, she tried putting it in the shed saying that is where it belongs not under the patio table. I've since stopped calling it a shed and its my brewery!
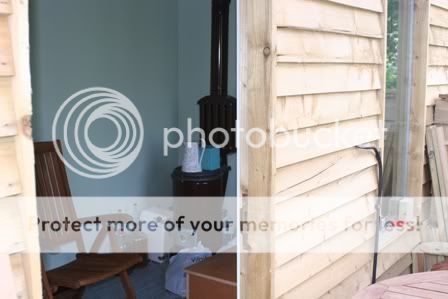
Not easy taking pics without a really wide angle lense but this is one side with wood burning stove (still need to add the flue throught the wall and small chimney, if I can find some cheap flue pipe)
Now for the more important bit,
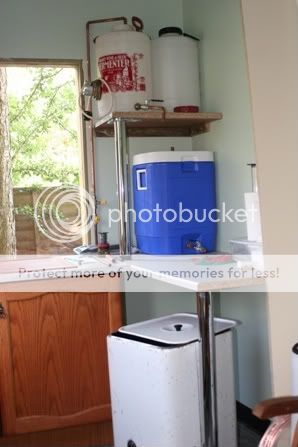
The brew corner a simple three tier set up, once I've made a 300mm step for the boiler to sit on it'll be 4 tier into the fermenter.
HLT, a converted narrow neck fermenter with immersion heater, a coleman cooler for the mash tun and berco boiler, boiler and mash tun have slotted copper manifolds in the bottom.
I've also spent the last few evening building some shelving for the demi johns and ingredients etc so its now even looking tidy.
Finally,
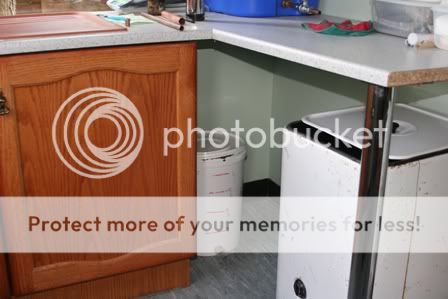
The fermenting corner, this is likely to become extra insluated and possibly cooled/heated in the future.
But for now it seem fine even on the hottest day with me doing my AG brew (daft idea to do it that day I hear you say) it was ~26C for a short period but has generally sat at 24C or below. The bucket has my last extract brew bubbling nicely, well it was actually trying to escape and having a good dribble but I sorted that ;o)
Thats it really any questions fire away but thanks for all your suggestions and encouragement see brew days for it in use.
Cheers
Its been quite a while since a started this also since I've been on the site been really busy and everytime I've thought about doing an update I havent taken the pics so here we go.
Started last Nov it probaby ended up taking best part of 6 months what with snow and scope creep but it was worth it.
I did my first extract brew in here 2 weeks ago and first AG last week and all is going well.
I'll post the brew day seperatly so for the pics,
Last time I took a pic from the end of the veggy patch (the one with the insulated green house) it wasnt quite so far away.
A slightly better view with decking and small shed for the lawn mower, she tried putting it in the shed saying that is where it belongs not under the patio table. I've since stopped calling it a shed and its my brewery!
Not easy taking pics without a really wide angle lense but this is one side with wood burning stove (still need to add the flue throught the wall and small chimney, if I can find some cheap flue pipe)
Now for the more important bit,
The brew corner a simple three tier set up, once I've made a 300mm step for the boiler to sit on it'll be 4 tier into the fermenter.
HLT, a converted narrow neck fermenter with immersion heater, a coleman cooler for the mash tun and berco boiler, boiler and mash tun have slotted copper manifolds in the bottom.
I've also spent the last few evening building some shelving for the demi johns and ingredients etc so its now even looking tidy.
Finally,
The fermenting corner, this is likely to become extra insluated and possibly cooled/heated in the future.
But for now it seem fine even on the hottest day with me doing my AG brew (daft idea to do it that day I hear you say) it was ~26C for a short period but has generally sat at 24C or below. The bucket has my last extract brew bubbling nicely, well it was actually trying to escape and having a good dribble but I sorted that ;o)
Thats it really any questions fire away but thanks for all your suggestions and encouragement see brew days for it in use.
Cheers
-
softlad
Re: New brewery build 3B's
Looking good there
Cheap flue pipe doesnt exist (or at least I couldnt find any)
When I installed my wood burner I was hoping to go through the rear wall but was told that I needed to go straight through the roof (cant remember why though)
My flue starts as single skin and then changes to insulated about 400mm below the ceiling
-
Jolum

- Hollow Legs
- Posts: 453
- Joined: Tue Jun 03, 2008 2:09 pm
- Location: Somewhere over there...near Derby :-)
Re: New brewery build 3B's
Quick question, how did you run the leccy to your boiler etc, buried armoured cable? I ask cos that's the stumbler I have at the mo - I'm in the process of moving the brewery from the garage\kitchen to a purpose built shed but it's the question of running the leccy to it. I've got mains water outside so I can tee off that and run food grade tubing for now (without having to bury anything) but the bloody leccy, I really don't want to be running extension cables through the garden - especially with the kids running about.
I suppose if it's going to be a permanent building I should consider burying all the pipes\cables but what a bind that will be - not so much the doing as the getting SWMBO on side
I suppose if it's going to be a permanent building I should consider burying all the pipes\cables but what a bind that will be - not so much the doing as the getting SWMBO on side
"Everybody has to believe in something, I believe I'll have another drink." - W.C. Fields
-
JontyR
Re: New brewery build 3B's
If you were going to have to bury the cable, I'd be tempted to get some waste pipe and bury that as a type of duct, then you could pull in whatever services you want at a later date as required.
-
Jolum
- Hollow Legs
- Posts: 453
- Joined: Tue Jun 03, 2008 2:09 pm
- Location: Somewhere over there...near Derby :-)
Re: New brewery build 3B's
Agreed.JontyR wrote:If you were going to have to bury the cable, I'd be tempted to get some waste pipe and bury that as a type of duct, then you could pull in whatever services you want at a later date as required.
"Everybody has to believe in something, I believe I'll have another drink." - W.C. Fields
-
WishboneBrewery
- CBA Prizewinner 2010
- Posts: 7874
- Joined: Sun Nov 30, 2008 9:06 pm
- Location: Keighley, West Yorkshire
- Contact:
Re: New brewery build 3B's
Looking good 
-
likesbeer
Re: New brewery build 3B's
I didnt bury the cable but have used armoured to be safe and its strung along the bottom of the fence out of the way of digging etc. No need to bury just lift it up a bit but do use armoured
-
bungle666
Re: New brewery build 3B's
HMMMMM i have had a good think about the "leccy" situation for your she.... AHEM i mean brewery, and these are my thoughts. your garden is long but all on one level so consider this..
get a roll of 10mm twin and earth cable. find a spare way in your consumer unit and fit the spare way with a 40A mcb then the fit the circuit with an RCD. run the twin and earth on poles up the garden about 15' in the air, ensuring the wire is FIRMLY attached to each pole and each pole is spaced about 25' apart. you will then have a good strong power source running to the shed. get a small 2 or 3 way consumer unit for the shed and fit a standard ringmain (15 amp) and a 5 amp lighting circuit. this will then enable scope to use a 16amp ceeform feed (blue round plug) for your boiler and or HLT.
HTH
B..
-
Kev888

- So far gone I'm on the way back again!
- Posts: 7701
- Joined: Fri Mar 19, 2010 6:22 pm
- Location: Derbyshire, UK
Re: New brewery build 3B's
If its of use, I ran standard twin and earth through un-buried galvanised tube/conduit to my shed, to provide the armouring for it. It was legitimate to do it yourself back then, but I guess flexibility in what cable can be obtained could also be useful if the more recent restrictions and tell-tale harmonised/pre-harmonised colour thing were an issue...Jolum wrote:Quick question, how did you run the leccy to your boiler etc, buried armoured cable? I ask cos that's the stumbler I have at the mo
I considered just hanging it but I know from using extendion leads it can sag when it warms with current, so some sort of higher tensile support may be advisable with that idea. Not sure if it shouldn't still be armoured though..
Cheers,
Kev
Kev
-
likesbeer
Re: New brewery build 3B's
To add a bit more detail the cable is run back to the house fitted to a 40A mcb, I think it was 4mm2 (but its rated to I think 52A ish) 3 core armoured cost about £90 for 60 meters, there is a junction box on the back of the house so standard cable inside, in the she...brewery a garage consumer unit which is RCD on the mains bit (was on special at screwfix and didnt cost a lot) with a ring mains for the sockets and a lighting circuit. I think 3kw heater can pull 12.5 amps a bit close for a 13 amp socket and does get a little warm but no issue so far. I would recomend armouroured or steel trunking as one day someone will forget and put a spade in, plus to meet regs it will need to be x distance down wrapped in yellow electrickery tape etc etc, fixed to the fence no need. You can do the leccy yourself providing you do it to the correct standard, I think theoretically it might need inspecting but I dont think so.
If hung between posts etc. then I also think that sagging etc and dosnt look great neatly clipped to the fence no issue.
For the boss tell her its weed digging ;o) and its a big weed so your making sure you get it all, or find some flowers she wants planting and pop them in a nice long trench
If hung between posts etc. then I also think that sagging etc and dosnt look great neatly clipped to the fence no issue.
For the boss tell her its weed digging ;o) and its a big weed so your making sure you get it all, or find some flowers she wants planting and pop them in a nice long trench