
Sounds all very promising chaps, thanks very much. I probably got lucky with my fridge as its an old tech one with a nicely visible heating plate at the back and no ice box, plus nothing in the roof like a freezer would have - perfect in fact, how often does that happen?
I was thinking of insulation thickness too; the width isn't a problem in my case but the depth needs to be low (then I'll still have the option of getting the car in the garage). I agree with beermonsta that celotex/kingspan is the most thickness-efficient insulation, about three times better than rockwool and comparable with armaflex or quality sleeping mats. So I'll go with that - should pay for itself over time by reducing energy costs. The fridge has about 25mm insulation, and my cupboard will be about twice the wall area that it currently has so doubling to 50mm sounds sensible to me. The main thing is perhaps to still achieve a good seal around the door, as draughts will rob the insulation of much of its benefit.
At 20C it won't normally be cooling as far as normal but my garage is far less consistant than a heated, insulated house so the temperature differentials could still become high in the summer and winter - crash cooling in summer is probably the worst case. So I'm going to insulate the garage roof (homebase are doing rockwool-like stuff for £3 a roll at the mo!!!) and theres a very thick concrete slab in there so i'm hoping this combination will iron out the real extremes between day and night. By way of a ballpark, the unaltered fridge currently has a 60w tube heater in and this has had no problem keeping it at 20C even over this winter in the uninsulated garage, so I don't think we're likely to be talking of massive energy use for most of the time. with it being in the garage I may increase the insulation thickness at the sides and squirt foam into the corners to help it along a bit, though.
Thanks again for the thoughts!
Cheers
Kev
Plastic conical FV build - pics
-
Kev888

- So far gone I'm on the way back again!
- Posts: 7701
- Joined: Fri Mar 19, 2010 6:22 pm
- Location: Derbyshire, UK
Re: Plastic conical FV build - pics
Crikey yes. If I've got the right one it looks like the tripple B&Q pack is the same size as the big homebase one, so comparable. Amazing these subsidies 
Cheers
Kev
Cheers
Kev
Kev
-
Kev888
- So far gone I'm on the way back again!
- Posts: 7701
- Joined: Fri Mar 19, 2010 6:22 pm
- Location: Derbyshire, UK
Re: Plastic conical FV build - pics
Still thinking about the lid; I've been doing some internet oggling and quite like this sort of wine-press style of lid clamp, as it could leave the tank itself free of fixing and screws and so on - cleaning is rather on my mind since I moved up to bigger tanks. Of course, my tank isn't as robust as a stainless one, but its top should be fairly compliant and so maybe combined with a squishy inner-tube type of seal (sitting on the top of the tank) the pressure neededn't be very high to get a good seal. I'm mounting the tank in a frame anyway, so won't need to build much in the way of extra superstructure.
Or maybe just stick a brick on it..
I guess I could just make a simple disk for the actual lid itself - but it may be better to be sunken or convex (as seen from the inside) to direct condensation back into the FV rather than have it collecting around the seal/top.
Edit: Aha - good old Ikea! Pity its not called 'beery' really :

Cheers
Kev
Or maybe just stick a brick on it..
I guess I could just make a simple disk for the actual lid itself - but it may be better to be sunken or convex (as seen from the inside) to direct condensation back into the FV rather than have it collecting around the seal/top.
Edit: Aha - good old Ikea! Pity its not called 'beery' really
Cheers
Kev
Kev
-
Gricey

- Under the Table
- Posts: 1081
- Joined: Sat Jul 03, 2010 9:07 pm
- Location: Sheffield, UK
- Contact:
Re: Plastic conical FV build - pics
Groggy, fantastic, that is spot on!
Look forward to the steins coming soon, SPÃ…NNÃ…RD
Look forward to the steins coming soon, SPÃ…NNÃ…RD
Bad Panda Brewery
Fermenting: FV1: AG#18 English IPA FV2: AG#19 Summer Dunkelweizen
Conditioning: AG#16 Chimay Reddish, AG#17 Amarillo Brillo
Maturing: AG#05 B.O.R.I.S.: Bricksh*tter Oatmeal Russian Imperial Stout - ready 01/10/11, AG#07 Monkey Shot! IAPA - ready 16/06/11 maybe
Drinking: AG#11, AG#14, AG#15
Planning: AG#20 Summer Hefeweisen, AG#21 Saison Brettre, AG#22 Simcoe Poisoning Red IPA, AG#23 Oatmeal Stout
-
Kev888
- So far gone I'm on the way back again!
- Posts: 7701
- Joined: Fri Mar 19, 2010 6:22 pm
- Location: Derbyshire, UK
Re: Plastic conical FV build - pics
Been busy with work for a few weeks so this is progressing at a snails pace, however I thought about the details for the combined frame/cabinet and have partly built the metal shelf affair so hopefully there'll be some pics before too long.
This picture is a guide rather than a real plan and it'll change anyway depending on what materials I already have, but I'm going to build the frame from studwork timber as its cheap and relatively smooth. The metal shelf thing is going to be mainly made with the 1" square tubular legs from an old school desk. I was going to rout a hole in a wooden shelf but decided metal would make the whole thing slimmer:

NB the scale is wrong in this resized picture (its a little over 6' tall); the spelling could be a bit tighter too!
(panels/insulation omitted for clarity. Also the fridge already has a 60w tube heater in but I forgot to draw it)
The insulation will form panels within the frame, and will be 50mm rigid kingspan/celotex foam except at the very front and back of the conical where it'll be 25mm (and except front and back of the shelf where it'll be minimal) to keep overall width of the monstrosity down.
I've not quite decided how I'm going to fix the door, but I'll probably hinge it and have a few latches down the other side, with draft excluder foam strip to seal it when closed. I'll clad the exterior with hardboard or thin ply but leave the insulation alone to form the interior surface - its foil finish is heat reflective and wipe-down so should be fair enough. The exception will be the base, I want something sealed in case of leaks and firm enough to take the fridge.
The shelf will be a tight fit around the conical but will just rest in the frame, so shelf and conical can be lifted out when empty (I don't want to tilt the frame to get at it due partly to the fridge and partly to there being insufficient ceiling height in the garage)
Cheers
Kev
This picture is a guide rather than a real plan and it'll change anyway depending on what materials I already have, but I'm going to build the frame from studwork timber as its cheap and relatively smooth. The metal shelf thing is going to be mainly made with the 1" square tubular legs from an old school desk. I was going to rout a hole in a wooden shelf but decided metal would make the whole thing slimmer:
NB the scale is wrong in this resized picture (its a little over 6' tall); the spelling could be a bit tighter too!
(panels/insulation omitted for clarity. Also the fridge already has a 60w tube heater in but I forgot to draw it)
The insulation will form panels within the frame, and will be 50mm rigid kingspan/celotex foam except at the very front and back of the conical where it'll be 25mm (and except front and back of the shelf where it'll be minimal) to keep overall width of the monstrosity down.
I've not quite decided how I'm going to fix the door, but I'll probably hinge it and have a few latches down the other side, with draft excluder foam strip to seal it when closed. I'll clad the exterior with hardboard or thin ply but leave the insulation alone to form the interior surface - its foil finish is heat reflective and wipe-down so should be fair enough. The exception will be the base, I want something sealed in case of leaks and firm enough to take the fridge.
The shelf will be a tight fit around the conical but will just rest in the frame, so shelf and conical can be lifted out when empty (I don't want to tilt the frame to get at it due partly to the fridge and partly to there being insufficient ceiling height in the garage)
Cheers
Kev
Kev
-
Kev888
- So far gone I'm on the way back again!
- Posts: 7701
- Joined: Fri Mar 19, 2010 6:22 pm
- Location: Derbyshire, UK
Re: Plastic conical FV build - latest pics added
Right, a bit of progress at last. Firstly I cut the opening a bit larger to fit my stainless tray lid. The cut edge is a little rough, I may have to sand it down a bit, but that would mean fine scratches so I'm not sure whats best as yet. The tray fits quite nicely though, and with a weight on is fairly flush/tight against the top rim. I may still make a squashy seal/washer from silicone tube or something to help out if keeping the beer in it for many weeks.

I also made the metal support for the tank, and painted it in hammerite. I'd originally intended to just rout a hole in a sheet of thick ply but went with steel to keep it slim and so keep the total depth of the setup as shallow as possible. Bending the metal ring properly circular and keeping it that way whilst welding on the frame was tricky - particularly if you're as bad at welding as I am. (the holes in the front are because the steel is recycled from some old school desk legs)

And I built a frame from smallish studwork timber; the metal shelf thing is just resting in it on some nails at the mo, there'll be some rails for it to rest on when I've determined the right height:

I'll need to fill the sides with celotex/kingspan and make a door before cladding the exterior with thin ply. But First I want to modify the fridge and get it in there to make sure everything fits, and thats currently got a wlp005 starter in it so it'll have to wait:

Cheers
Kev
I also made the metal support for the tank, and painted it in hammerite. I'd originally intended to just rout a hole in a sheet of thick ply but went with steel to keep it slim and so keep the total depth of the setup as shallow as possible. Bending the metal ring properly circular and keeping it that way whilst welding on the frame was tricky - particularly if you're as bad at welding as I am. (the holes in the front are because the steel is recycled from some old school desk legs)
And I built a frame from smallish studwork timber; the metal shelf thing is just resting in it on some nails at the mo, there'll be some rails for it to rest on when I've determined the right height:
I'll need to fill the sides with celotex/kingspan and make a door before cladding the exterior with thin ply. But First I want to modify the fridge and get it in there to make sure everything fits, and thats currently got a wlp005 starter in it so it'll have to wait:
Cheers
Kev
Kev
-
Kev888
- So far gone I'm on the way back again!
- Posts: 7701
- Joined: Fri Mar 19, 2010 6:22 pm
- Location: Derbyshire, UK
Re: Plastic conical FV build - pics
Thanks chaps! to be frank I'm just glad to have made some progress; what with having flu' and then having to spend silly hours at work its all been painfully slow for the last couple of months - hopefully another weekend or two will see it done though!
Cheers
Kev
Cheers
Kev
Kev
-
Kev888
- So far gone I'm on the way back again!
- Posts: 7701
- Joined: Fri Mar 19, 2010 6:22 pm
- Location: Derbyshire, UK
Re: Plastic conical FV build - pics
Right, made some more progress this weekend, so more pics.
First I took the top off the fridge, exposing the insulation. Just to double check there were no tubes passing through the top I'd carefully piggled through the insulation down to the plastic around all edges - just like a mini time-team . There were some metal reinforcements around the front and hinge which I hacksawed though, after that it was just thin plastic that was easy to cut - though some of the delicate cooling tubes were quite close so care was needed:

I later sealed the rough edges and exposed foam with foil tape to stop leaks getting into the walls. This was pretty much the minimum I could do to make the fridge fit (at one time I'd considered transplanting just the workings), so hopefully should make it least painful to replace the old freecycle fridge if it ever needs it.
I could then measure up the altered fridge and size the hole for it to fit snugly into at the back of my cupboard; the bits around the hole aren't structural so could be re-sized/replaced if I ever needed to use a different fridge. I also insulated the cupboard with 50mm of celotex (except just behind the tank where I went down to 25mm to keep the cupboard's depth down). I put 9mm thick ply around the outside and top as I'd not triangulated the frame, so this will hopefully keep the sides square. The internal base was an offcut of kitchen worktop, but otherwise I left the interior just foil faced celotex:

I'll probably put some squirty foam around the fridge to further seal it and add extra insulation, though I'll clad the cupboard wall in polythene first so that the foam will be easier to cut out (without damage to the celotex) if I have to replace the old fridge.
And here is the cupboard with the conical in it:

This shows how the tank clears the fridge and thermostat enclosure (just). I may bypass the thermostat (should I want to crash cool or do lagers) but I'd like to keep the light working so its good that it fits.

Theres still room for the old shelf, so i could get a couple of demijohns in there at the same time, or remove the conical and put a normal FV in there.
I've already got an ATC 800 (set up for controlling the fridge before the alterations), so Its really now just needing the door and some sort of seal around the stainless tray/lid, possibly also a small fan to aid air circulation in the bigger cupboard. Then I can leak test and give it a trial run
Cheers
Kev
First I took the top off the fridge, exposing the insulation. Just to double check there were no tubes passing through the top I'd carefully piggled through the insulation down to the plastic around all edges - just like a mini time-team
I later sealed the rough edges and exposed foam with foil tape to stop leaks getting into the walls. This was pretty much the minimum I could do to make the fridge fit (at one time I'd considered transplanting just the workings), so hopefully should make it least painful to replace the old freecycle fridge if it ever needs it.
I could then measure up the altered fridge and size the hole for it to fit snugly into at the back of my cupboard; the bits around the hole aren't structural so could be re-sized/replaced if I ever needed to use a different fridge. I also insulated the cupboard with 50mm of celotex (except just behind the tank where I went down to 25mm to keep the cupboard's depth down). I put 9mm thick ply around the outside and top as I'd not triangulated the frame, so this will hopefully keep the sides square. The internal base was an offcut of kitchen worktop, but otherwise I left the interior just foil faced celotex:
I'll probably put some squirty foam around the fridge to further seal it and add extra insulation, though I'll clad the cupboard wall in polythene first so that the foam will be easier to cut out (without damage to the celotex) if I have to replace the old fridge.
And here is the cupboard with the conical in it:
This shows how the tank clears the fridge and thermostat enclosure (just). I may bypass the thermostat (should I want to crash cool or do lagers) but I'd like to keep the light working so its good that it fits.
Theres still room for the old shelf, so i could get a couple of demijohns in there at the same time, or remove the conical and put a normal FV in there.
I've already got an ATC 800 (set up for controlling the fridge before the alterations), so Its really now just needing the door and some sort of seal around the stainless tray/lid, possibly also a small fan to aid air circulation in the bigger cupboard. Then I can leak test and give it a trial run
Cheers
Kev
Kev
-
leedsbrew
Re: Plastic conical FV build - pics
Fan-bloody tastic kev! You must be well pleased with that mate! When's she get her inauguration?
-
beermonsta
Re: Plastic conical FV build - pics
Good effort old chap. I swear you're my lost at birth twin - as I've been up to similar stuff this weekend! hope you don't mind me dropping this here - best place for it for people searching for similar stuff I guess....
So since last post I've had a Timothy Taylor (brewed using the real yeast don't you know!) in the conical - the results of which are almost drained from my Cornies. A nice fruity tasting ale.
After that me and my brew buddie decided to make a riggwelter. Unfortunately we brew to the same capacity (66litres) and forgot the extra strength would increase the malt bill to the point where it filled my 50l thermos pot to capacity (and the real unfortunate thing was that was without the strike liqour )
)
Anyhoo, the end result was a seriously stiff mash (ooo-errr missus) and a rediculously low conversion of about half the OG that was expected. Riggwelter was re-named to weak-welter.
Lesson learnt. The solution...buy a bigger thermos pot next up making my 80litre thermos pot into a mash tun. (This means I will have a complete stainless brewery spare soon to sell - get the word out if you know someone interested!)
Ey - how did I get side tracked? back to the point. The conical was used for the weak welter and has performed perfectly so far. Dropping of the trub is child play and I laugh at the hours spent cleaning and sanitising a secondary FV for transfer. Taking samples is just as much a doddle. I've also found that the CO2 gas line jams in the air lock bubbler grommet perfectly so when taking samples and pulling yeast I replace the lost volume inside with CO2 so no chance of bacteria being drawn in or air oxidising my beer.
In fact I've left the weak welter in there to condition whilst I torture myself emptying some cornies
Oh, I nearly forgot, I didn't mention how I cleaned the concial. I decided to buy a steam wall paper stripper which I used to weaken the krausen ring which made a quick rub down with a sponge very easy. Next I used the hoze to blast steam at the inside of the valves which cleaned out trapped yeast. Finally I wondered how hot it would get inside with the steam so I left the hoze inside and put the lid on loose. I then came back 20 mins later and used my digital thermometer pressed against the outside at various points and registered 80'C. So inside must have been hotter. This must be hot enough to sanitise effectively.
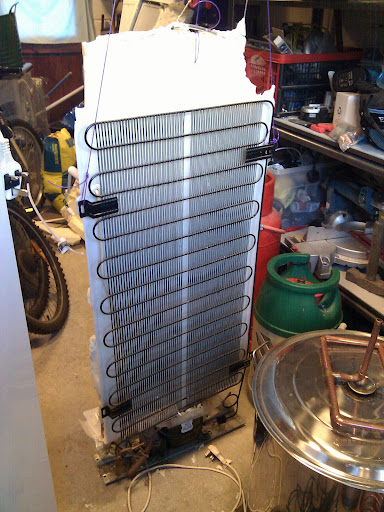
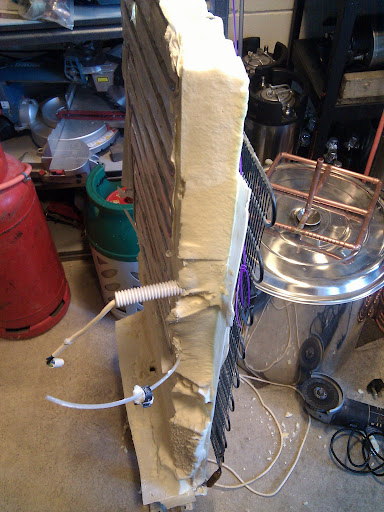
Now I am in the middle of striping a fridge to its bare components and reassembling it into a larger fridge or "temperatute controlled fermenting cupboard" controlled by an ATC800+ which will accomodate the Conical fermenter. By the way, if your stressed, ripping a fridges guts out (I wanted to say bastardising but I didn't want to swear) is great fun. Geese, that insulating foam inside bonds to everything!
Here's a sneak peek...

kingspan insulation is due to be picked up tomorrow (good 'ol fleabay) and I'll get some PAR wood to knock a frame together.
Anyone got any recommendations for a suitable glue? epoxy is probably too expensive, I've got some contact adhesive but numb-nuts here bought the usless 24-years-to-dry water based stuff instead of destroy the environment whilst getting mildly high VOC aka "the good stuff" evo-stick impact adhesive.
Still to decide upon the heater...tube, CHE, blow ...hmmm.
I know I want a fan in there to blow the warm/cold air around to maintain an even temperature.
Kev - did you consider the problem of condensation forming? - All that moisture in the air that gets inside will condense on the fridge expansion/cooling coils and eventually drip down. I'm not sure what to do - I was hoping the silver foil lining of the kingspan will be a good enough moisture barrier. Keep us updated Kev as your one (tiny) step ahead of me and it's good to see what your doing - gives me more to think about
So since last post I've had a Timothy Taylor (brewed using the real yeast don't you know!) in the conical - the results of which are almost drained from my Cornies. A nice fruity tasting ale.
After that me and my brew buddie decided to make a riggwelter. Unfortunately we brew to the same capacity (66litres) and forgot the extra strength would increase the malt bill to the point where it filled my 50l thermos pot to capacity (and the real unfortunate thing was that was without the strike liqour
Anyhoo, the end result was a seriously stiff mash (ooo-errr missus) and a rediculously low conversion of about half the OG that was expected. Riggwelter was re-named to weak-welter.
Lesson learnt. The solution...buy a bigger thermos pot
Ey - how did I get side tracked? back to the point. The conical was used for the weak welter and has performed perfectly so far. Dropping of the trub is child play and I laugh at the hours spent cleaning and sanitising a secondary FV for transfer. Taking samples is just as much a doddle. I've also found that the CO2 gas line jams in the air lock bubbler grommet perfectly so when taking samples and pulling yeast I replace the lost volume inside with CO2 so no chance of bacteria being drawn in or air oxidising my beer.
In fact I've left the weak welter in there to condition whilst I torture myself emptying some cornies
Oh, I nearly forgot, I didn't mention how I cleaned the concial. I decided to buy a steam wall paper stripper which I used to weaken the krausen ring which made a quick rub down with a sponge very easy. Next I used the hoze to blast steam at the inside of the valves which cleaned out trapped yeast. Finally I wondered how hot it would get inside with the steam so I left the hoze inside and put the lid on loose. I then came back 20 mins later and used my digital thermometer pressed against the outside at various points and registered 80'C. So inside must have been hotter. This must be hot enough to sanitise effectively.
Now I am in the middle of striping a fridge to its bare components and reassembling it into a larger fridge or "temperatute controlled fermenting cupboard" controlled by an ATC800+ which will accomodate the Conical fermenter. By the way, if your stressed, ripping a fridges guts out (I wanted to say bastardising but I didn't want to swear
Here's a sneak peek...
kingspan insulation is due to be picked up tomorrow (good 'ol fleabay) and I'll get some PAR wood to knock a frame together.
Anyone got any recommendations for a suitable glue? epoxy is probably too expensive, I've got some contact adhesive but numb-nuts here bought the usless 24-years-to-dry water based stuff instead of destroy the environment whilst getting mildly high VOC aka "the good stuff" evo-stick impact adhesive.
Still to decide upon the heater...tube, CHE, blow ...hmmm.
I know I want a fan in there to blow the warm/cold air around to maintain an even temperature.
Kev - did you consider the problem of condensation forming? - All that moisture in the air that gets inside will condense on the fridge expansion/cooling coils and eventually drip down. I'm not sure what to do - I was hoping the silver foil lining of the kingspan will be a good enough moisture barrier. Keep us updated Kev as your one (tiny) step ahead of me and it's good to see what your doing - gives me more to think about
-
boingy
Re: Plastic conical FV build - pics
Looking good, Kev.The fan is defo a good idea.
And it is only now that I realise the scale of your conical!
And it is only now that I realise the scale of your conical!
-
Kev888
- So far gone I'm on the way back again!
- Posts: 7701
- Joined: Fri Mar 19, 2010 6:22 pm
- Location: Derbyshire, UK
Re: Plastic conical FV build - pics
Thanks for the replies and encouragement guys!
Boingy, think you're right on the fan; previously i didn't use one, but on reflection it'd be more important now - its a bigger cupboard and with not too much space to circulate around the tank.
I'm blushing now But erm, yes, the scale got a bit out of hand - I'd decided on 'plenty' as it was, but they hadn't got that one in stock so I ordered the one above, also not realising they'd already allowed plenty of head room over the specified capacity as well. Oh well, at least bubble-overs should be less frequent now.
Beermonsta - looks a bit more radical than mine! Yes, I'm hoping the cupboard will be insulated enough that any serious condensation will only form on the coolling plate of the fridge, and if there is any on the inner walls the foil should stop it seeping in. I've been using the fridge 'as is' out in the garage this winter and this has seemed to be the case before I extended it; the inner walls were too warm to cause condensation so i'm hoping the extended ones will be the same. (Happily my fridge has a collection gulley and drain hole built in to deal with any that dripps off the cooling radiator/plate - it collects in a small moulded dish mounted on the motor, whose heat presumably evaporates it away).
Cheers,
Kev
Boingy, think you're right on the fan; previously i didn't use one, but on reflection it'd be more important now - its a bigger cupboard and with not too much space to circulate around the tank.
I'm blushing now
Beermonsta - looks a bit more radical than mine! Yes, I'm hoping the cupboard will be insulated enough that any serious condensation will only form on the coolling plate of the fridge, and if there is any on the inner walls the foil should stop it seeping in. I've been using the fridge 'as is' out in the garage this winter and this has seemed to be the case before I extended it; the inner walls were too warm to cause condensation so i'm hoping the extended ones will be the same. (Happily my fridge has a collection gulley and drain hole built in to deal with any that dripps off the cooling radiator/plate - it collects in a small moulded dish mounted on the motor, whose heat presumably evaporates it away).
Cheers,
Kev
Kev