
Couldn't have done that size brew before power control.
Boiler power control
-
The_blue
Re: Boiler power control
Did a little 5 litre brew last night to start my SMaSH brews. Worked great 
Couldn't have done that size brew before power control.
Couldn't have done that size brew before power control.
-
The_blue
Re: Boiler power control
1st full batch was done over the weekend with no issues.
The standard heatsink seems to work.
The standard heatsink seems to work.
-
Kev888

- So far gone I'm on the way back again!
- Posts: 7701
- Joined: Fri Mar 19, 2010 6:22 pm
- Location: Derbyshire, UK
Re: Boiler power control
Good stuff! What power of element are you controlling with it?
Cheers
Kev
Cheers
Kev
Kev
-
Kev888
- So far gone I'm on the way back again!
- Posts: 7701
- Joined: Fri Mar 19, 2010 6:22 pm
- Location: Derbyshire, UK
Re: Boiler power control
Thanks, that suggests that it could almost certainly do 3kw with a bigger heatsink (if necessary) then..
Thats useful; I just wasn't sure if the specs could be trusted; 40A and 220v would normally suggest 8.8kw so I guess some of the specs are peak (rather than continuous) ratings or something.
Cheers
Kev
Thats useful; I just wasn't sure if the specs could be trusted; 40A and 220v would normally suggest 8.8kw so I guess some of the specs are peak (rather than continuous) ratings or something.
Cheers
Kev
Kev
-
Dr. Dextrin
Re: Boiler power control
I've taken the triac off mine in preparaton for fixing it in a metal box (been working on it today). This means I can now read the ID on the triac, and it's a BTA41700B. You can find a data sheet here:
http://www.taydaelectronics.com/datasheets/A-191.pdf
It's quite a robust device - up to 700V** and 40A (although not both at the same time!!) and the data sheet confirms that the case is electrically isolated which makes life easier. Given this spec, the limitation in practice will be thermal - i.e. determined by how big a heat sink it has.
The thermal resistance between the semiconductor junction and the case is pretty low at only 0.6C/W and I estimate it'll need to dissipate about 10 to 15W - giving an approximate 6 to 9C temperature difference. The max junction temperature is 125C, so this means the heatsink (or at least the triac case) can get pretty darned hot before the device is at risk.
Given all this, it looks is if the quoted 3.8kW (for my device) is based on the limitations of the heatsink supplied - in free air, presumably. So with a bigger heatsink, or forced air cooling, I think this device might even handle considerably more than that.
** Actually the data sheet only mentions 600V and 800V versions, but this seems to be what the"7" means in the triac ID.
-
Kev888
- So far gone I'm on the way back again!
- Posts: 7701
- Joined: Fri Mar 19, 2010 6:22 pm
- Location: Derbyshire, UK
Re: Boiler power control
Looks good; quite a simple circuit but it appears to be effective; there seem to be replacements available on ebay etc too, far cheaper than a true semiconductor fuse.
Cheers
Kev
Cheers
Kev
Kev
-
Lars
Re: Boiler power control
Great thread guys, I've bought the same cheapo triac dimmer as the_blue http://www.ebay.ie/itm/3000W-Adjustable ... 4602680dbf . I've a 40litre buffalo and I've been agonissing over how to enclose it and keep it cool etc...
I love the_blues idea of mounting it in the dead space under the boiler. I think I'll do that with mine. Just a question about that for 'the_blue', have you had any overheating issues because I've fired it up once or twice and it does get very hot? I'm wondering what the ambient temp is like in the deadspace under the boiler combined with the heat from the heatsink, will it cause any problems? How many brews have you done with this and are you still alive, or have you been killed by arc flash?
Thanks
L
-
Anavrin
Re: Boiler power control
Have a look at the power controller I've used, its not the cheapest but it doesn't need any modifications
viewtopic.php?f=6&t=50042
viewtopic.php?f=6&t=50042
-
Lars
Re: Boiler power control
Thanks guys, thats a bit steep for me at the moment Anarvin since I already bought the cheap one. Just need to figure how I'm going to fit it into the boiler and minimise the risk of the chassis becoming live.....
L
L
-
Dr. Dextrin
Re: Boiler power control
A couple of pics to show how my boiler power controller turned out. It ended up being a general-purpose 3kW unit based on the original cheap chinese controller board. Here it is mostly finished:
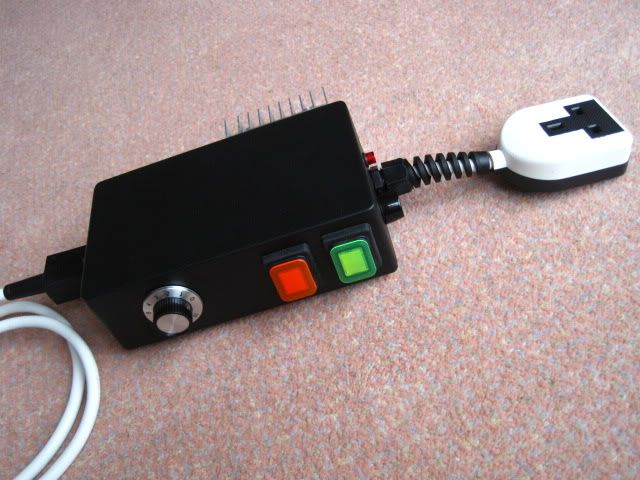
Notable external features...
Graduated knob for repeatable setting (I still have to add a pointer). I thought this was simpler than using a meter across the output. However, I have included a neon across the output for a little visual feedback.
On/off and bypass switches. These allow you to turn the boiler off, or get it back up to the boil quickly after additions without losing the power setting. The switches are illuminated so you can see easily when they are on and waterproof in case of wet hands.
Larger external heatsink added. This is electrically grounded but thermally insulated from the metal case with foam sheets to avoid cooking the other components.
Ultra-fast semiconductor fuse: I went with this in the end because the inside of the case is quite full and it's a lot of work to get to the triac if it needs replacing. The i2s value of the fuse is about 1/4 that of the triac, so hopefully it'll provide effective short-circuit protection. The fuse does get a little warm, but seems to be coping in a standard fuseholder.
Another pic showing inside the case:
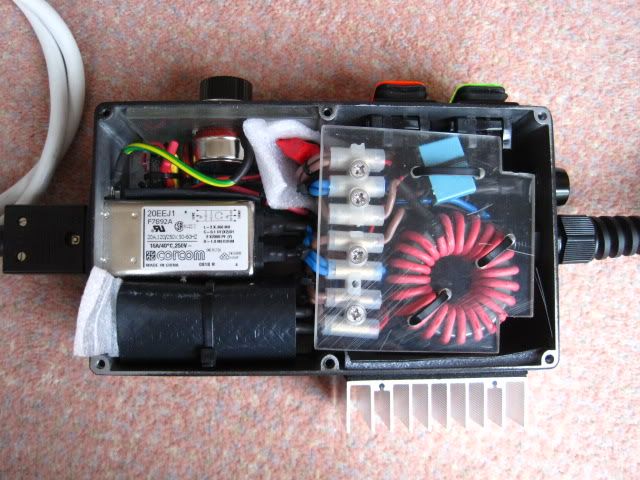
Notable internal features...
The chinese controller board is at top left mounted through a perspex plate for better insulation. I found that the circuit board tracks that carried the full load current were getting quite hot, so I bypassed them and removed the original screw connectors. The triac has also been removed from the board and is mounted on the back of the heatsink through a hole in the case using 2.5 sq mm conductors, but it is obscured by thermal insulation.
An issue with these cheap controllers is that they use a very simple circuit that shows hysteresis. They will dim a light smoothly down to zero, but when you turn them back up, the light stays off and then suddenly comes on at mid-brightness. You can read about why this happens and a simple fix for it here:
http://techno-fandom.org/~hobbit/lighting/dimmer.html
and also here:
http://www.eetasia.com/ARTICLES/2001JUN ... MD_AN5.PDF
(page 4) but note that these circuits are for 120V, so the resistors need upgrading to about 30k (and appropriate wattage) for 240V. The extra capacitor needed (see the first article) turned out to be about 0.022uF. The extra components, including a small bridge rectifier, cost less than a quid from Maplin and are mounted on a small piece or veroboard attached to the main circuit board at the extreme top left of the case, using a cable tie and three flying leads.
The 16A RF-filtered IEC power socket at centre left provides common-mode filtering from about 1MHz upwards to stop RF interference going back up the power cord and into the house wiring. I have added to this using my own two-stage low-pass LC filter to tackle lower frequencies. This consists of two series chokes and two parallel capacitors placed between the power controller board and the mains input. The larger of these can be seen at right (a choke consisting of mains cable wound on a toroidal ferrite core) and at bottom left (a bank of 4 x 5uF capacitors connected in parallel and wrapped in a bundle of black insulation). The other smaller filter components are hidden from view. In theory, the big choke is actually way too small and the core should saturate at around about 1A, never mind the 13A it has to carry. However, it seems to take out enough of the switching transients to still be quite effective.
Testing with a portable radio and with the controller at its noisiest setting (50% power with a full load) there is no detectable interference on the house mains much above 600kHz and at 600kHz (the lowest frequency I can test) it is far quieter, electrically, than the fluorescent lights in our kitchen. So I think I have that nailed.
Lastly, the extra chokes have required an RC snubber (the blue rectangle, also from Maplin) wired across the on/off switch to protect the contacts.
I've done 3 brews with the controller in essentially its final form now, and they've all gone well. Used at full power the heatsink gets almost too hot to touch, but the case stays around 30 to 35C. In practice, it never actually gets this hot because it's not on full power and I use the bypass switch while getting up to the boil.
Since I've been using this beer clarity seems to have improved quite noticeably. Instead of the old simmerstat, that gave on/off periods of boiling and not boiling, I can now tweak the boil to be nice and vigorous all the time without actually boiling over.
Notable external features...
Graduated knob for repeatable setting (I still have to add a pointer). I thought this was simpler than using a meter across the output. However, I have included a neon across the output for a little visual feedback.
On/off and bypass switches. These allow you to turn the boiler off, or get it back up to the boil quickly after additions without losing the power setting. The switches are illuminated so you can see easily when they are on and waterproof in case of wet hands.
Larger external heatsink added. This is electrically grounded but thermally insulated from the metal case with foam sheets to avoid cooking the other components.
Ultra-fast semiconductor fuse: I went with this in the end because the inside of the case is quite full and it's a lot of work to get to the triac if it needs replacing. The i2s value of the fuse is about 1/4 that of the triac, so hopefully it'll provide effective short-circuit protection. The fuse does get a little warm, but seems to be coping in a standard fuseholder.
Another pic showing inside the case:
Notable internal features...
The chinese controller board is at top left mounted through a perspex plate for better insulation. I found that the circuit board tracks that carried the full load current were getting quite hot, so I bypassed them and removed the original screw connectors. The triac has also been removed from the board and is mounted on the back of the heatsink through a hole in the case using 2.5 sq mm conductors, but it is obscured by thermal insulation.
An issue with these cheap controllers is that they use a very simple circuit that shows hysteresis. They will dim a light smoothly down to zero, but when you turn them back up, the light stays off and then suddenly comes on at mid-brightness. You can read about why this happens and a simple fix for it here:
http://techno-fandom.org/~hobbit/lighting/dimmer.html
and also here:
http://www.eetasia.com/ARTICLES/2001JUN ... MD_AN5.PDF
(page 4) but note that these circuits are for 120V, so the resistors need upgrading to about 30k (and appropriate wattage) for 240V. The extra capacitor needed (see the first article) turned out to be about 0.022uF. The extra components, including a small bridge rectifier, cost less than a quid from Maplin and are mounted on a small piece or veroboard attached to the main circuit board at the extreme top left of the case, using a cable tie and three flying leads.
The 16A RF-filtered IEC power socket at centre left provides common-mode filtering from about 1MHz upwards to stop RF interference going back up the power cord and into the house wiring. I have added to this using my own two-stage low-pass LC filter to tackle lower frequencies. This consists of two series chokes and two parallel capacitors placed between the power controller board and the mains input. The larger of these can be seen at right (a choke consisting of mains cable wound on a toroidal ferrite core) and at bottom left (a bank of 4 x 5uF capacitors connected in parallel and wrapped in a bundle of black insulation). The other smaller filter components are hidden from view. In theory, the big choke is actually way too small and the core should saturate at around about 1A, never mind the 13A it has to carry. However, it seems to take out enough of the switching transients to still be quite effective.
Testing with a portable radio and with the controller at its noisiest setting (50% power with a full load) there is no detectable interference on the house mains much above 600kHz and at 600kHz (the lowest frequency I can test) it is far quieter, electrically, than the fluorescent lights in our kitchen. So I think I have that nailed.
Lastly, the extra chokes have required an RC snubber (the blue rectangle, also from Maplin) wired across the on/off switch to protect the contacts.
I've done 3 brews with the controller in essentially its final form now, and they've all gone well. Used at full power the heatsink gets almost too hot to touch, but the case stays around 30 to 35C. In practice, it never actually gets this hot because it's not on full power and I use the bypass switch while getting up to the boil.
Since I've been using this beer clarity seems to have improved quite noticeably. Instead of the old simmerstat, that gave on/off periods of boiling and not boiling, I can now tweak the boil to be nice and vigorous all the time without actually boiling over.
-
Kev888
- So far gone I'm on the way back again!
- Posts: 7701
- Joined: Fri Mar 19, 2010 6:22 pm
- Location: Derbyshire, UK
Re: Boiler power control
Very informative - thanks very much for posting all that! I can see myself trying one of these with the next build.
Cheers
Kev
Cheers
Kev
Kev
-
runthangs
Re: Boiler power control
Hogarth, how did you wire up the 3800w Ebay dimmer? it has just two connectors, Presumably whether the live or neutral is connected it doesn't matter? But which side is input vs output?i tried live in via the connector closest to the scr/heatsink, it worked for a few seconds then a bright spark and now nothing no matter which way or which wires I connect!
It says 220v only, whilst my supply is 240v so wonder if that's an issue?
The whole thing feels a bit unsafe so I might have to opt for a £50 site transformer if nobody has any other suggestions?
It says 220v only, whilst my supply is 240v so wonder if that's an issue?
The whole thing feels a bit unsafe so I might have to opt for a £50 site transformer if nobody has any other suggestions?