Cheap Oypla Boiler on Amazon and thermal cut-off bypass

The forum for discussing all kinds of brewing paraphernalia.
Post Reply
jiiiiiiiim
Sober
Posts: 4
Joined: Thu Jan 16, 2020 6:46 pm

Cheap Oypla Boiler on Amazon and thermal cut-off bypass

Post by jiiiiiiiim » Thu Jan 16, 2020 8:35 pm

Hi All, hope this is OK for a first post. I've been lurking for a while but finally have something worth posting(I think).

Backstory:
I've been brewing off and on for years, originally in Canada, I now live in a small flat in London and got the itch to brew again. I did a 6 litre stove top batch and now the itch is back :D . I saw a lot of people using the Buffalo and Burco boilers so I thought I'd try something similar with the goal being to build an automated mash temp and recirculating BIAB rig. I'm trying to do this on a shoestring budget so I had a look to see if there were any cheaper options. I came across a 30L model on Amazon and Ebay for around £56, which was quite a lot cheaper than the other options, the brand is Oypla. I figured I'd roll the dice and try it out.

The boiler:
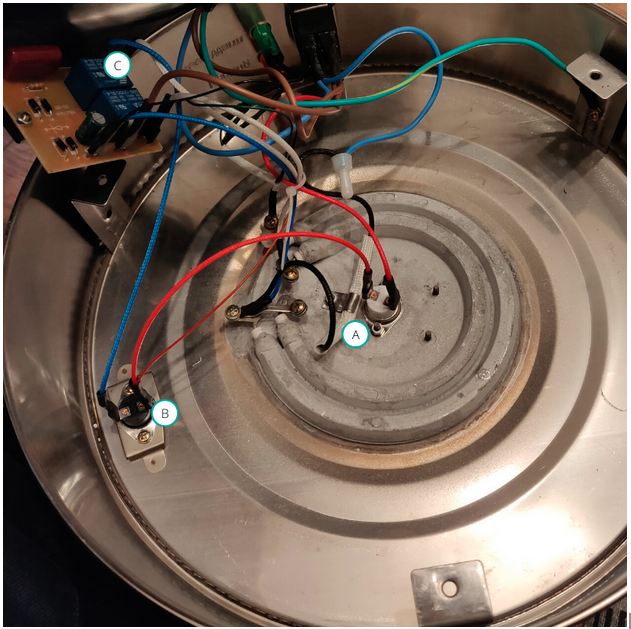
It arrived today and looked to be pretty good quality for the price, the steel is definitely thin, I’m hoping that won’t be a problem long term. I gave it a quick test run with a few litres of water and as expected it got to a boil then cut off, adding some more cold water to lower the temperature got it to kick back on until it boiled. After drying it off I turned it upside down and removed 3 screws on the black plastic cover on the bottom to access the electrical. It looked a little something like this:

https://i.postimg.cc/90FyG0RX/image.png

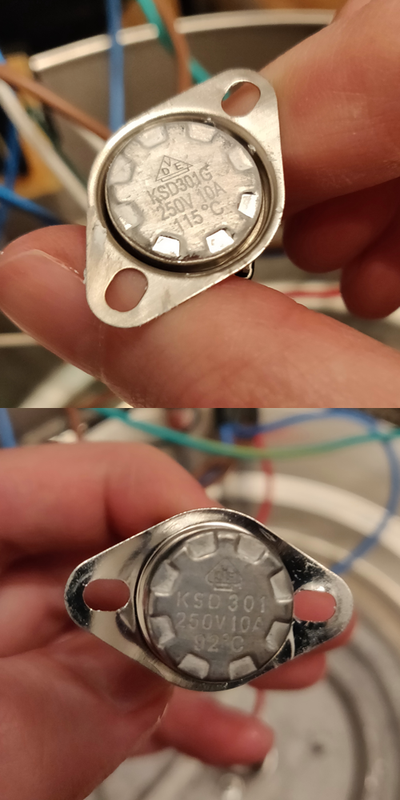
It seems basically when the switch is on the live wire comes into a normally open thermal switch(Item A in the photo), this switch is rated at 115C, this seems to be in place in case someone turns it on dry fallback. B is another normally open thermal switch but this one triggers at 92C, this is effectively what’s keeping us from a proper boil, but can keep an urn full of water hot for tea. To bypass you could replace switch B with a higher temp switch, the model is KSD301 and you can get them on ebay for around £3.

Here is a closeup of the switches after I wiped the thermal paste off(don't worry I added new stuff before putting it back).
https://i.postimg.cc/T3WYHxnR/image.png

Alternatively, and what I opted for was just taking the output of switch A and moving it to the input for the relays at C. This bypasses the 92C check altogether but leaves the “dry power fallback” switch in place. I tested with a few litres of water and it boiled just fine after this for several minutes. I’ll do a full test with it when I get the rest of my parts.

More info about the boiler that may be of interest:
Volume : 30L - Top and bottom diameters are almost exactly 30cm, depth of pot is 42.5cm so it’s almost exactly 30L to the rim
Valve: It comes with the standard boiler spigot, I removed this and it looks like the hole for it is something in the neighbourhood of 13.5mm, it’s a few cm up from the bottom so I’m thinking I might use this one for a thermowell and punch a new one lower for the ball valve.
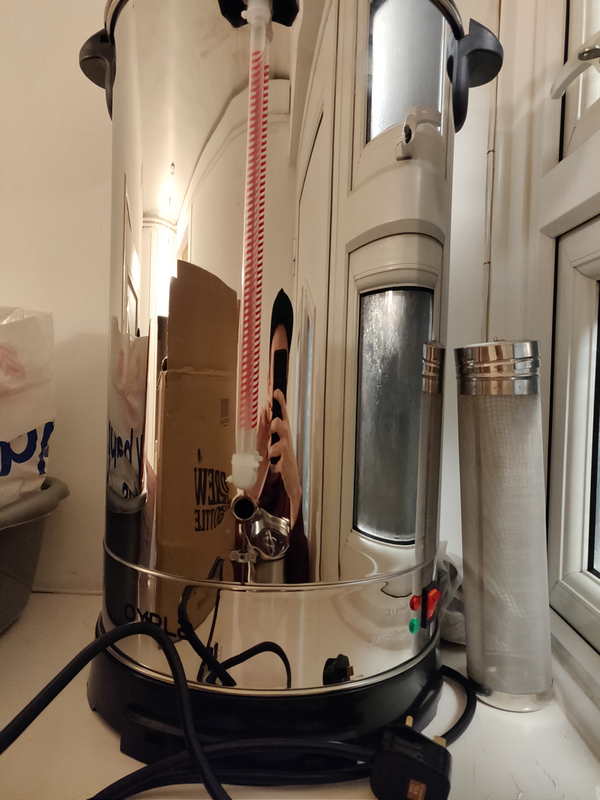
Sight Glass: it comes with a sight glass, it has small holes drilled in the wall that hold two nipples each with a silicone elbow attached these silicone elbows have a piece of clear plastic between them to form the sight glass (polycarbonate maybe?) I think I will attempt to leave the sight glass in place, could be quite useful if I add some markings.

Here is a photo with the stock spigot and the extra stuff around the sight glass removed
https://i.postimg.cc/ZqCPQCVW/image.png

Next steps:
I plan to add a ball valve, thermowell, cheap pump and STC 1000 + SSR to control mash temps, I'm hoping to figure out a way to mount the STC to make this a cheap all-in-one kind of brew system. I'll be bypassing the janky little relays that are included with the boiler electrical so I'm not too worried about that for now.

User avatar
rpruen
Steady Drinker
Posts: 48
Joined: Sun Jan 05, 2020 3:29 pm
Location: Burnham On Sea, Somerset
Contact:

Re: Cheap Oypla Boiler on Amazon and thermal cut-off bypass

Post by rpruen » Thu Jan 16, 2020 10:01 pm

Thanks for the post, I will follow this with interest.

Might I suggest a thermal fuse be added when you remove the thermal regulation from the boiler? A 10A 115C fuse clamped onto the hotplate would do it. I'm a bit paranoid of my boiler as it has no overheat protection for the element, and I burned one element up.

Regards

Richard

jiiiiiiiim
Sober
Posts: 4
Joined: Thu Jan 16, 2020 6:46 pm

Re: Cheap Oypla Boiler on Amazon and thermal cut-off bypass

Post by jiiiiiiiim » Thu Jan 16, 2020 11:48 pm

Good idea, I realise now I wrote the wrong thing in my first post, what I actually did was take the output from the first thermal switch(not the mains toggle switch) and ran it to the relay so the stock 115C thermal protection is still in place. I will try to post a photo of the updated wiring tomorrow. That said I think a thermal fuse is still a good idea as a fail safe, I think I still have some from another project

jiiiiiiiim
Sober
Posts: 4
Joined: Thu Jan 16, 2020 6:46 pm

Re: Cheap Oypla Boiler on Amazon and thermal cut-off bypass

Post by jiiiiiiiim » Sat Feb 15, 2020 5:59 pm

Just as a quick update, I've wired in a 12vdc power supply and a 12v-5v stepdown converter. This allowed me to wire in a raspberry pi zero w, 12v "food grade" pump with a DC motor driver, solid state relay for the heating element and DS18B20 temperature sensor. The pi is running craftbeerpi so I can use that as the controller. I did a dry run of everything today and it all seems to work, the wiring is a mess though so I need to tidy that all up and re-assemble and I'll post some more photos.

It turns out there is already a 15 amp 200C thermal fuse in case everything else goes wrong. My plan is to keep the existing thermal switch on the input of the SSR so that should be the first line of safety for accidentally turning the heater on dry, but if that all goes wrong the thermal fuse is a bit of added safety.

My biggest worry is how hot it will get where I've mounted the SSR, I put it on a big heat sink but I'll have to keep an eye on that, I think I'm also going to add a 12v pc fan to keep air moving across the heatsink.

Fungus
Tippler
Posts: 15
Joined: Sun Feb 11, 2018 9:51 am

Re: Cheap Oypla Boiler on Amazon and thermal cut-off bypass

Post by Fungus » Sun Feb 16, 2020 12:09 am

I junked most of the wiring underneath my boiler and connected the element to an Inkbird PID controller in a separate project box and added a temp probe through go the wall of the boiler. Neatens up the wiring underneath massively and you can dial in precise temps. Only issue I've found with these types of boiler is a propensity to scorch the wort during boiling due to the high density of the element.

I looked at incorporating everything into the base but risk of damage from heat or liquid spills seemed too great.

User avatar
rpruen
Steady Drinker
Posts: 48
Joined: Sun Jan 05, 2020 3:29 pm
Location: Burnham On Sea, Somerset
Contact:

Re: Cheap Oypla Boiler on Amazon and thermal cut-off bypass

Post by rpruen » Sun Feb 16, 2020 4:10 pm

jiiiiiiiim wrote:
Sat Feb 15, 2020 5:59 pm
Just as a quick update, I've wired in a 12vdc power supply and a 12v-5v stepdown converter. This allowed me to wire in a raspberry pi zero w, 12v "food grade" pump with a DC motor driver, solid state relay for the heating element and DS18B20 temperature sensor. The pi is running craftbeerpi so I can use that as the controller. I did a dry run of everything today and it all seems to work, the wiring is a mess though so I need to tidy that all up and re-assemble and I'll post some more photos.
Fantastic I love my Raspberry Pi.

I haven't any idea there was software for controlling a microbrewery. I may have to look into this :)

regards

Richard

jiiiiiiiim
Sober
Posts: 4
Joined: Thu Jan 16, 2020 6:46 pm

Re: Cheap Oypla Boiler on Amazon and thermal cut-off bypass

Post by jiiiiiiiim » Sun Feb 16, 2020 6:08 pm

[quote=Fungus post_id=848182 time=1581808140 user_id=18146]
I looked at incorporating everything into the base but risk of damage from heat or liquid spills seemed too great.
[/quote]

Yeah I can definitely see this being an issue, especially the heat with the SSR. I've moved all of the DC bits into the plastic chamber below the steel chamber that houses the element but I could only fit the SSR and heatsink in with the element. I'm hoping a vent and fan will keep the heat down but if not I'll just move everything out to a control box. I might do that anyway, I really liked the idea of a DIY all-in-one system but the more I get into it the more an external controller makes a lot more sense.

[quote=rpruen post_id=848194 time=1581865814 user_id=25127]
I haven't any idea there was software for controlling a microbrewery. I may have to look into this
[/quote]
It was quite easy to get going, I used the 3rd version which is still in beta but seems to work well enough for me: https://github.com/Manuel83/craftbeerpi3. Once it's set up you just tell it which GPIO your temp sensors and relays(seems to work just as well with motor driver ICs as well) are hooked up to. There is a rough guide for the hardware here too https://web.craftbeerpi.com/hardware/

Post Reply