
Can anyone please enlighten me on how to include a picture, I can't see any control icon for this, and when I edited it with word I can't send it.
It is more than likely a simple oversight by myself.
Cheers.
Vaudy <_<
Picture
-
eskimobob
Hi Vaudy,
Well you actually need to put the picture somewhere on the web where you can link to it. I currently use http://photobucket.com/. You need to open an account with them but it is free and takes a few mins.
Once you have uploaded your picture to photobucket (or wherever), you can then include it in your messages by clicking on the "IMG" button at the top of the post window. It will ask you for the location of the image and once you have entered that, it will enclose it within [ IMG ] and [ /IMG ] tags which when posted will be replaced by the picture.
Once you know how to do it, the view on photobucket includes a link that already has the IMG tags and therefore you can simply copy and paste the final link without having to use the IMG button.
Hope this makes sense...
-
vaudy
Eskimobob,
Thanks for the information regarding posting a picture, however I have followed your instructions and getting the img logo prior to posting, but it fails to post and I get the following message -
You are not allowed to use that image extension on this board.
a valid format is:
http://www.domain.com/picture.gif
I trust that you will be able to give further instructions how to get round this,
looking forward to your reply.
cheers,
Vaudy
-
eskimobob
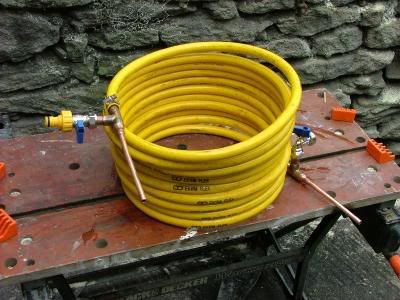
Here's how I would put in a picture of my wort cooler:
Click this http://i71.photobucket.com/albums/i126/ ... nished.jpg to see the photo.
Now what you have to do is:
1) copy the location of that image (http://i71.photobucket.com/albums/i126/ ... nished.jpg)
2) press the IMG button at the top of the page when you are posting
3) paste the location that you copied in step one into the box that pops up
4) press ok.
It should then appear something like:
[ IMG ]http://i71.photobucket.com/albums/i126/ ... nished.jpg[ /IMG ]
in your posting but once submitted the forum will replace the text with the actual picture.
Ignore the spaces in the [ IMG ] bit above, I have put them in otherwise it will really put the image in.
Hope this is a bit clearer
Try posting my image below and see if it works...
-
vaudy
Thanks Eskimobob,
for the instructions to post a picture, if I have managed it a picture should appear with this post.
Saturday evening ‘late’ got the boiler fired up to prepare the water for tomorrow.
Got up nice and early, the water in the boiler had held its temperature at 800C (wrapped up with a sleeping bag).
Mash strike temp 780C, initial mash temp 680C, this was a good guess, hope my luck stays.
Mashed for 1 ½ hours (reached starch end point) and the temperature had only dropped 20C.
The mash was about the largest that my system can cope with, I usually brew 10 gallons and the mash is staggered in two vessels, this time I only wanted a 5 gallon brew.
Boil went with no hiccups (have run out of gas in the past, including my spare cylinder).
Cooled with an immersion coil cooler (no water shortage up north).
The maths showed that I had achieved a 75% efficiency (Jims figures on the web page, 80% Wheelers figures) O.G. 63.
Pitched with Saffel? ale yeast having previously prepped a starter, it was working within one hour, and had go completely mad by this morning with yeast all over the floor.
Looking forward to testing it (not brewed a stout for years, usually I keep to bitters).
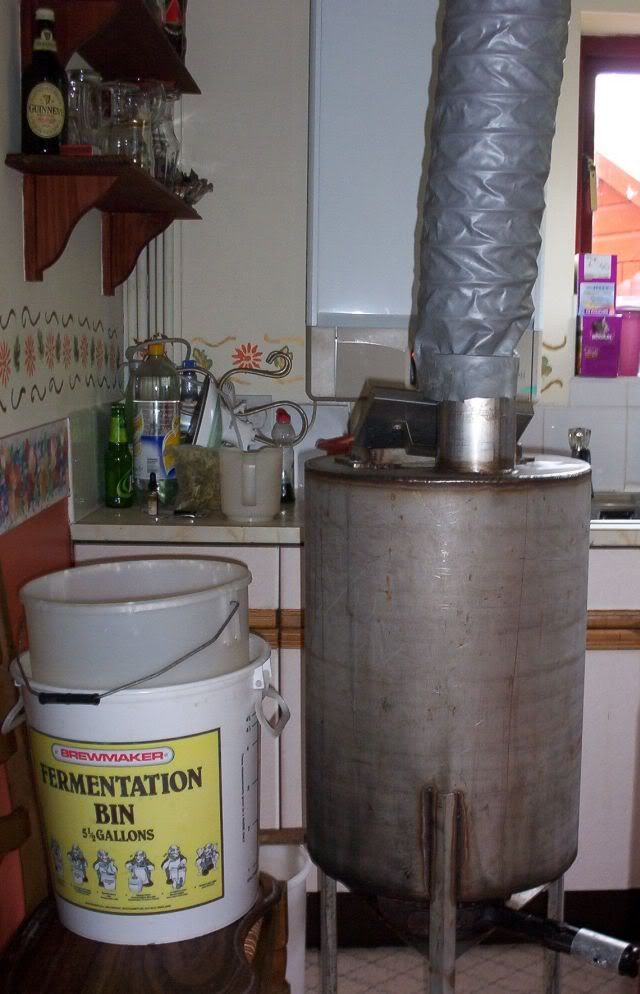
If I can manage to insert a picture of my set up I will

Mash tun – fermenting bin with two sleeping bags for insulation.
Sparging – fermenting bin with tap (Outer), fermenting bin with S/S
False bottom supported with copper tube sections
Boiler- 10 gal with false bottom, vent to the outside
I jug the mash into the sparging vessel and spray manually with a watering can, it works ok but could be improved (can be messy).
I look forward to any comments.
Cheer’s
Vaudy
for the instructions to post a picture, if I have managed it a picture should appear with this post.
Saturday evening ‘late’ got the boiler fired up to prepare the water for tomorrow.
Got up nice and early, the water in the boiler had held its temperature at 800C (wrapped up with a sleeping bag).
Mash strike temp 780C, initial mash temp 680C, this was a good guess, hope my luck stays.
Mashed for 1 ½ hours (reached starch end point) and the temperature had only dropped 20C.
The mash was about the largest that my system can cope with, I usually brew 10 gallons and the mash is staggered in two vessels, this time I only wanted a 5 gallon brew.
Boil went with no hiccups (have run out of gas in the past, including my spare cylinder).
Cooled with an immersion coil cooler (no water shortage up north).
The maths showed that I had achieved a 75% efficiency (Jims figures on the web page, 80% Wheelers figures) O.G. 63.
Pitched with Saffel? ale yeast having previously prepped a starter, it was working within one hour, and had go completely mad by this morning with yeast all over the floor.
Looking forward to testing it (not brewed a stout for years, usually I keep to bitters).
If I can manage to insert a picture of my set up I will
Mash tun – fermenting bin with two sleeping bags for insulation.
Sparging – fermenting bin with tap (Outer), fermenting bin with S/S
False bottom supported with copper tube sections
Boiler- 10 gal with false bottom, vent to the outside
I jug the mash into the sparging vessel and spray manually with a watering can, it works ok but could be improved (can be messy).
I look forward to any comments.
Cheer’s
Vaudy


-
vaudy
-
bod
-
Frothy
-
vaudy
The opening at the top of the boiler allows me to remove the hops, which are prevented from leaving the boiler via a stainless steel mesh, in hind sight when I made the boiler I should have had a slightly larger opening.
The boiler holds approx 11 1/2 gallons allowing for a ten gallon brew, the burner is 30,000 btu's and copes with a ten gallon batch.
The boiler holds approx 11 1/2 gallons allowing for a ten gallon brew, the burner is 30,000 btu's and copes with a ten gallon batch.