
if the bolts are not SS or a high enough grade or treated correctly, how much confidence have you that the rest of the assembly is as advertised?greenxpaddy wrote:Lazy old me!
Looks like it was just the bolts then....?
Wolfys Stainless Steel Brewery Build Log (picture intensive)
-
Fil
- Telling imaginary friend stories
- Posts: 5229
- Joined: Sun Oct 16, 2011 1:49 pm
- Location: Cowley, Oxford
Re: Wolfys Stainless Steel Brewery Build Log (picture intens
ist update for months n months..
Fermnting: not a lot..
Conditioning: nowt
Maturing: Challenger smash, and a kit lager
Drinking: dry one minikeg left in the store
Coming Soon Lots planned for the near future nowt for the immediate
Fermnting: not a lot..
Conditioning: nowt
Maturing: Challenger smash, and a kit lager
Drinking: dry one minikeg left in the store
Coming Soon Lots planned for the near future nowt for the immediate
-
darkonnis
Re: Wolfys Stainless Steel Brewery Build Log (picture intens
Must be some chemical that doesnt eat 316 stainless but will eat lower grades and the likes of nickel/tin/brass. I mention this because then you'd know it was up to the job for definite.
-
Kev888

- So far gone I'm on the way back again!
- Posts: 7701
- Joined: Fri Mar 19, 2010 6:22 pm
- Location: Derbyshire, UK
Re: Wolfys Stainless Steel Brewery Build Log (picture intens
This really is a major build - must have taken weeks, the whole lot in one go; excellent stuff!
Cheers
kev
Cheers
kev
Kev
-
greenxpaddy
Re: Wolfys Stainless Steel Brewery Build Log (picture intens
My confidence would be that provided no rust is evident elsewhere it would be logical that all the component parts have been sourced from different suppliers and there has only been one slip up. If its just the bolts then I would still see that the reduction in cost is worth it.Fil wrote:if the bolts are not SS or a high enough grade or treated correctly, how much confidence have you that the rest of the assembly is as advertised?greenxpaddy wrote:Lazy old me!
Looks like it was just the bolts then....?
-
Kev888
- So far gone I'm on the way back again!
- Posts: 7701
- Joined: Fri Mar 19, 2010 6:22 pm
- Location: Derbyshire, UK
Re: Wolfys Stainless Steel Brewery Build Log (picture intens
It may not even be the material of the bolts as such; stainless can rust if its not treated properly during manufacture or if carbon steel tools are used on it - transfering particles that give rust a toe-hold. This can even happen occasionally with tried and tested items like cornies and french stock pots etc if they get damaged.
Cheers
Kev
Cheers
Kev
Kev
-
Wolfy
Re: Wolfys Stainless Steel Brewery Build Log (picture intens
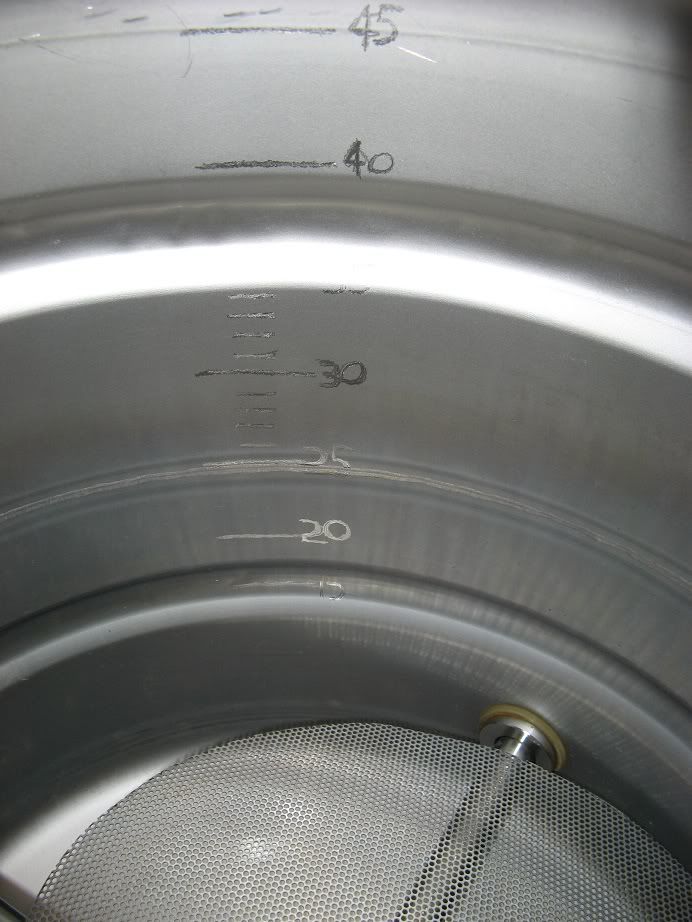
Kettle Volume Markings
Blog stuff.
In order to know how much wort is drained from the mash tun into the kettle, I added volume markings were added to the inside of the kettle.
It cost the equivalent of £2, but the Ebay-supplied 'Etching/Engraving Pen':

... did a good job to engrave the volume markings on the inside of the keggle:
PID Auto-Tune
The first few times used the PID was not very accurate, over-shooting - and then holding the temperature - 1 or 2 degrees above the set value. The instructions for auto-tuning the PID (as provided by SESTOS) were not very helpful:
"First operate the Auto adjustment, press AT key 2 second, SV display blink AT, finally into PID control mode. Press the AT key 2 second to abandon Auto adjustment."
Luckily the functionally of the uinit is so similar to the Auber PID that their detailed and easy to understand instructions can be used.
What those instructions made clear was:
By default auto-tune is not enabled.
To enable the auto-tune function one must enter the settings-menu and change the 'CtrL' setting (called 'At' by Auber) from 3 to 2.
Once this is done the PID will enter auto-tune mode where it will configure itself for the system.
Now that the auto-tune has been run, the PID holds the mash-temperature to within about 0.2 deg C of the set value - a much better result:

Blog stuff.
In order to know how much wort is drained from the mash tun into the kettle, I added volume markings were added to the inside of the kettle.
It cost the equivalent of £2, but the Ebay-supplied 'Etching/Engraving Pen':
... did a good job to engrave the volume markings on the inside of the keggle:
PID Auto-Tune
The first few times used the PID was not very accurate, over-shooting - and then holding the temperature - 1 or 2 degrees above the set value. The instructions for auto-tuning the PID (as provided by SESTOS) were not very helpful:
"First operate the Auto adjustment, press AT key 2 second, SV display blink AT, finally into PID control mode. Press the AT key 2 second to abandon Auto adjustment."
Luckily the functionally of the uinit is so similar to the Auber PID that their detailed and easy to understand instructions can be used.
What those instructions made clear was:
By default auto-tune is not enabled.
To enable the auto-tune function one must enter the settings-menu and change the 'CtrL' setting (called 'At' by Auber) from 3 to 2.
Once this is done the PID will enter auto-tune mode where it will configure itself for the system.
Now that the auto-tune has been run, the PID holds the mash-temperature to within about 0.2 deg C of the set value - a much better result:
-
scuppeteer

- Under the Table
- Posts: 1512
- Joined: Fri Oct 01, 2010 7:32 pm
- Location: Brenchley, Kent (Birthplace of Fuggles... or is it?)
Re: Wolfys Stainless Steel Brewery Build Log (picture intens
Wolfy, people like you just make me sick. I wish I was that bloody handy to build something like that. Awesome post and build mate. 
Dave Berry
Can't be arsed to keep changing this bit, so, drinking some beer and wanting to brew many more!
Sir, you are drunk! Yes madam, and you are ugly, but in the morning I shall be sober! - WSC
Can't be arsed to keep changing this bit, so, drinking some beer and wanting to brew many more!
Sir, you are drunk! Yes madam, and you are ugly, but in the morning I shall be sober! - WSC
-
dynamic dave
Re: Wolfys Stainless Steel Brewery Build Log (picture intens
Great idea the engraving inside the kettle found one on ebay £1.96 via Singapore.
thanks
thanks
-
Wolfy
Re: Wolfys Stainless Steel Brewery Build Log (picture intens
But - as per the first post - I'm not that 'handy' - if I can do it anyone can.scuppeteer wrote:Wolfy, people like you just make me sick. I wish I was that bloody handy to build something like that. Awesome post and build mate.
Some of the stuff here I've done for the first time, much of it I just 'made up', the milk-crates you see in some of the pictures are also my 'work bench' and much of the 'work' is done on the front porch.
Part of the reason to post the pictures/details is to show that it's not that hard, even if you have no handy-type skills.
-
Cazamodo
Re: Wolfys Stainless Steel Brewery Build Log (picture intens
I love the engraving idea. Just dont think I could bring myself to scratch my shiny pots =[
-
Wolfy
Re: Wolfys Stainless Steel Brewery Build Log (picture intens
During the build process I made the decision that the brewery should concentrate on functionality rather than how it looks - polished stainless looks great but wrapping it (ugly) insulation and etching the insides is much more practical - it's there to make beer not to look at, and other than in online-photos, I'm really the only person who sees it (... well the only one sees and cares about it anyway). 
-
Wolfy
Re: Wolfys Stainless Steel Brewery Build Log (picture intens
Temperature calibration, pump and hose insulation
I picked up a couple of mercury thermometers so that I could calibrate the various thermometers and temperature probes through the brewery.

As it turned out the PID temperature probe was reading about 2degC above the actual temperature, the mash-tun's dial temperature probe was close enough to be accurate, and the TempMate and cheap digitial thermometers were within about 0.5degC at most temperatures measured.
Having fixed insulation on the silicon hoses was a nuisance, making them less flexible and harder to clean. These little velcro straps (usually used to tie computer/electrical cables) work well to hold the hose insulation in place, while also allowing it to be easily removed when required.

Cheap-little-brown-solar-pump decided to stop working mid-brew, again. This time I disassembled it and cleaned it well inside - likely something that should be done every brew - given the amount of crud inside especially inside and around the shaft and housing.

Luckily it worked again - either because it was cleaned or simply because it was allowed to cool down for 30 mins - because the other one doesn't work now (after just a couple of brews with it). I know they're popular around here, and they are cheap but they don't seem to like how I'm using them and so I'm pretty sure I need to upgrade to a more substantial and dedicated brewing pump soon.
I picked up a couple of mercury thermometers so that I could calibrate the various thermometers and temperature probes through the brewery.
As it turned out the PID temperature probe was reading about 2degC above the actual temperature, the mash-tun's dial temperature probe was close enough to be accurate, and the TempMate and cheap digitial thermometers were within about 0.5degC at most temperatures measured.
Having fixed insulation on the silicon hoses was a nuisance, making them less flexible and harder to clean. These little velcro straps (usually used to tie computer/electrical cables) work well to hold the hose insulation in place, while also allowing it to be easily removed when required.
Cheap-little-brown-solar-pump decided to stop working mid-brew, again. This time I disassembled it and cleaned it well inside - likely something that should be done every brew - given the amount of crud inside especially inside and around the shaft and housing.
Luckily it worked again - either because it was cleaned or simply because it was allowed to cool down for 30 mins - because the other one doesn't work now (after just a couple of brews with it). I know they're popular around here, and they are cheap but they don't seem to like how I'm using them and so I'm pretty sure I need to upgrade to a more substantial and dedicated brewing pump soon.
-
Wolfy
Re: Wolfys Stainless Steel Brewery Build Log (picture intens
New HERMS vessel
More details on blog here.
The plastic-cooler HERMS vessel worked OK, but didn't tolerate being (repeatedly) dropped on the floor, so while I was considering what to do about the HERMS container, Aldi had some stainless 'compost buckets' on special.

The trusty TCT hole-saw was used to make the hole in the base of the bucket for the element:

Since the element was a bit larger than the 32mm hole, it needed to be enlarged some:

A grinding-stone attached to the cordless drill, which made the process much quicker:

Element removed from our old kitchen kettle, once it was removed from the kettle-housing and the plastic trimmed down a little:

The gasket from the kettle-element was used to measure the hole and hold the element and mount in place:

However, since the wall of the plastic-kettle was much thicker than the stainless bucket, an insert-gasket was made by cutting out a silicon baking tray:

I thought it might be amusing to keep the little LED light, but not sure it will serve much purpose and might remove it.
The installed element:

Leak testing:

... and checking that it all works when plugged into the PID:

And finally, with a couple of holes drilled into the lid, and lots of fiddling to get the HERMS-coil attached, in use with the old little brown solar pump:

It looks nicer then the old one, I might wrap it in left-over insulation, but leaving it like this might help the PID control the temperature a little more accurately, since the stainless bucket will act as a heat-sink to dissipate heat if the PID over-shoots.
More details on blog here.
The plastic-cooler HERMS vessel worked OK, but didn't tolerate being (repeatedly) dropped on the floor, so while I was considering what to do about the HERMS container, Aldi had some stainless 'compost buckets' on special.
The trusty TCT hole-saw was used to make the hole in the base of the bucket for the element:
Since the element was a bit larger than the 32mm hole, it needed to be enlarged some:
A grinding-stone attached to the cordless drill, which made the process much quicker:
Element removed from our old kitchen kettle, once it was removed from the kettle-housing and the plastic trimmed down a little:
The gasket from the kettle-element was used to measure the hole and hold the element and mount in place:
However, since the wall of the plastic-kettle was much thicker than the stainless bucket, an insert-gasket was made by cutting out a silicon baking tray:
I thought it might be amusing to keep the little LED light, but not sure it will serve much purpose and might remove it.
The installed element:
Leak testing:
... and checking that it all works when plugged into the PID:
And finally, with a couple of holes drilled into the lid, and lots of fiddling to get the HERMS-coil attached, in use with the old little brown solar pump:
It looks nicer then the old one, I might wrap it in left-over insulation, but leaving it like this might help the PID control the temperature a little more accurately, since the stainless bucket will act as a heat-sink to dissipate heat if the PID over-shoots.
-
Kev888
- So far gone I'm on the way back again!
- Posts: 7701
- Joined: Fri Mar 19, 2010 6:22 pm
- Location: Derbyshire, UK
Re: Wolfys Stainless Steel Brewery Build Log (picture intens
looks like a very good a addition!
Ah, so theres a 'reason' to leave it shiny
Cheers
Kev
Ah, so theres a 'reason' to leave it shiny
Cheers
Kev
Kev
-
weiht
Re: Wolfys Stainless Steel Brewery Build Log (picture intens
loved the hopback! Does using all pellets clog it or affects the flow rate?
Ace!
Ace!