
Hello after a long break! Malting my own now....
-
Patterd Ale
- Hollow Legs
- Posts: 418
- Joined: Tue Jun 29, 2010 6:40 pm
- Location: Gloucestershire
Re: Hello after a long break! Malting my own now....
Seymour ruined and inspired my life in almost equal measure. Well done you sir, heading toward apocalypse proof. Best get reloading also, defend your crops.
-
Subsonic
Re: Hello after a long break! Malting my own now....
I agree wholeheartedly with that, I know exactly what you are saying.
-
wilfh
- Piss Artist
- Posts: 295
- Joined: Sat Jun 30, 2012 4:09 pm
- Location: Half way between Newcastle and Sunderland
Re: Hello after a long break! Malting my own now....
Looks fantastic
What's Seymour's self sufficiency book?
Wilf
What's Seymour's self sufficiency book?
Wilf
-
Subsonic
Re: Hello after a long break! Malting my own now....
http://www.amazon.co.uk/Complete-Book-S ... 860&sr=1-4
My only advice is Ignore the bit on pig killing, pigs are pretty smart he forgot to mention that. Sub
My only advice is Ignore the bit on pig killing, pigs are pretty smart he forgot to mention that. Sub
-
Belter
Re: Hello after a long break! Malting my own now....
That's brilliant! John Seymour. Who found this book?
-
Trefoyl

- Even further under the Table
- Posts: 2558
- Joined: Mon Nov 09, 2009 5:28 pm
- Location: New Jersey
Re: Hello after a long break! Malting my own now....
viewtopic.php?f=23&t=36494
Hopefully Jim's directions on posting pictures are clear. But whatever works.
I wish I had enough sun to grow tomatoes and hops. Our tiny backyard is covered by a big tree, which is nice actually, but we can only grow ferns. Which are also nice, actually.
Hopefully Jim's directions on posting pictures are clear. But whatever works.
I wish I had enough sun to grow tomatoes and hops. Our tiny backyard is covered by a big tree, which is nice actually, but we can only grow ferns. Which are also nice, actually.
Sommeliers recommend that you swirl a glass of wine and inhale its bouquet before throwing it in the face of your enemy.
-
Subsonic
Re: Hello after a long break! Malting my own now....
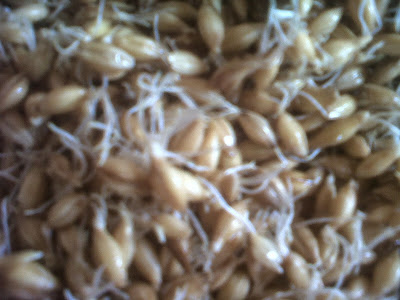
Here is the progress so far. I have finished the soak and rinse of the barley as it is beginning to form little roots. My original 11 litres of grain (7kg) has swollen to over 15 litres with the water uptake. Next I drain the grain and spread it on an old malt sack on the brewshed floor, its still a tad warm here (22c) but overnight the temp drops a bit. What I do next is leave the barley to sprout, I turn it regularly (every few hours during the day) and mist it to keep it moist with a little water puffer. So I did that and seeing as I had some malted barley from the last lot I figured I would crush that and get ready for a brew. So at the end is a pic of 'some I made earlier'. My concrete roller crusher is very heath robinson and was a prototype to see if I could make one work. I will post a bit in equipment later to explain how I made it and what I will do for mill number 2. It took me about 30 minutes to hand feed the crusher with a jug as I haven't fixed up a feed hopper yet and doub't I will anyway. I hope that is of interest. For your infor this 7kg of grain cost me about £3 and thats the reason I am malting my own. I think my crusher overcrushes a bit on the second run, but I have to run thyrough twice as on the first run a few grains escape the rollers. Its a prototype though so I expect a few hiccups.
Grain soaking

Grain on 'malting floor'

View of rootlets forming

Crusher

Malted grain before crush

After second run through crusher

Grain soaking
Grain on 'malting floor'
View of rootlets forming
Crusher
Malted grain before crush
After second run through crusher
-
subfaction
- Hollow Legs
- Posts: 496
- Joined: Fri Feb 25, 2011 1:46 pm
- Location: Leamington Spa, Warwickshire, England
Re: Hello after a long break! Malting my own now....
Looks great, thanks for taking the time to share 
-
Subsonic
Re: Hello after a long break! Malting my own now....
Heres an update from the malting started on Tuesday. The malt is on the brewshed floor and regularly turned and misted if need be. My temperature here is a little high in the day (22c) so the growth is going well, perhaps a tad too fast, but at night its cooler now. The rootlets are all forming nicely and the acrospire (the bit that makes the shoot) at about 25-50% growth. My target is 100%, i.e. the barley is 100% modified before the shoot breaks out of the seed. Some people cut the seed open to see the acrospire, but I find you can actually see it growing underneath the hull. I will post a pic of the barley below, its a bit blurry but taken with my phone.
In the meantime I did a trial brew with the malt I made the other week and milled yesterday. The efficiency was 46%, I know thats way low compared to my usual bog standard 70%, but you have to remember that I made the malt myself and am on a bit of a learning curve as regards malting. I am getting better at it though, its getting more obvious now.
Despite this, since I know the efficiency I can simply plug that into my spreadsheet and up the grain bill to hit my target. Which is exactly what I do now, so my 1038 bitter came in just above the target at 1040.
Now, the reason I am doing this is I can't afford to get grain shipped here, secondly I like a challenge. So far its all going to plan. I just brewed 20 litres of all grain beer with a grain bill cost of £2.50. Hops were free as I grow them and the yeast was a washed batch so cost me pretty much nothing. Bit of gas and job done. I need to build a better grain mill as the double crush produces a bit more flour than shop bought malt, but hell I'm sitting with a great pint now so can't grumble too much. Grain is cheap!!! Sub
-
Subsonic
Re: Hello after a long break! Malting my own now....
Here is a final picture of the malting process. If you read the thread you will know that I started this malt from scratch about last week. The barley was washed, then soaked for about half a day then the process repeated until the barley was beginning to form tiny roots. I then stopped the rinsing cycle and spread it on my brewshed floor to 'malt'. Turning regularly is crucial otherwise you get a nice matted carpet of barley. After 6 days I have barley where the acrospire, (the bit that forms the shoot) is just about to break out of the grain. I carefully watch this bit to get the barley to be pretty much 75 - 100% modified, i.e. all the shoots are 75 - 100% of the grain length and just about to break out. A good indicator is that a few grains will actually start to shoot out, and in the pic below you can see one that has done this

Next the grain is transferred to my polytunnel, spread out on a table and with a fan above and left to dry. I'm in the south of France so its still pretty warm here. In 2 days the grain will be dry. I keep back about 1kg of the green malt and use this to make my crystal malt (dead easy).

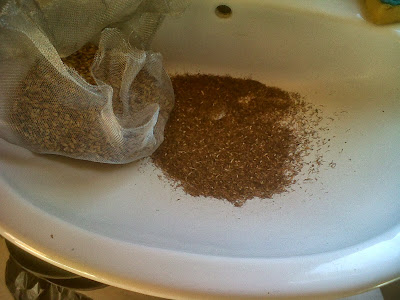
Once dry the malt is transferred to a fermentation bin and given a good stir and mix to rub off all the rootlets. I then place it on a mosquito screen and rub the grain about and all the rootlets fall through as a sort of sawdust. That leaves me with my malt ready for crushing. The cost of this 7kg malt = £3 and thats why I am malting my own! I hope that is of use to anyone who fancies having a go. There is plenty of info on youtube about home malting. Sub
Next the grain is transferred to my polytunnel, spread out on a table and with a fan above and left to dry. I'm in the south of France so its still pretty warm here. In 2 days the grain will be dry. I keep back about 1kg of the green malt and use this to make my crystal malt (dead easy).
Once dry the malt is transferred to a fermentation bin and given a good stir and mix to rub off all the rootlets. I then place it on a mosquito screen and rub the grain about and all the rootlets fall through as a sort of sawdust. That leaves me with my malt ready for crushing. The cost of this 7kg malt = £3 and thats why I am malting my own! I hope that is of use to anyone who fancies having a go. There is plenty of info on youtube about home malting. Sub
-
Subsonic
Re: Hello after a long break! Malting my own now....
Well I had a bit of extra time so did some crystal malt as well. I make crystal using the green sprouted malt before it is air dried. Its best to google different ways of doing it but I basically take 1kg of the sprouted barley and mash it whole at 155F for 2 hours. I then drain it, transfer to the oven, spread it thick on a baking tray and kiln it for 2 hours between 145 F and 165 F (longer = sweeter). i then dry it at 250F for 2 hours and turn frequently. I then roast it at 350F for 10 minutes to give me a light crystal. The 1kg ended up as 550g.
The reason I work in Farenheit is just cos I learn't to brew in Texas and that's how they did it there. Whilst over there I purchased a fab bit of kit (in the picture) called a RediCheck thermometer. This is an electronic probe with wireless transmitter (mine is modded to transmit further). It has Centigrade / Farenheit, upper and lower alarms, 2 probes (its actually for a smoker but is fab for brewing). I use this to monitor the oven and ensure the temp is bang on. Its great to use when you mash as well cos you can walk about with the receiver and monitor your mash temp! I know, its sad lol Sub

The reason I work in Farenheit is just cos I learn't to brew in Texas and that's how they did it there. Whilst over there I purchased a fab bit of kit (in the picture) called a RediCheck thermometer. This is an electronic probe with wireless transmitter (mine is modded to transmit further). It has Centigrade / Farenheit, upper and lower alarms, 2 probes (its actually for a smoker but is fab for brewing). I use this to monitor the oven and ensure the temp is bang on. Its great to use when you mash as well cos you can walk about with the receiver and monitor your mash temp! I know, its sad lol Sub

Re: Hello after a long break! Malting my own now....
Best post i've read in quite a while.
Well bloody done Sub.
Norm
The Doghouse Brewery (UK)
-
Subsonic
Re: Hello after a long break! Malting my own now....
I finished making the crystal today. When its dry you have to get all the roots off the malt (same as I do with any malt I make). I do this with a stainless steel mosquito screen offcut. I just dump the crystal malt in and move it about a lot to allow all of the rootlets to fall through. This photo shows about half the crystal (250g) and the amount of roots that fall off. its quite a lot and not something that you want in the mash! The stainless mesh is pretty good and would make a good mash tun false bottom. Its still 40c here in the polytunnel and the malt is pretty much dry, one more day and its done then the next batch goes in. I will post some pics of the beer in due course. Sub
Edit - if you do malt on the floor watch out for mice! I just noticed a bit of grain on one side that was kinda munched so moved the beer fridge and out ran a nice fat mouse. Well, I had planned for this, 'Henry' the hoover was plugged in and running, that mouse shot up the pipe like a fat little sausage! He was ok and I let him go in the garden. I'm thinking about building a wooden frame on the floor with a mesh over for malting. I'm also thinking of a sort of cupboard with a set of frames for the malt, a heater at the bottom, fan at top and another ATC800 running the heater for the malt. The polytunnel is ok but its only a matter of time till the mice and rats spot all my malt.......I'm having a fine beer now from my malt but its a tad opaque as I cracked the keg a bit early so I'm not posting a pic. BUT - Home malting works!
Edit - if you do malt on the floor watch out for mice! I just noticed a bit of grain on one side that was kinda munched so moved the beer fridge and out ran a nice fat mouse. Well, I had planned for this, 'Henry' the hoover was plugged in and running, that mouse shot up the pipe like a fat little sausage! He was ok and I let him go in the garden. I'm thinking about building a wooden frame on the floor with a mesh over for malting. I'm also thinking of a sort of cupboard with a set of frames for the malt, a heater at the bottom, fan at top and another ATC800 running the heater for the malt. The polytunnel is ok but its only a matter of time till the mice and rats spot all my malt.......I'm having a fine beer now from my malt but its a tad opaque as I cracked the keg a bit early so I'm not posting a pic. BUT - Home malting works!

Re: Hello after a long break! Malting my own now....
Where's the 'like' button when you need it? 
-
Subsonic
Re: Hello after a long break! Malting my own now....
I checked my new batch of malt on the 'malt floor' today. My wife left the brewshed open for the dogs to sleep in, despite 2 Bullmastiffs being in there and me covering the grain with one of her nice towels, there was a hole munched clean through her towel this morning. Dammit, I'm gonna be in trouble.
I think malting on the floor is a non starter unless I fix up a proper wooden frame and mesh, and even then it will attract mice. So I have adopted a new approach. In the states they use big plastic buckets (like the mango boiler ones) on their side which rotate on a timer with the grain inside. I don't have time (and can't be bothered) to build one so I have gone for the highly technical approach of a plastic storage box. I can still have this on the floor inside the house (where its actually quite cool) and I can turn the grain and mist it ok. So that is the new 'malting tun'.
Pic below of the malt box with one my totally useless mouse catchers.